Well, here I go!! I just had to get off the sideline and participate in sharing my project and not just looking at everyone else's. The car is done and running, but I will post the pics of the process taken to a racer that looked like this at the beginning, the second as I found it, and last as it is now.....

You are using an out of date browser. It may not display this or other websites correctly.
You should upgrade or use an alternative browser.
You should upgrade or use an alternative browser.
IMSA Fiero Race car
- Thread starter Dave Deerson
- Start date
I will be able to keep the pics and updates coming quickly as the car is finished and running!!
First a bit of background...
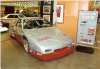
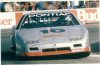
in 1984 Pontiac/GM wanted to promote the new Fiero line and decided to enter pro IMSA racing up against the like of Mazda and others. With a meager budget, John Callies(head of fledgling Pontiac Motorsports) went to his GM in house suspension engineer friend Terry Satchel to help him design a tube chassis so that plans could be sold to privateers as well as a factory team.Terry had designed a few GT1 SCCA cars and has since worked with the Penske and Rousch organizations. Parts were designed for low cost and simplicity,so a team could go to factory liaison Hufffaker enginering and purchase everything from chassis plans, body panels,suspension bits,etc.. that were all designed and engineered by GM. My car was the sparetime/after hours project of Terry Satchell himself and his friend Greg Seyfert(who had also spent time working with the Penske organization). The car was built over the winter of 1984 and mostly raced in SCCA GT2 events throughout the upper Midwest. Greg and his friend David Buist then campaigned the car in limited IMSA Pro events from 1985 to 1987 with drivers such as Tim Evens, Jack Broomall,Bill Wink and John Gimbal. The car was sold in 1992 to Jack Ondrak of Canada (Jac Mac's TVR customer during the SFOS!!) who raced it in regional races until selling it to his friend in Arizona around 1999. Drew never put the car together, as he originally wanted the chassis for the basis of a Porsche bodied/powered race car,but sat in his barn for 7 years as an unfinished project. I stumbled upon it and purchased the roller in 2005.So over the next 2 years I totally went through the car and my savings!! Here are some pics of the car in action throughout it's IMSA career:
First a bit of background...
in 1984 Pontiac/GM wanted to promote the new Fiero line and decided to enter pro IMSA racing up against the like of Mazda and others. With a meager budget, John Callies(head of fledgling Pontiac Motorsports) went to his GM in house suspension engineer friend Terry Satchel to help him design a tube chassis so that plans could be sold to privateers as well as a factory team.Terry had designed a few GT1 SCCA cars and has since worked with the Penske and Rousch organizations. Parts were designed for low cost and simplicity,so a team could go to factory liaison Hufffaker enginering and purchase everything from chassis plans, body panels,suspension bits,etc.. that were all designed and engineered by GM. My car was the sparetime/after hours project of Terry Satchell himself and his friend Greg Seyfert(who had also spent time working with the Penske organization). The car was built over the winter of 1984 and mostly raced in SCCA GT2 events throughout the upper Midwest. Greg and his friend David Buist then campaigned the car in limited IMSA Pro events from 1985 to 1987 with drivers such as Tim Evens, Jack Broomall,Bill Wink and John Gimbal. The car was sold in 1992 to Jack Ondrak of Canada (Jac Mac's TVR customer during the SFOS!!) who raced it in regional races until selling it to his friend in Arizona around 1999. Drew never put the car together, as he originally wanted the chassis for the basis of a Porsche bodied/powered race car,but sat in his barn for 7 years as an unfinished project. I stumbled upon it and purchased the roller in 2005.So over the next 2 years I totally went through the car and my savings!! Here are some pics of the car in action throughout it's IMSA career:
Attachments
Very cool indeed....
I've a pal here that used to race a Fiero in the SCCA's Improved Touring class. With the 2.8l V6 and Getrag (I believe) gearbox.. It was pretty darned quick on the short tracks..
He did have a hard time keeping rear wheel bearings in it though..
I've a pal here that used to race a Fiero in the SCCA's Improved Touring class. With the 2.8l V6 and Getrag (I believe) gearbox.. It was pretty darned quick on the short tracks..
He did have a hard time keeping rear wheel bearings in it though..
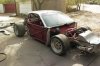
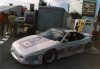
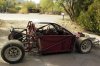
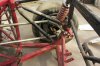
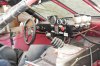
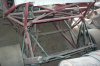
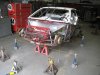
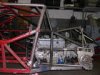
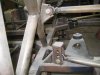
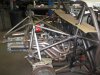
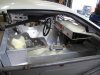
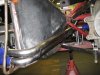
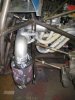
When I got the car home it was plain to see that she led a HARD LIFE!!! The chassis was very bruised and battered. There was even galvanized fence post used in places as patch material!! The back half of the car was so bad in that no chassis pick up point was even side to side or symmetrical!! So that's why I did not have any remorse in cutting the back end off and rebuilding without the original Super Duty 4cyl that would have been very expensive to buy/build and maintain. My plan for the car from the outset was NOT to race it but use it for track day fun.I am the Regional Race Tech Director for NASA Notheast, So my track days/racedays are free and I have the privilege of getting as much tracktime per day as I want. So for the events that I don't race my Spec. Miata, I wanted a fun,fast reliable toy. My driveline requirements were: at least 300hp,very reliable with minimum maintenance and PUMP GAS( I don't see the need to spend $7 to $9.00 gal for a track day toy)The the engine was to be the LS6( which I got used from a SCCA T1 race shop that "times them out of service" at 20 hours very inexpensively. The gearbox,since I didn't have the budget for a Hewland DGB (I still don't) was to be the Porsche 930(which I later converted to dog-engagement). This has been a rock solid combo after working out some small issues. Jack Ondrack still campaigns a Huffaker Fiero(a later version) and owns all of Huffaker's body molds, so I was able to source a full new body(reusing a few parts).Here are some pics of how she looked after being pushed out into sunlight for the first time in many years and later when I got her back east in my shop..........
Attachments
-
 Picture 321.jpg53.3 KB · Views: 3,857
 -
 Picture 325.jpg48 KB · Views: 1,841
 -
 Picture 324.jpg59 KB · Views: 2,117
 -
 Picture 534.jpg45.8 KB · Views: 1,636
 -
 Picture 542.jpg43.9 KB · Views: 1,813
 -
 Picture 549.jpg48.3 KB · Views: 1,538
 -
 Picture 554.jpg41.1 KB · Views: 1,507
 -
 Picture 550.jpg46.5 KB · Views: 1,575
 -
 Picture 538.jpg39.6 KB · Views: 1,445
 -
 Picture 579.jpg48.6 KB · Views: 1,835
 -
 Picture 578.jpg45.5 KB · Views: 2,239
Brian Hamilton
I'm on the verge of touching myself inappropriatel
WOW!!! Please keep posting this incredible story. Fantastic work BTW, car looks fantastic!
Thats one helluva job, you've done there Dave!
I know next to nothing about Fieros, I've never seen one out here but I probably wouldn't have recognised one as such, even if I'd tripped over it! I was aware that they had been used as a platform for some kit cars but I never realised they were rear engined out of the factory. I'll have to do a search on Fiero and educate myself a little.....
Your car looks absolutely stunning, and that paint scheme sets it off nicely.
I am very interested to see the detail of your rebuild as you post it up.
Cheers
Russ
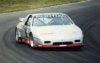
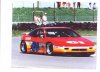
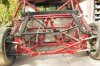
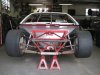
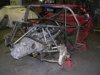
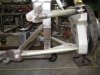
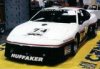
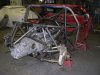
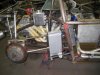
So after I got her home and cleaned up it was time to see how the big V8 lump was going to slot into the place where a 4cyl used to be! At the same time I needed to correct the patches upon patches in the chassis and put the suspension pick up points back on the car in the right places. I was lucky in that respect as I had access to both scanned copies of the original chassis blueprints and X,Y and Z coordinates of "revised" chassis pickup points( updates from pro Fiero teams that addressed issues such as snap oversteer and rear traction under power) that another tube chassis Fiero owner was gracious enough to share with me. At this time I made the decision of what "look" the car was to have. You see, during the cars racing life, there were updates as IMSA and SCCA allowed wider track widths each season. I wanted to go for the "late"1988-89 "fastback" look that had the widest front suspension and largest front and rear fender flares. In the many crates of parts were piles of suspension links,control arms and pieces of every dimension with no markings as to what was used in what combination!! Did I say that I love puzzles??!! With the suspension mocked up, the body was sourced from Jack Ondrack's molds. The last pic was my inspiration. It shows the 1989 Huffaker Racing entry of George Robinson with the widest flares and suspension.
Attachments
-
 th_mock-uppics014.jpg5.1 KB · Views: 1,299
 -
 th_mock-uppics008.jpg5.2 KB · Views: 1,363
 -
 th_mock-uppics009.jpg5.2 KB · Views: 1,262
 -
 th_mock-uppics010.jpg4.6 KB · Views: 1,349
 -
 Picture 714.jpg42.9 KB · Views: 1,310
 -
 Picture 716.jpg50.5 KB · Views: 1,212
 -
 Picture 715.jpg40.6 KB · Views: 1,146
 -
 Picture 717.jpg48.3 KB · Views: 1,351
 -
 th_Columbus_1988_George_Robinson.jpg4.8 KB · Views: 1,322
Terry Oxandale
Skinny Man
The LS and the 930 seem to fit very well! Fascinating project.
Ox
Ox
When I first saw your posting, I though you bought this guy's project
Building a tube frame fiero - Pennock's Fiero Forum
He built a V8 tubeframe Fiero from scratch! But, I realized, there is more than one wide eyed, crazied Fiero enthusiatist! Good luck with your build!
Darnel
Building a tube frame fiero - Pennock's Fiero Forum
He built a V8 tubeframe Fiero from scratch! But, I realized, there is more than one wide eyed, crazied Fiero enthusiatist! Good luck with your build!
Darnel
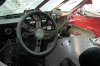
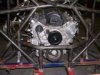
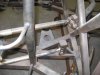
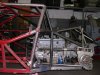
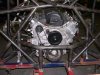
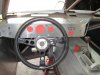
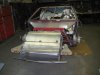
Moving along to interior sheet metal, plumbing,shift linkage and headers. I laid out the shift linkage before the headers as I wanted to get the straightest run to the gearbox. I fabbed up the shifter as a copy of a formula car or Hewland style shifter, but one that gives more travel as the Porsche in original form needs .8in from the neutral position to engaged and a Hewland only needs .5in. The shifter and main rod that slides through the bearing supports were later hard-chromed for reduced friction with minimal lube as not to attract too much dust and dirt.I installed aluminum slugs in the end of the tubes and fabbed up washers that support the tube without crushing it when the bolt is tightened.
I need to mention that the engine is joined to the trans by and adapter plate and clutch by Kennedy. I will get to the clutch actuation later..
The interior sheet metal was easy as I just used the original parts as patterns. You can see in my pics that I like to mock things up as complete as possible, even if that means resorting to using cardboard to mimic something so that I can see how the real part's dimensions will interact with things around it. I call it my version of CAD..............Cardboard Aided Design!!
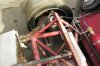
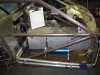
I ran the cooling pipes out and around the driver's compartment. Done with the intention of keeping as much from me heats as possible, I think I would do it differently next time as I found that Huffaker later on ran his under a false floor in the passenger side, which gives a more direct run up to the radiator,instead of behind the right front tire. I went a little overkill on the radiator. It is the same size that can cool a 700hp Trans Am car!! I have had to do some tricks in the water pump and rad inlet duct just to be able to build some heat in the engine as I run it on days less than 90deg F!!
I decided to run an accusump and the early LS6 "batwing" oil pan as they have been run on a roadcourse over 1.5gs with no starvation issues,and besides, I just didn't have the budget for a drysump and my main goal was to just get this thing onto the track and upgrade it later. in 2 1/2 seasons I have not had an oiling issue. I installed a fairly large oil cooler continuing my trend of overcooling. The intake is the stock LS6, just turned around with a Camaro throttle body.
I need to mention that the engine is joined to the trans by and adapter plate and clutch by Kennedy. I will get to the clutch actuation later..
The interior sheet metal was easy as I just used the original parts as patterns. You can see in my pics that I like to mock things up as complete as possible, even if that means resorting to using cardboard to mimic something so that I can see how the real part's dimensions will interact with things around it. I call it my version of CAD..............Cardboard Aided Design!!
I ran the cooling pipes out and around the driver's compartment. Done with the intention of keeping as much from me heats as possible, I think I would do it differently next time as I found that Huffaker later on ran his under a false floor in the passenger side, which gives a more direct run up to the radiator,instead of behind the right front tire. I went a little overkill on the radiator. It is the same size that can cool a 700hp Trans Am car!! I have had to do some tricks in the water pump and rad inlet duct just to be able to build some heat in the engine as I run it on days less than 90deg F!!
I decided to run an accusump and the early LS6 "batwing" oil pan as they have been run on a roadcourse over 1.5gs with no starvation issues,and besides, I just didn't have the budget for a drysump and my main goal was to just get this thing onto the track and upgrade it later. in 2 1/2 seasons I have not had an oiling issue. I installed a fairly large oil cooler continuing my trend of overcooling. The intake is the stock LS6, just turned around with a Camaro throttle body.
Attachments
-
 Picture 572.jpg58.2 KB · Views: 1,158
 -
 Picture 571.jpg44.7 KB · Views: 3,368
 -
 Picture 573.jpg53.8 KB · Views: 1,235
 -
 Picture 574.jpg40.9 KB · Views: 1,460
 -
 Picture 577.jpg42.4 KB · Views: 1,186
 -
 Picture 566.jpg44.7 KB · Views: 1,136
 -
 cooling pipes.jpg108.6 KB · Views: 1,136
 -
 Picture 565.jpg51.2 KB · Views: 1,180
 -
 Picture 569.jpg38 KB · Views: 1,048
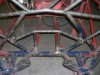
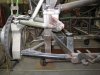
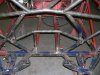
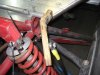
With the suspension I continued to use mockup parts to help me with packaging. With the front swaybar arm, I used wood with a piece of aluminum attached to it so I could determine the angle it would need to be bent to in order to clear the A arm. I then orderd the blank straight arms,cut them to the correct length, drill/tap and then bent them in a friends 20ton Ironworker press. The broomstick "swaybar" also helps to finalize the width needed before the order is placed. Using the wood for arms, I can drill alternate mounting holes for changing the bar rates and checking the clearance of the linkage at each setting. Pieces of tubing help me get the right length of drop links before I order them also.Then when the parts come in, it feels good to just bolt them in and confirm a correct fit! At this time I should say that before this I spent many late nights in front of the computer with a swaybar/spring rate program agonizing over not only what size swaybars front and rear to run, but what length lever arm and adjustment hole locations would be needed.
I fabbed up the air intake/filter assembly to be fed by a duct in the left rear quarter panel with the oil cooler being fed by the one on the opposite side. There is a fitting hidden on the underside for the air intake sensor for the ECM.
I fabbed up the air intake/filter assembly to be fed by a duct in the left rear quarter panel with the oil cooler being fed by the one on the opposite side. There is a fitting hidden on the underside for the air intake sensor for the ECM.
Attachments

Terry Oxandale
Skinny Man
Dave,
Who was the source for your sway-bars and arms?
Ox
Who was the source for your sway-bars and arms?
Ox
Dave,
Who was the source for your sway-bars and arms?
Ox
Looked like Home Depot to me.... :lipsrsealed:
Just kidding...
")
Nice mock-ups!!! Love the car - must be a brute!!! I'd always be fearful of someone pounding it in the back-side at the track though... That Porsche gearbox is right out there in the line of fire!
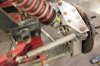
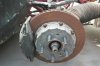
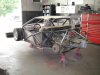
The uprights were designed by GM and cast/manufactured by Super Bell Axle Co. and actually have a GM part number cast into them!.They were designed to use a production S-10/full size front wheel drive hub/bearing units in order to keep the costs within reason. They were only manufactured for a short time and there wasn't much of a demand for them,so finding more will be difficult,although I do have a few for spares.
Similar threads
- Replies
- 1
- Views
- 461
- Replies
- 15
- Views
- 1K