SLC 24 Howard Jones

Howard Jones

Supporter
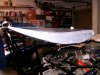
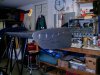
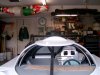
Fran, I looked up the 1223 profile. It looks like it will work well beyond more than 15 degrees angle of attack. The drag goes up but it doesn't stall. How about my wing? Can you point me towards any performance data?

Now......I have no idea if I will be able to really drive the car anywhere near fast enough to tell if I am doing any good when I try to set the car up. However I do like this stuff, that is the real hobby part in my mind, and so far I have been able to learn what I need to make things work.

Any advice on aero setup will be useful if only to keep me off the wrong track.

Thanks Fran.
 
Howard,

As you are testing your wing you might try taping "telltales" to the leading edges and trailing edges and have someone take digital photos as you pass by (poor man's wind tunnel). Would probably be most usefull along trailing edge to follow airflow separation (telltale would curl under wing edge). Just a thought...
 

Randy V

Moderator-Admin
Staff member
Admin
Lifetime Supporter
Howard -
From past experience with wings on GT cars, I would set the wing 2 degrees up (in tail) from neutral and make your changes only 1/2 degree at a time.

Putting too much wing into the rear of the car will quickly overcome the downforce of the front air-dam/splitter and your car will no longer turn in properly at speed.. I can tell you more about this if you like, but it's not very pretty...

Remember that the wing is creating downforce even in a neutral position, so 2 degrees is actually a fair amount..
 

Howard Jones

Supporter
Doc, thanks, 2 degrees leading edge lower than level is what are talking about, correct. It's funny that's where is looks right also. Wasn't it Mark Donohue who said if it looks right it usually is when it came to race cars.

There's a long way to go before I get to try all this out. Gotta keep plugging away. One thing at a time.

By the way, my wing doesn't have any holes in the ends of it where the end plates attach. The plates are marked. Does this mean that there is an alum plate or something to drill and tap threads into to attach the end plates inside the ends of the wing? That's my guess. Any pictures, anybody?
 
I think 2-degrees would be a good start. As Randy mentioned, 0-degrees will still cause downforce and, according to some, even as much as 5-degrees negative! The angle of attack will depend on the specific profile of the airfoil AND the flow over the top of the car but can go as much as maybe 12 - 14 degrees. But my comfort level would be about 8-degrees max.

Oil droplets on surfaces (intentional or not) or even driving in the rain can give you hints of airflow over surfaces as well. The streaks left behind show the surface flow patterns.
 
Doc, thanks, 2 degrees leading edge lower than level is what are talking about, correct. It's funny that's where is looks right also. Wasn't it Mark Donohue who said if it looks right it usually is when it came to race cars.

There's a long way to go before I get to try all this out. Gotta keep plugging away. One thing at a time.

By the way, my wing doesn't have any holes in the ends of it where the end plates attach. The plates are marked. Does this mean that there is an alum plate or something to drill and tap threads into to attach the end plates inside the ends of the wing? That's my guess. Any pictures, anybody?

If I recall my carbon wing, it had threaded inserts in it for the end plates.
 
Howard,
For my fiberglass first generation wing: I used nutserts in the wing ends for the end-plates. I made a pattern of the ends and cut a piece of aluminum to account for the thickness of the nutsert rims as there is not enought fg material to countersink. So, it is wing end, aluminum spacer (same shape as the end plate contact area, but with bigger holes to go around nutserts), and then the end plates. Preliminary wing setting was 5 degrees, looked right, but only testing will prove it to be close. I think between 2 and 3 degrees will work well. Looking at making canards for the front of the bodywork to balance. Moving the wing up and forward will also assist in overall balance as evidenced by the customer race car.
 
Howard; It's a little difficult to see in this pic, but i have two 1/4-20 inserts in each side of my tail.
 

Attachments

  • tail3.JPG
    tail3.JPG
    185.7 KB · Views: 515

Howard Jones

Supporter
Wing end-plates. Thanks for all the help guys, here's how I did mine. Fran put me on to Plexus two part epoxy. I looked it up and decided to use the MS300 type, they make several. I looks to me like it was made to bond fiberglass to aluminum.

Here's where I got it and some good information on it.

Plexus MA 300 All Purpose High Strength Adhesive

So I made some end-plate adapters out of 1/8 4130 and added 10 countersunk holes so that I could rivet them on along with 5, 10-24 threaded holes to mount the end-plates.

Then it was just a matter of preparing the two surfaces with some 80 grit sandpaper, cleaning with alcohol and spreading on the plexus on both surfaces. Then quickly riveting on the adapter plate.

Advice: If you use this stuff, do one side at a time and be prepared to work fast with rivets and rivet gun at the ready. This stuff gets hard quickly. Plan on 3 Min's pot time. That's enough, just don't dottle.

I used one tube set for both sides. That's one ounce. It would be good for lots of stuff like this as long as you can do it quickly.

Here's some pictures. The stuff, the parts, prep, and final assembly. Wing done for now, on to bodywork........... and back to doors.
 

Attachments

  • HPIM1259.jpg
    HPIM1259.jpg
    141.9 KB · Views: 399
  • HPIM1253.jpg
    HPIM1253.jpg
    171.2 KB · Views: 429
  • HPIM1254.jpg
    HPIM1254.jpg
    198 KB · Views: 472
  • HPIM1252.jpg
    HPIM1252.jpg
    164.4 KB · Views: 431
  • HPIM1256.jpg
    HPIM1256.jpg
    203.8 KB · Views: 436
  • HPIM1257.jpg
    HPIM1257.jpg
    167.7 KB · Views: 419
  • HPIM1258.jpg
    HPIM1258.jpg
    170.9 KB · Views: 496
Last edited:
Dear Howard:

Here are a couple of articles from the website Mulsanne's Corner (www.mulsannescorner.com), a site dedicated to sports car design. These articles have to do with wing and endplate design.

1. CFD Analysis of Endplate Effect (Text and images copyright Emanuele Brandimarti and Cornelis van Steenbergen)
Mulsanne's Corner: CFD Analysis of endplate effect

"Applying small endplates will thus result in an increase in the lift generated by the wing by 7%."

2. Wing Endplate Depth
(Images copyright Juha Kivekas, Text copyright Michael J. Fuller)
Mulsanne's Corner: Wind Endplate Depth

"Wing endplates act as span increase aerodynamically. That is, in general terms, a wing with an endplate is equal to a wider wing with out one."

Audi-JK3.jpg

Audi endplate

Both articles give lots of mathematics to figure out how big you want your wing and endplates to be. I hope this helps.

Bassanio et Portia :)
 
Nothing to add other than I love the detail your putting into your build. Looks like the wing is high enough for clean air too.

BTW, is that a Kirkey 47 seat? If so I've got the same and have nothing but praise for it.
 
Howard, looks great! I use Plexus MA300 for many tasks. Other useful items are Click-Bond fasteners. Look them up.
 

Howard Jones

Supporter
Rear bodywork henge point and diffuser support. All one piece, I didn't like the idea of just poking a hole in the side of the alum diffuser and using a big bolt. I will get some 3/8 X 2 inch quick pins and use them.
 

Attachments

  • HPIM1260.jpg
    HPIM1260.jpg
    138.7 KB · Views: 313
  • HPIM1261.jpg
    HPIM1261.jpg
    117 KB · Views: 316
  • HPIM1262.jpg
    HPIM1262.jpg
    180.9 KB · Views: 329

Howard Jones

Supporter
This is how the rear henge ended up. It's hard to see because everything is painted black but with the above pictures you can work it out. I added some backing plates inside the body and they firmed it up quite a bit. Works good.
 

Attachments

  • HPIM1274.jpg
    HPIM1274.jpg
    77.8 KB · Views: 330
  • HPIM1275.jpg
    HPIM1275.jpg
    124.7 KB · Views: 332
  • HPIM1277.jpg
    HPIM1277.jpg
    147.1 KB · Views: 351
  • HPIM1279.jpg
    HPIM1279.jpg
    86.1 KB · Views: 334
Thats how its supposed to be installed....

with the hinge centerline/pivot being behind the rear of the tail, the pivot point enables the angle of lift to be greater...nice job.

Did you have a visitor this weekend??
 

Howard Jones

Supporter
I am going to add body catches like on a GT40 and just about every other prototype I have ever seen. I think that the body pieces that come off need some hold down redundancy in addition to the pins, especially the rear.

I made four sets and here you see the front top pockets installed. You can see the finishing body-filler to fill some small imperfections. They will look like they were part of the original lay up once they are finish sanded and painted. They are bonded into place with Plexus MS300. Super strong stuff.
 

Attachments

  • HPIM1285.jpg
    HPIM1285.jpg
    162.3 KB · Views: 341
  • HPIM1287.jpg
    HPIM1287.jpg
    139.3 KB · Views: 350
  • HPIM1289.jpg
    HPIM1289.jpg
    149.9 KB · Views: 326
Last edited:
One of the reasons we did not have external latches on the SLC street car body , was having looked at Mosler , Maserati MC12 and others they looked very unsophisticated, and an unsightly after thought on otherwise smooth bodied cars...ironic that you are adding them after the fact...they will work well I am sure.
We use surface mounted Aerocatches on the SLC racer...4 on the tail and two on the nose....this kind of latch is becoming the standard on most race cars.

Aerocatch has a great new latch that is also a draw latch , similar to a GT40 type latching system
 
Last edited:
Back
Top