I'm watching this. I really enjoy your build thread. Thanks Ken for posting up and for providing details with part numbers to boot. Very nice.
ditto-great thread and very nice build.

I'm watching this. I really enjoy your build thread. Thanks Ken for posting up and for providing details with part numbers to boot. Very nice.
I'm watching this. I really enjoy your build thread. Thanks Ken for posting up and for providing details with part numbers to boot. Very nice.
As do I. I am subscribed to your thread and am impressed with every addition.
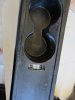
Incorporating a stock IP really brings a "production car" feel. I modified a C5 IP for my build.
I see you cut the drivers side Aircon vent away too. Guess it won't fit without doing that. What's the plan for the vents? Interesting...
Like to see that bracket as well. Idea's are popping, damn! Just finished making a solid back fiberglass window that fits flush, thinking about what I'll do with it now.
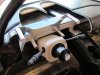
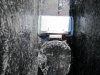
For safety reasons (foot interference) I completely removed both the tilt and telescopic motors from the steering column. I found the telescopic feature to be useless anyways as I want it extended out as far as it can go. The tilt feature will still be used .....I will just build a small wheel for the cable to adjust it up or down manually.
Many thanks for the compliment Jim.
Be careful mounting the telescopic motor though. It has to move forward/backward when the column moves forward/backwards.
I was amazed at how our builds are similar Vidal. Your website build log is inspiring!
For safety reasons (foot interference) I completely removed both the tilt and telescopic motors from the steering column. I found the telescopic feature to be useless anyways as I want it extended out as far as it can go. The tilt feature will still be used .....I will just build a small wheel for the cable to adjust it up or down manually.