Could you give me recommendations on the best way to attach interior panels without having screw heads exposed (roof panel, a pillars and door side panels)?
Check out Fastcaps. They sell a no mar countersink that provides for a screw and an inset, self adhesive flush cap. The caps are available in a variety of colors. I think that with a little detail work, you could probably match your carbon fiber close enough so nobody would be able to tell there was a screw there.
I intend on using the same type of panel connectors the OEMs use for all there interior plastic panels. Some have feathered fingers while others have inserts which spread when the pin is inserted. They come in colors, mostly black and are very unobtrusive.
I intend on using the same type of panel connectors the OEMs use for all there interior plastic panels. Some have feathered fingers while others have inserts which spread when the pin is inserted. They come in colors, mostly black and are very unobtrusive.
If you have the factory interior ceiling panel, how large are the gaps along the edges at the doors and the windshield? Mine are large enough that squeezing the body roof and interior ceiling creates too much pressure and distortion that they will not stay together.
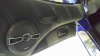
I used the weather striping with the locking channel around my doors to hold my roof panel and A pillar covers on looks very factory. door panels already have recesses in them for screws make sure the screws sit up inside the panels after they are installed as they will rub on you door sills, there is zero room there.
I used black anodized screws along the outside bottom edge of the door panels (i.e. only visible when the door is open). These camouflage pretty well against the black leather.
At the middle of the door panel, there is a leather door pull. Each end of the pull is secured with screws into a bracket which is glassed into the door structure. This helps pull the door panel tight to the window frame and provides a solid structure to pull the door down with. The screws are covered with upholstered buttons. Similar buttons are used to cover a screw at the very top, rear edge of the door panel and at the front of the door panel, facing into the cockpit. Both of these are needed to hold the panel snug against the door frame and both have an upholstered button on them.
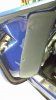
McMaster sells some caps that snap closed over the screw head and are a great way to hide an exposed screw. CLICK HERE. I used fasteners for the roof panel at the rear bulkhead, and used these caps. The screws are under the seat belts, so combined with these caps they're all but out of sight. I also have the door shocks inside the doors and fastened the brackets for those to the bottom of the door inner. These caps make the screws look far more presentable. For the other parts of the ceiling panel, I put in a dome light at the front. It snaps in and out. I bonded a bracket to the inside of the spider to match up to a bracket on the inside or the ceiling panel and screw them together. At the leading edge of the ceiling panel I glued some very strong magnets to the ceiling panel and glued brackets with steel mating surfaces to the inside of the spider.
For the sides of the ceiling panel, I didn't like the way they didn't match the spider, and I realized I couldn't force the gap closed with weatherstrips because interference with the roll bar was part of the problem. So I cut the ceiling and fiberglassed it back together the way I wanted it. While I was at it, I cut out the clearance humps for the roll bars and fit those to where my bars actually were, too.