Steve’s Active Power GEN II Coyote GT40

Ask and receive.

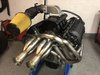
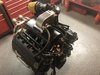
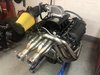
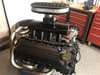
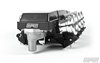
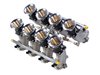
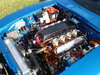
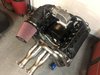
I received my new collections today and the engine is ready to be installed.

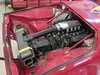
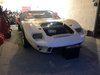
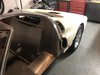
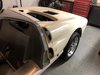
The body is having some fiberglass repairs done and I should have that in a week.

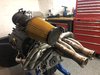
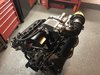
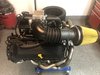
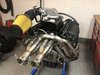
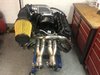
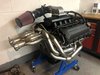
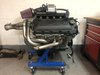
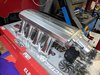
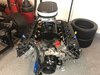
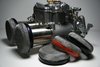
Here is where I am on the engine.
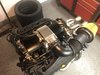
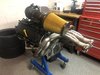
 

Attachments

  • 75D94DE8-A6FB-4500-882A-FB6CEBB624CB.jpeg
    75D94DE8-A6FB-4500-882A-FB6CEBB624CB.jpeg
    446.7 KB · Views: 817
  • 2DDFBFC3-B1EF-4B9C-8054-17F5DBFB4AFD.jpeg
    2DDFBFC3-B1EF-4B9C-8054-17F5DBFB4AFD.jpeg
    425.4 KB · Views: 817
  • AE9A211C-0EAB-494D-B480-A28D1092AD47.jpeg
    AE9A211C-0EAB-494D-B480-A28D1092AD47.jpeg
    499.3 KB · Views: 856
Thanks George

I like how it came out too.

Here are some more pictures.
 

Attachments

  • 6251BBF3-3839-4D63-BB6B-E54D286D6846.jpeg
    6251BBF3-3839-4D63-BB6B-E54D286D6846.jpeg
    389.4 KB · Views: 693
  • B196FAB6-789C-450E-BB01-82A4FFED2BD2.jpeg
    B196FAB6-789C-450E-BB01-82A4FFED2BD2.jpeg
    474.6 KB · Views: 697
  • 2F3AD07D-ED1E-417D-97E5-F3C6F1C3493E.jpeg
    2F3AD07D-ED1E-417D-97E5-F3C6F1C3493E.jpeg
    447.9 KB · Views: 662
  • 624F5ECA-1892-43CF-B7FB-3D7403B8E5CA.jpeg
    624F5ECA-1892-43CF-B7FB-3D7403B8E5CA.jpeg
    459.4 KB · Views: 759
  • 9AD34E59-BBE2-4E92-A71F-50856241959A.jpeg
    9AD34E59-BBE2-4E92-A71F-50856241959A.jpeg
    411.5 KB · Views: 629
  • FAC401DB-BF3D-41D4-ACDB-2263C3BCD28C.jpeg
    FAC401DB-BF3D-41D4-ACDB-2263C3BCD28C.jpeg
    444.5 KB · Views: 599
  • 4D3BDE9C-201F-4EC7-85BE-1E79D114D304.jpeg
    4D3BDE9C-201F-4EC7-85BE-1E79D114D304.jpeg
    474.4 KB · Views: 645
How are you planning to incorporate that intake pipe/filter w/ the rear hood? (My Active GT40 ships this weekend...can't wait to get my hands on it!!)
 
New K&N filter.

My body is coming this week or next week. I’ll see how it fits when it arrives. I’m plannung to do some mods.
 

Attachments

  • 3391E1C6-1FEE-435B-B28F-A9CC20FACBAF.jpeg
    3391E1C6-1FEE-435B-B28F-A9CC20FACBAF.jpeg
    509.7 KB · Views: 618
  • E941E9F6-303E-4A00-B423-69DC702EEC9B.jpeg
    E941E9F6-303E-4A00-B423-69DC702EEC9B.jpeg
    381.5 KB · Views: 629
  • 6CEE9D5E-63B6-4DD5-BC19-FEF9F431C1FC.jpeg
    6CEE9D5E-63B6-4DD5-BC19-FEF9F431C1FC.jpeg
    407.5 KB · Views: 627
New K&N filter.

My body is coming this week or next week. I’ll see how it fits when it arrives. I’m plannung to do some mods.

I was looking at a similar Intake Manifold (Carb style, large central inlet)...but was thinking I'd mount the Throttle-body directly to it, then a 90 degree bend, MAF & then ~6" intake pipe; from all of the pictures, there's not a lot of space, and I didn't want to cut the engine shroud (FG portion that's part of the rear body & surrounds the engine) more than I have to. Post pics as you figure out the intake, I'm very interested!

**Nice job with the headers, love the collectors.
 

Ron McCall

Supporter
I was looking at a similar Intake Manifold (Carb style, large central inlet)...but was thinking I'd mount the Throttle-body directly to it, then a 90 degree bend, MAF & then ~6" intake pipe; from all of the pictures, there's not a lot of space, and I didn't want to cut the engine shroud (FG portion that's part of the rear body & surrounds the engine) more than I have to. Post pics as you figure out the intake, I'm very interested!

**Nice job with the headers, love the collectors.
What about something like this? This is going in a Pantera that I'm building at the moment.
 

Attachments

  • IMG_20190204_085134.jpg
    IMG_20190204_085134.jpg
    523.7 KB · Views: 638
What about something like this? This is going in a Pantera that I'm building at the moment.

Very nice. The reason I didn’t do that is because I was 100% set on using the “bundle of snakes” exhaust. If I went the way you’re going, my air intake would be where the headers are. Huge Pantra fan btw...

It took a long time trying to figure this out. It was trial and error.

Peter, I was thinking the same thing as you, but my first attempt, looks more like Robbie the Robot than an engine.
 

Attachments

  • 2DE1163D-BF0B-4B67-986B-5D9EE71D72A4.jpeg
    2DE1163D-BF0B-4B67-986B-5D9EE71D72A4.jpeg
    440.3 KB · Views: 682
  • 1D47EE01-AF4C-4929-A6EA-AF8D059C2BE2.jpeg
    1D47EE01-AF4C-4929-A6EA-AF8D059C2BE2.jpeg
    409.2 KB · Views: 719
What about something like this? This is going in a Pantera that I'm building at the moment.

Yeah, that was my 1st thought...main problem is where to stick the intake filter as it would need to take a quick 90 degree bend to stay above the engine shroud. I attached a pic of another GT40...the general layout seems to require ITBs, or run the intake to another area for fresh air like what you're doing.

Very nice. The reason I didn’t do that is because I was 100% set on using the “bundle of snakes” exhaust. If I went the way you’re going, my air intake would be where the headers are. Huge Pantra fan btw...

It took a long time trying to figure this out. It was trial and error.

Peter, I was thinking the same thing as you, but my first attempt, looks more like Robbie the Robot than an engine.

haha...and even that looks like it may be too high! I've started contacting Jenvey & Harrop for their ITBs...I'd have to switch from MAF to MAP which impacts some of the streeetability of the tune, in addition these are $$ esepcaiily b/c I've got a DBW (drive by wire) throttle.
 

Attachments

  • image.png
    image.png
    747.6 KB · Views: 654
  • hurricane-1000x1000.jpg
    hurricane-1000x1000.jpg
    199.8 KB · Views: 732
  • Jenvey.JPG
    Jenvey.JPG
    98 KB · Views: 694
I assume you saw what Chris did on his Coyote build. I assume he had to use a "cobra elbow" to make that tight bend between the intake manifold & passenger bulkhead....but the intake filter is pulling from the fresh air, assuming there's some shroud that prevents it from picking up the hot exhaust air..
 

Attachments

  • Active_Coyote_DSCN3531-590x442.jpg
    Active_Coyote_DSCN3531-590x442.jpg
    53.5 KB · Views: 681
  • Cobra_elbow_90CB40-t.jpg
    Cobra_elbow_90CB40-t.jpg
    6 KB · Views: 670

Rick Merz

Lifetime Supporter
I put the same drive by wire Harrop Hurricane on my LS3 525 in a '77 280Z in 2011 and had excellent streetability and excellent WOT. the right tuner can do wonders.
 

Attachments

  • DSC07536.JPG
    DSC07536.JPG
    692 KB · Views: 668
  • DSC07523.JPG
    DSC07523.JPG
    632.9 KB · Views: 623
I put the same drive by wire Harrop Hurricane on my LS3 525 in a '77 280Z in 2011 and had excellent streetability and excellent WOT. the right tuner can do wonders.

very nice...I've seen pictures of your car before, love it!! if I go down that path, I'll make sure to contact you. Did you ever add filters? If I go ITB, I was thinking something old school like this.
 

Attachments

  • 57mm_1_1.jpg
    57mm_1_1.jpg
    100.1 KB · Views: 818

Rick Merz

Lifetime Supporter
Yes, but only when driving on the road since they drop top end power when you are on the track. Old school is cool to. I had the smaller version of those on a different 280Z that I bought brand new in '77 (special model called "The Z With More Zap").
 

Attachments

  • scan0052.jpg
    scan0052.jpg
    874.7 KB · Views: 690
Body came today. I have a lot of work to do but I’m looking forward to learning and building.

The body is a splash mold from an original 1966 car. I bought it off of Ted Laird who is a known enthusiast. A splash mold (from what I’m told) is a mold that was created to just make a couple of body’s off of. I believe that this car is a one generation mold off of an original car.

I’m pretty excited about that. It’s probably the closest you can get to a real car other than...a real car.

This is gonna be fun!
 

Attachments

  • 543C6E2A-62C2-4F77-AE78-94F640F037AE.jpeg
    543C6E2A-62C2-4F77-AE78-94F640F037AE.jpeg
    323.4 KB · Views: 437
  • 80843D5F-585A-40BF-B9AE-178D76790EDA.jpeg
    80843D5F-585A-40BF-B9AE-178D76790EDA.jpeg
    348.5 KB · Views: 397
  • 35CAAB56-BF26-4586-A967-C6C9CF8A2CEA.jpeg
    35CAAB56-BF26-4586-A967-C6C9CF8A2CEA.jpeg
    330.2 KB · Views: 370
  • CE8BE86C-1C1F-492D-BFFF-0BA9337BDFC4.jpeg
    CE8BE86C-1C1F-492D-BFFF-0BA9337BDFC4.jpeg
    403.4 KB · Views: 372
  • E56A532C-4097-45BD-BF86-24953F478210.jpeg
    E56A532C-4097-45BD-BF86-24953F478210.jpeg
    444.5 KB · Views: 398
  • B17E2FD9-D46D-426B-AD7C-77BB741CFCF6.jpeg
    B17E2FD9-D46D-426B-AD7C-77BB741CFCF6.jpeg
    354.8 KB · Views: 382
  • 3761E0F5-AEA9-453D-A52C-32A400C0C114.jpeg
    3761E0F5-AEA9-453D-A52C-32A400C0C114.jpeg
    332.1 KB · Views: 362
Some more of the finished motor. Some small details left to do, but I’m basically done with the motor.
 

Attachments

  • 7FDE64E4-1641-4947-8170-A3C23BFA89C5.jpeg
    7FDE64E4-1641-4947-8170-A3C23BFA89C5.jpeg
    509.7 KB · Views: 377
  • E8C81A07-FF7E-47EF-89E7-C0DCE1F57806.jpeg
    E8C81A07-FF7E-47EF-89E7-C0DCE1F57806.jpeg
    381.5 KB · Views: 452
Steve as talented as you are I am sure your end product will look and run great. You are essentualy doing a scratch build putting your creativity skills to work. Enjoy the ride and keep posting.
 
Thanks George. What actually is the definition of a scratch build?

I’ve heard the term many times but I’m not sure what is considered a scratch build?
 
Back
Top