apologies, the rest of your build suddenly appeared and questions answered.great job

You are using an out of date browser. It may not display this or other websites correctly.
You should upgrade or use an alternative browser.
You should upgrade or use an alternative browser.
1st MDA to Canada
- Thread starter ChrisMartino
- Start date
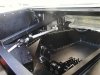
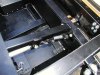
New MDA steering column support bar now completed, Pedal box assembly and brakes next.
Hello Ross, I'm just east of Oshawa - should you want a look, just let me know.
Chris
Hello Ross, I'm just east of Oshawa - should you want a look, just let me know.
Chris
Attachments
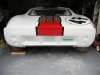
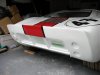
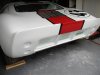
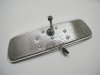
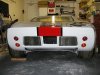
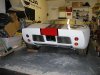
Finally had a chance to finish my pain in the rear, rear! Paint is done, re-assembly of the lights and louvre grills once the clearcoat is cured. Front black-out and fuel caps re-sprayed flat black. Also attached are some goodies I've purchased...
Chris
Chris
Attachments
-
 Finished Paint_01.jpg36.1 KB · Views: 1,246
 -
 Finished Paint_02.jpg35.4 KB · Views: 1,260
 -
 Finished Paint_03.jpg34.6 KB · Views: 1,272
 -
 BlackOuts_01.jpg28.2 KB · Views: 1,275
 -
 Marchal 653.jpg31.6 KB · Views: 1,277
 -
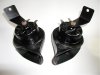 Hi-Lo Mixo France Horns.jpg31.3 KB · Views: 1,311
 -
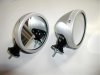 Raydots_01.jpg26.6 KB · Views: 1,253
 -
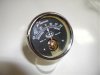 CAV Ammeter_01.jpg28.1 KB · Views: 1,288
 -
 Lucas608_01.jpg36.6 KB · Views: 1,272
 -
 MDA Demister Vent_01.jpg61.1 KB · Views: 1,270
Hi there Chris, I would love to come see.Are the weekends the best? She is looking good, you must be excited. Cheers, Ross
Thanks Bill, it started raining heavily before I could snap anymore hence the garage shots - we'll do!
Hi Ross, just give me a heads-up, I can devote more time with you on the weekends so yes, just give me a call and I can make arrangements with you.
Chris
Hi Ross, just give me a heads-up, I can devote more time with you on the weekends so yes, just give me a call and I can make arrangements with you.
Chris
Thanks Martin, it took a lot longer than I thought it would but I'm in no rush (AKA haven't much time ") ) and these kind of projects are a learning experience so slow and steady is how I got to the end - the MDA product is worthy of the extra time spent, that's my plug...
) and these kind of projects are a learning experience so slow and steady is how I got to the end - the MDA product is worthy of the extra time spent, that's my plug...
Now the front and rear ducts are next and I can then hopefully rid myself of the major bodywork/projects... ( I would like to actually drive this car in the near future!!!)
Cheers-
Chris
) and these kind of projects are a learning experience so slow and steady is how I got to the end - the MDA product is worthy of the extra time spent, that's my plug...Now the front and rear ducts are next and I can then hopefully rid myself of the major bodywork/projects... ( I would like to actually drive this car in the near future!!!)
Cheers-
Chris
Attachments
Richard,
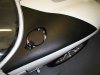
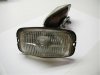
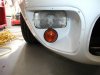
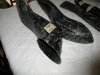
Hopefully these help, let me know if you need anymore. The original holes were cut for the spot lamp and indicator supplied by MDA but since then I've changed many parts to original where possible. Everything needs a clean-up and I will probably put a small bead of sealant around the glass.
The L488's are shown before & after trimming the rubber boot and tossing out the chrome ring.
Chris
Attachments

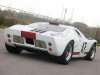
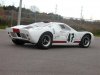
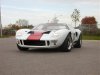
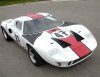
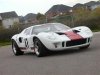
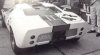
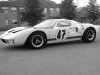
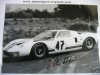
Well after many months of body mods, this is the first time since 2005 I have been able to take my build to a decent area for proper pics so I hope you enjoy them!
Cheers -- Chris
Cheers -- Chris
Attachments
-
 Right-Rear_03.jpg41.2 KB · Views: 980
 -
 Right_02.jpg44 KB · Views: 961
 -
 Left-front_01.jpg40.8 KB · Views: 968
 -
 Top-Front_01.jpg47.1 KB · Views: 970
 -
 Rear-front_01.jpg43.5 KB · Views: 957
 -
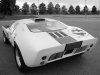 Left-rear-B&W_01.jpg48.2 KB · Views: 955
 -
 Original 1010 rear.jpg38.9 KB · Views: 929
 -
 Left-B&W_01.jpg54.6 KB · Views: 982
 -
 John Whitmore_01.JPG39.6 KB · Views: 915
Last edited:
Hi Chris, I have to say what a great job you have done. The car is looking fantastic.
Its also good to see the car from a longer shot now you have the covers and windows in and the mods to the rear tail and lights done. It really has moved on since I saw it last year, Im very impressed.
Craig and others are correct, the attention to details is to your credit. I know the body work was well fitted and then painted last year, though now with the other parts fitted it looks near complete and very accurate.
I'll speak to you soon
Very best regards
Mark
Thanks guys, I really appreciate your kind words, gives me more motivation to keep going! I'll be in touch Mark for more goodies to be ordered...
Bill, that's a bummer - but I'm happy you gave me a heads-up about it. Wish there was a way to do it. Will the the rear and front NACA ducts be OK? That would be the last of the body additions if possible. (where have I heard that before)")
Chris
Bill, that's a bummer - but I'm happy you gave me a heads-up about it. Wish there was a way to do it. Will the the rear and front NACA ducts be OK? That would be the last of the body additions if possible. (where have I heard that before)
Chris
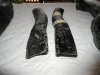
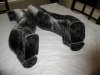
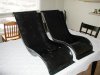
Just received my duct work and seat shells from William Hough Composites. Bill cast moulds of the ducts that were in the nose of Chassis #1017 and ducts from the tail of chassis #1054. The moulds were cast just as the ducts were without improving them, apparently it was a lot of work to cut the ducts out and not screw them up! Installation work should be interesting-
The seat shells look great and will go for finishing over the winter.
Thanks Bill!
Chris
The seat shells look great and will go for finishing over the winter.
Thanks Bill!
Chris
Attachments
Doc Watson
Lifetime Supporter
Stunning..........
Similar threads
- Replies
- 5
- Views
- 1K
- Replies
- 12
- Views
- 806
- Replies
- 17
- Views
- 10K
- Replies
- 18
- Views
- 4K