Your build is something to behold. The talent and craftsmanship are incredible. Far exceeds anything I'm capable of

You are using an out of date browser. It may not display this or other websites correctly.
You should upgrade or use an alternative browser.
You should upgrade or use an alternative browser.
Bob's GT Forte scratch build.
- Thread starter bobjmanchester
- Start date
Ian Anderson
Lifetime Supporter
Looking great Bob
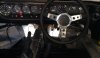
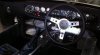
Switches in centre section look like they may go out too far from steering centre line to be in the exempt zone. (XXXcm from edge of steering wheel)
If they are outside that zone they fail the sharp edge test.
Moved closer together and towards the steering wheel and all should pass
Ian
Switches in centre section look like they may go out too far from steering centre line to be in the exempt zone. (XXXcm from edge of steering wheel)
If they are outside that zone they fail the sharp edge test.
Moved closer together and towards the steering wheel and all should pass
Ian
Looking great Bob
Switches in centre section look like they may go out too far from steering centre line to be in the exempt zone. (XXXcm from edge of steering wheel)
If they are outside that zone they fail the sharp edge test.
Moved closer together and towards the steering wheel and all should pass
Ian
Thanks very much Ian.
I've already been warned so I'd better take note.
The 3 switches on the left, including the hazard, are all IVA ok.
The next one along is the headlamp flasher switch so if that's out I could replace it with another push button - I think.
Your quite right, if there's any doubt I will just make up another panel.
Attachments
Last edited:
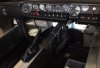
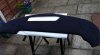
The weather hasn't improved much but I'm making progress.
Wired up most of the dashboard and covered it in leather.
At the front end almost finished the wiring. Starting to tidy things up.
Wow Bob wish I knew about your leather-work skills, would never of got my dash flocked
")
Nick
Wow Bob wish I knew about your leather-work skills, would never of got my dash flocked
Nick
You haven't seen it close up yet mate.
You could always be de flocked. :laugh:
Ok, time to "fess up".
I've split the dashboard.
As I've probably mentioned several times I'm an old guy and the thought of getting stuck under the thing doesn't appeal.
Mostly wired up and much easier to work on.
Won't be as easy with the screen in but as far as I'm concerned "every little helps".
Covered the lower in leather and the top in faux suede.
Next thing is to sort out demister vents.
Attachments


Mike Pass
Supporter
Good plan Bob. You can get at all the gubbins behind the dashboard and the Alcantara type top will prevent distracting screen reflections. Good idea also to paint the demister vent matt black. Mine is satin black and is too reflective and annoying in bright sunlight.
Just shows you should always remember the 6 Ps......
Perfect planning prevents piss poor performance.
Keep up the good work.
Cheers
Mike
Just shows you should always remember the 6 Ps......
Perfect planning prevents piss poor performance.
Keep up the good work.
Cheers
Mike
Mike Pass
Supporter
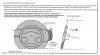
The original ones were from a Ford Zodiac (Mk3?). Pic attached. They used to come up on on EBay but I have not seen any for a while. I got an original one from a place that did old Ford spares. I think Tornado do a good replica one. Mark Sibley used to do good replica ones when he was MDA. He is now at GTRacing and may still do them - try him at
Home - GT Racing
Cheers
Mike
Home - GT Racing
Cheers
Mike
Attachments
That's it got mine from Tornado . same as above ....
Probably not Bob m8 .. LOL
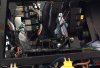
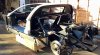
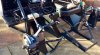
The suns out in Manchester at last so here’s a quick update.
Rear suspension and brakes in place, just waiting for coilovers.
Now sorting the handbrake callipers.
Anti roll bar mounts look a bit flimsy so a bit more development needed there.
Rear suspension and brakes in place, just waiting for coilovers.
Now sorting the handbrake callipers.
Anti roll bar mounts look a bit flimsy so a bit more development needed there.
Attachments
")
Thanks Brian and everyone who has contacted me off forum.
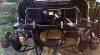
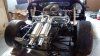
I should have left those crappy roll bar mounts out of the photo session.
Don’t worry they are not going to be used. I was just figuring what to do.
I will probably go with something like this on Andy Greens build.
Hope you don’t mind the use of your pic Andy.
I’ve got loads more on my hard drive.
Superb build mate.
Attachments
Similar threads
- Replies
- 14
- Views
- 4K
- Replies
- 22
- Views
- 6K
- Replies
- 17
- Views
- 6K