Bobs GTD

Howard Jones

Supporter
Bob, I have a complete GTD brake setup including the entire parking brake system. Drop me a email and we can discuss what you need.

I'm here in the USA so shipping would be fairly cheap.

Howard.
 
Bob, your dog doesn't seem to have been helping much lately. Surely he hasn't got bored with helping?

Anyway, keep the pics coming, and we can enjoy the build while you do the hard work.

Dalton
 
Well I finally got the center counsil and hand brake in its not secured yet but all there. sorry I'll try to keep the pictures coming. I also relocated the steering shaft to give me a little more foot room.
 

Attachments

  • DSCN0047.JPG
    DSCN0047.JPG
    82.2 KB · Views: 1,295
  • DSCN0048.JPG
    DSCN0048.JPG
    83.1 KB · Views: 1,343
Well after a trip to my favorite salvage yard and the local NAPA store, and about 2 hours of creative engineering and 37 bucks my parking brake set up is complete and seems to work OK. here are the latest pics.
Bob
 

Attachments

  • DSCN0059.JPG
    DSCN0059.JPG
    84.4 KB · Views: 1,261
  • DSCN0060.JPG
    DSCN0060.JPG
    84.8 KB · Views: 1,221
  • DSCN0061.JPG
    DSCN0061.JPG
    82.7 KB · Views: 1,143
  • DSCN0062.JPG
    DSCN0062.JPG
    81.4 KB · Views: 1,108
Has anyone considered using an emergency brake unit from a 914 Porsche?

The 914 unit allows you to pull up on the brake, and then push it back to the down position when the brake is on.
 

David Morton

Lifetime Supporter
Bob,
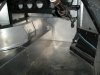
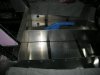
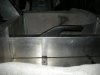
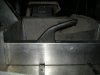
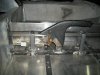
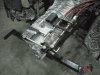
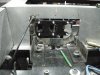
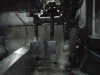
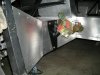
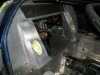
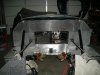
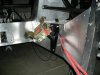
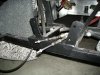
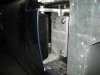
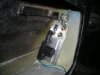
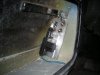
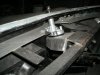
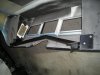
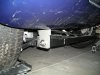
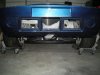
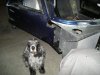
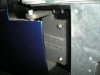
You may not have allowed enough room for feet/pedals with the centre tunnel the way you have it now. I fabricated a similar centre tunnel but with less height/elevation(but sufficient for two 50mm coolant pipes) but where I joined the front bulkhead the profile went from being rectangular about 18 inches from the bulkhead to Triangular biased toward the passenger foot well. If this isn't clear I'll get a photo of it this week. I didn't use the pipe covers in the passenger footwell as my coolant pipes are , obviously, down the centre. so there was room to put in a passenger footrest like the rally cars use.
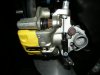
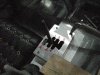
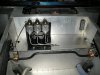
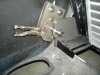
I didn't put a handbrake in the centre position either - I think that as I have seperate hydraulics front and rear, an hydraulic lock lever will work as a parking break in addition to leaving it in gear. Sure - some will chirp up that it cannot be permitted for our Ministry of Transport tests but thats taken care of as well.
Unless you have tiny pieds, try your foot well positions and see how much space you have.
I'm assuming this is a GTD?
Dave M
 
Last edited:
First concern is to dave, thanks for the imput and I have already tried the foot pedals and they seem to fit fine and as far as the hand brake that stays ingaged with the handle down my fiero had that set up and you don't know many times i've taken off with the brake still on, that sucks because you tend to distroy brake pads very easy that way.
 
Well I finaly got a little more stuff done on the car the petal box is set up and the shifter linkage is in and working. and of coarse Winston my supervisor is always there to put in his two cents.
 

Attachments

  • DSCN0073.JPG
    DSCN0073.JPG
    94 KB · Views: 1,205
  • DSCN0076.JPG
    DSCN0076.JPG
    86.6 KB · Views: 1,163
  • DSCN0077.JPG
    DSCN0077.JPG
    88.5 KB · Views: 1,135
  • DSCN0079.JPG
    DSCN0079.JPG
    86.8 KB · Views: 1,077
  • DSCN0078.JPG
    DSCN0078.JPG
    93.5 KB · Views: 1,125
Bob, Winston must be a good manager because the build is looking great. My daughter loves him by the way. Go with what he thinks on the 40.
 
Hi All,
Well I finally got out to the garage and took pictures of the recent accomplishments. As you can see from the new pics there has been some progress, the brakes are finished new lines, proportioning valve, clutch line all the masters and the mounting brackets all powder coated. Also I have done some refitting of aluminum body panels. Also got some speaker holes cut in and wired. Next are the air conditioning lines and heater hoses
See you soon,
Bob
 

Attachments

  • DSCN0107.JPG
    DSCN0107.JPG
    89.7 KB · Views: 807
  • DSCN0108.JPG
    DSCN0108.JPG
    81.9 KB · Views: 808
  • DSCN0109.JPG
    DSCN0109.JPG
    83 KB · Views: 816
  • DSCN0110.JPG
    DSCN0110.JPG
    85.1 KB · Views: 832
  • DSCN0111.JPG
    DSCN0111.JPG
    83.2 KB · Views: 869
  • DSCN0112.JPG
    DSCN0112.JPG
    80.1 KB · Views: 826
  • DSCN0113.JPG
    DSCN0113.JPG
    81.8 KB · Views: 792
Well I finished off the area around the master cylinders, I built a frame then insulated it aluminum faced insulation the added two cover pieces,
it does'nt look original but it finishes it off nicely, what do you think?
Bob
 

Attachments

  • DSCN0114.JPG
    DSCN0114.JPG
    86.2 KB · Views: 634
  • DSCN0115.JPG
    DSCN0115.JPG
    79.5 KB · Views: 634
Wow,
I can't believe it's been just a year sence I posted anything new on my build log, but I have been busy on the car so here is the update as of today.
First I redesigned the door hinges.
 

Attachments

  • DSCN0161.jpg
    DSCN0161.jpg
    42.3 KB · Views: 585
  • DSCN0165.jpg
    DSCN0165.jpg
    39.8 KB · Views: 578
Next I bought a keyless entry system and installed the power door locks
 

Attachments

  • DSCN0160.jpg
    DSCN0160.jpg
    42.6 KB · Views: 540
  • DSCN0180.jpg
    DSCN0180.jpg
    42.6 KB · Views: 614
I got my wiper motor installed, it"s a 120 degree unit
I finished my air conditioning setup
and then made new stainless fuel filler necks to replace those ugly ones on the left side of the picture
 

Attachments

  • DSCN0162.jpg
    DSCN0162.jpg
    44 KB · Views: 579
  • DSCN0163.jpg
    DSCN0163.jpg
    47.6 KB · Views: 548
  • DSCN0164.jpg
    DSCN0164.jpg
    40.3 KB · Views: 562
  • DSCN0166.jpg
    DSCN0166.jpg
    40.8 KB · Views: 637
Next order of business was to make the dash inlay I decided to make it out of black walnut, with all new gauges from VDO with a 220 MPH speedo.

I then designed my version of the hartwell latch using original PRESS buttons that I got from old aircraft parts. everything was then hardcoat anodized for wear resistance.

The front and rear bonnet pivot hinges are my design, made out of alum. with stainless steel pivots.

next is the pic of the door hinge in hardcoat anodize.

I redid the rear pivot support on the frame and the body for greater support.

I hope to get into the habit of posting more often but for know that's it.
Thanks,
Bob
 

Attachments

  • DSCN0183.jpg
    DSCN0183.jpg
    42.7 KB · Views: 584
  • DSCN0184.jpg
    DSCN0184.jpg
    47.2 KB · Views: 598
  • DSCN0190.jpg
    DSCN0190.jpg
    33.9 KB · Views: 529
  • DSCN0191.jpg
    DSCN0191.jpg
    33 KB · Views: 538
  • DSCN0192.jpg
    DSCN0192.jpg
    31.7 KB · Views: 543
  • DSCN0193.jpg
    DSCN0193.jpg
    25.5 KB · Views: 500
  • DSCN0194.jpg
    DSCN0194.jpg
    26.3 KB · Views: 497
  • DSCN0195.jpg
    DSCN0195.jpg
    28.6 KB · Views: 512
  • DSCN0196.jpg
    DSCN0196.jpg
    24.8 KB · Views: 489
  • DSCN0198.jpg
    DSCN0198.jpg
    40 KB · Views: 526
  • DSCN0197.jpg
    DSCN0197.jpg
    39.2 KB · Views: 562
Well,
Today I got the rear bonnet reattached on the new pivot brackets and they seem to work fine for now.

Also I reattached the door hinges and fit them as best I could, looks like there is a little body work to be done, but I expected that.

I also fit the new front bonnet pivots but still need to weld the stop collars on as you can see by the vice grips still on.
I'll keep plugin along on it
Thanks,
Bob
 

Attachments

  • DSCN0199.jpg
    DSCN0199.jpg
    45.1 KB · Views: 583
  • DSCN0200.jpg
    DSCN0200.jpg
    38.4 KB · Views: 622
  • DSCN0201.jpg
    DSCN0201.jpg
    41.7 KB · Views: 563
  • DSCN0202.jpg
    DSCN0202.jpg
    22 KB · Views: 548
  • DSCN0203.jpg
    DSCN0203.jpg
    32.9 KB · Views: 658
Back
Top