Bobs GTD

Hi Bob,
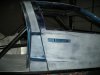
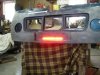
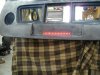
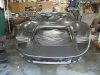
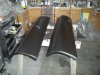
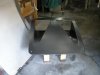
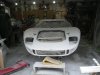
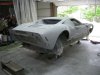
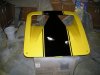
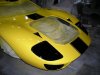
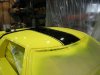
fantastic attention to detail, keep up the good work. I like you revised rear clam mount, much neater than having a cross-bar visible from the rear of the car

Regards
Andy
 
Just a few pics on the latch mountings that I made, there 304 stainless put on with 3M adhesive made for panel bonding ( good stuff) this weekends job is to glass them in and make them look pretty.
Bob
 

Attachments

  • DSCN0205.jpg
    DSCN0205.jpg
    18.9 KB · Views: 746
  • DSCN0206.jpg
    DSCN0206.jpg
    33.4 KB · Views: 744
  • DSCN0208.jpg
    DSCN0208.jpg
    19.4 KB · Views: 676
  • DSCN0209.jpg
    DSCN0209.jpg
    24.8 KB · Views: 661
  • DSCN0212.jpg
    DSCN0212.jpg
    34.7 KB · Views: 759
  • DSCN0213.jpg
    DSCN0213.jpg
    25.2 KB · Views: 650
Got the inside glass work done on the latches, and started the body work, now the fun begins.
Bob
 

Attachments

  • DSCN0217.jpg
    DSCN0217.jpg
    34.4 KB · Views: 589
  • DSCN0216.jpg
    DSCN0216.jpg
    23.7 KB · Views: 505
  • DSCN0215.jpg
    DSCN0215.jpg
    23.1 KB · Views: 549
Well I finished the door catches on the interior ( stainless steel) and lined up the doors so I can now start the body work to that area, I also finished the body latch work.
See Ya ,
Bob
 

Attachments

  • DSCN0218.jpg
    DSCN0218.jpg
    26.9 KB · Views: 533
  • DSCN0219.jpg
    DSCN0219.jpg
    32.9 KB · Views: 543
  • DSCN0221.jpg
    DSCN0221.jpg
    26.7 KB · Views: 524
  • DSCN0220.jpg
    DSCN0220.jpg
    26.6 KB · Views: 542
  • DSCN0222.jpg
    DSCN0222.jpg
    29.2 KB · Views: 519
  • DSCN0223.jpg
    DSCN0223.jpg
    21.9 KB · Views: 492
Got going on the front bonet and found lots of spider web cracks, that was a lot of work, but as you can see I have a lot of help, the only problem is they have to be right in the middle of what I'm doing and they are going to be harder to clean up than the car.
Got to go!
Bob
 

Attachments

  • DSCN0225.jpg
    DSCN0225.jpg
    38.2 KB · Views: 626
  • DSCN0224.jpg
    DSCN0224.jpg
    42.8 KB · Views: 591
Well today' s topic is how to build a steering column, my column came to me with no blinker and horn setup so here is my answer on how to solve that problem build one. I took a column from an old mustang bought an adapter and and a quick release adapter, a little field engineering and a couple of hours on the lathe and there it is my home made steering column. Now its back to body work.
See Ya,
Bob
 

Attachments

  • DSCN0226.jpg
    DSCN0226.jpg
    28.2 KB · Views: 518
  • DSCN0227.jpg
    DSCN0227.jpg
    25.2 KB · Views: 511
  • DSCN0228.jpg
    DSCN0228.jpg
    28.6 KB · Views: 541
  • DSCN0229.jpg
    DSCN0229.jpg
    24.4 KB · Views: 528
  • DSCN0230.jpg
    DSCN0230.jpg
    25.6 KB · Views: 500
  • DSCN0231.jpg
    DSCN0231.jpg
    19.5 KB · Views: 476
  • DSCN0232.jpg
    DSCN0232.jpg
    24.9 KB · Views: 522
  • DSCN0233.jpg
    DSCN0233.jpg
    31.9 KB · Views: 537
  • DSCN0234.jpg
    DSCN0234.jpg
    38.7 KB · Views: 551
  • DSCN0235.jpg
    DSCN0235.jpg
    48.7 KB · Views: 548
Today's project was the third brake light (LED}, A while back I purchased a box lot of LED lights on EBay, well I finally went through them and found a 12" long brake light and said I have got to incorporate this into my build. Well this weekend was fab time for that, and the pics are here. I made a stainless housing and cover with a clear plastic lens cover. The pictures do not do it justice, man that thing is bright, and it is also a running light to.
See Ya,
Bob
 

Attachments

  • DSCN0242.jpg
    DSCN0242.jpg
    39.1 KB · Views: 469
  • DSCN0243.jpg
    DSCN0243.jpg
    35.4 KB · Views: 459
  • DSCN0241.jpg
    DSCN0241.jpg
    57.5 KB · Views: 455
  • DSCN0240.jpg
    DSCN0240.jpg
    46.6 KB · Views: 506
  • DSCN0239.jpg
    DSCN0239.jpg
    47.4 KB · Views: 598
Well the body work continues, but I did one thing that I think is a good idea for anyone to do on there build, on the rear bonnet the upper edge is very week so I cut out a cardboard template and then covered it with 3 layers of glass, What a difference that made on the rear bonnet, now it's solid and added only minimal weight to the piece.
See ya Later,
Bob
 

Attachments

  • DSCN0246.jpg
    DSCN0246.jpg
    44.5 KB · Views: 589
  • DSCN0247.jpg
    DSCN0247.jpg
    43.1 KB · Views: 594
Well it's been to long seance I,ve posted any progress on the car. I got my front and rear locating pin set up finished all made out of 304 stainless, also got the remaining pcs of the hartwell latches done, and the body work goes on. there should be a lot of pictures soon but for now here are a few
Later,
Bob
 

Attachments

  • DSCN0255.jpg
    DSCN0255.jpg
    28.6 KB · Views: 496
  • DSCN0256.jpg
    DSCN0256.jpg
    29.4 KB · Views: 509
  • DSCN0257.jpg
    DSCN0257.jpg
    36.2 KB · Views: 533
Well the body work is finally come to an end so I started to fit my door handles, the machined handle is fine but the rest of the set up is a bunch of crap! So with that in mind I spent the whole weekend building new ones.
I used the machined alum. part than made housings for them that are self contained and just bolt into the body, like a production car would have. this works much better and looks great to, at least in my opinion. It will also be much easier to just slide them in after painting rather than fighting with that old crap.
Well got to go see ya later,
Bob

PS Andy thanks for the good words
 

Attachments

  • DSCN0280.jpg
    DSCN0280.jpg
    42.4 KB · Views: 517
  • DSCN0281.jpg
    DSCN0281.jpg
    30.3 KB · Views: 479
  • DSCN0282.jpg
    DSCN0282.jpg
    33.5 KB · Views: 475
  • DSCN0283.jpg
    DSCN0283.jpg
    36 KB · Views: 463
  • DSCN0284.jpg
    DSCN0284.jpg
    29.1 KB · Views: 485
  • DSCN0285.jpg
    DSCN0285.jpg
    28.2 KB · Views: 480
Hi All,
Well the 40 is finally one color again, and it kinda looks good in black, even if it is only epoxy primer. That does however mean that I still have a lot of work to do. Oh by the way I bought a new HVLP gun, does that Rock!!! very little over spray and lays down a nice coat.
Well got to go see ya soon,
Bob
 

Attachments

  • DSCN0288.jpg
    DSCN0288.jpg
    49.7 KB · Views: 610
  • DSCN0289.jpg
    DSCN0289.jpg
    48.3 KB · Views: 546
  • DSCN0292.jpg
    DSCN0292.jpg
    46.9 KB · Views: 520
  • DSCN0291.jpg
    DSCN0291.jpg
    46.4 KB · Views: 487
  • DSCN0290.jpg
    DSCN0290.jpg
    30.7 KB · Views: 505
Ha All,
Well the sanding is finally finished, with any luck I should be painting it in the next week or so, and yes winston was a big help.
Bob
 

Attachments

  • DSCN0301.jpg
    DSCN0301.jpg
    37.9 KB · Views: 452
  • DSCN0303.jpg
    DSCN0303.jpg
    39.5 KB · Views: 530
  • DSCN0302.jpg
    DSCN0302.jpg
    34.7 KB · Views: 482

Randy V

Moderator-Admin
Staff member
Admin
Lifetime Supporter
Great job on the door handles - they're the bane of my existence lately.. :veryangry:


Any more info on that HVLP? Cost?
 
Ha All,
Simon it's going to be ford chrome yellow with black strips. The HVLP I got from my local paint supplier it's a Devillvus gun at $139 for the two gun kit.
Thanks Guys,
Bob
 
Hello Again,
Well it is finally painted, it was a very long weekend and a lot of hours but it"s now painted, check out the pics, thanks goes out to my buddy at Knockout signs who made me up the two ford gt stripes out of paint mask, boy did that save me some time and headaches, also my friend Seth who helped me tape everything off. All said and done it turned out OK.
See ya soon,
Bob
 

Attachments

  • DSCN0306.jpg
    DSCN0306.jpg
    40.8 KB · Views: 522
  • DSCN0308.jpg
    DSCN0308.jpg
    34.9 KB · Views: 525
  • DSCN0309.jpg
    DSCN0309.jpg
    35.3 KB · Views: 523
  • DSCN0310.jpg
    DSCN0310.jpg
    35.5 KB · Views: 528
  • DSCN0311.jpg
    DSCN0311.jpg
    38.5 KB · Views: 527
Back
Top