And the insanity continues. A story of logistics..........I lived in Tampa Florida at the time and always loved the Porsche 917LH. Wanted to make a replica of one until i saw a picture of two people sitting in a 917. The cockpit is so small they were practically in each others laps. Decided to design my own car because I really like to bring a friend along. I worked with a fellow on his prototype c sports racer and learned some things about fiberglass. He built his body buck out of styrofoam. Found a great deal for styrofoam on ebay at the university of missouri located 100 miles west of St Louis, MO. Decided to go for it and I picked it up about a week later. As I drove out of town I was thinking...What the hell am I doing?? Its like 1000 miles one way. Well the foam was cheap and I said to hell with it. Road Trip!
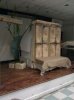
My C sport racer friend was nice enough to store it for me when I got it back to Tampa. I eventually came to the conclusion that I couldn't start the body until the chassis dimensions (wheel base, track width etc....) were finalized. Eventually figured out the dimensions on the chassis and started welding. Chassis construction on a wooden table leaves a lot to be desired. Decided to buy a heavy duty table. Found one on craigslist for 200 bucks. A 4'x8' solid steel slab 1/2 inch thick with huge square tubing for a frame is super great to weld on but super fricken heavy! Was cheap because guy selling it couldnt find anyone willing to haul it away. Was learning a lot about tig welding and things were moving along nicely until I decided to take a job in New York.
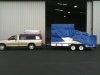
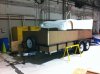
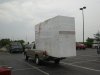
Keeping the dream alive I packed my awesome 900 pound welding table, 396 cubic feet of styrofoam and everything else I owned on a trailer and drove to Long Beach, NY. Four huge blocks of styrofoam and a 900 pound welding table are not the easiest things to own when you haven't "settled down". Foam takes up a lot of space and is not at all aerodynamic when driving down the road on a trailer. After getting about 5mpg during the move I decided I never wanted to do that again so I put the chassis on hold and started in on the body just to cut down on the shear volume of styrofoam. Had to move my whole project twice while living in New York.
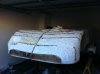
About 2/3 of the styrofoam in total was scrap after making the foundation for the buck. After trying to sell the scrap on craigslist (styrofoam is expensive) without much luck I ended up giving it to a church in the Bronx for an Easter passion play. I thought, after carrying it around for like 3 years, what a great thing for the foam to end up as! Used to construct Jerusalem and Jesus's tomb. Well as luck would have it I lost job in New York and had to move to California.
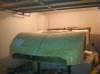
Keeping the dream alive I packed it all up again. It took 4 days to drive across country at an average speed 45 mph.......This time foam was much more aerodynamic but the table it was now sitting on had not gotten any lighter. After i arrived my project sat on my trailer under a tarp for about 6 months. Finally got settled down and project now sits in Long Beach California in a garage I got a great deal on. Workshop space in SoCal is generally not cheap. Nice thing though is the weather is good enough to work on it all year around. So after 5 or so years the "car" has about 6000 miles on it and never had an engine. Its hard to be a mobile ford motor company on wheels. The dream is still alive though! No way can I give up now! And would never even think of doing so. Got a 900 pound table to move? No problem!
My C sport racer friend was nice enough to store it for me when I got it back to Tampa. I eventually came to the conclusion that I couldn't start the body until the chassis dimensions (wheel base, track width etc....) were finalized. Eventually figured out the dimensions on the chassis and started welding. Chassis construction on a wooden table leaves a lot to be desired. Decided to buy a heavy duty table. Found one on craigslist for 200 bucks. A 4'x8' solid steel slab 1/2 inch thick with huge square tubing for a frame is super great to weld on but super fricken heavy! Was cheap because guy selling it couldnt find anyone willing to haul it away. Was learning a lot about tig welding and things were moving along nicely until I decided to take a job in New York.
Keeping the dream alive I packed my awesome 900 pound welding table, 396 cubic feet of styrofoam and everything else I owned on a trailer and drove to Long Beach, NY. Four huge blocks of styrofoam and a 900 pound welding table are not the easiest things to own when you haven't "settled down". Foam takes up a lot of space and is not at all aerodynamic when driving down the road on a trailer. After getting about 5mpg during the move I decided I never wanted to do that again so I put the chassis on hold and started in on the body just to cut down on the shear volume of styrofoam. Had to move my whole project twice while living in New York.
About 2/3 of the styrofoam in total was scrap after making the foundation for the buck. After trying to sell the scrap on craigslist (styrofoam is expensive) without much luck I ended up giving it to a church in the Bronx for an Easter passion play. I thought, after carrying it around for like 3 years, what a great thing for the foam to end up as! Used to construct Jerusalem and Jesus's tomb. Well as luck would have it I lost job in New York and had to move to California.
Keeping the dream alive I packed it all up again. It took 4 days to drive across country at an average speed 45 mph.......This time foam was much more aerodynamic but the table it was now sitting on had not gotten any lighter. After i arrived my project sat on my trailer under a tarp for about 6 months. Finally got settled down and project now sits in Long Beach California in a garage I got a great deal on. Workshop space in SoCal is generally not cheap. Nice thing though is the weather is good enough to work on it all year around. So after 5 or so years the "car" has about 6000 miles on it and never had an engine. Its hard to be a mobile ford motor company on wheels. The dream is still alive though! No way can I give up now! And would never even think of doing so. Got a 900 pound table to move? No problem!
Attachments


Last edited:
")