Chuck and Ryan's RCR Build

I was in the class that was the very last year to have shop class available to them in high school a few years ago. The program there was dismantled, the machines sold, and a computer lab installed in its place. My father had a MIG, TIG, Bridgeport, and lathe in the basement growing up, and I can't imagine growing up without them. Seeing the kind of 'engineers' that graduate from universities these days....shop class students of 10 years ago (let alone 30) would embarrass them in a test of practical knowledge.

Chuck, I saw pictures of your son's buggy in a news article online. Great work! You'd better hurry up on the '40 before he finds more expensive cars to work on....
 

Chuck

Supporter
Last moon buggy post. I promise.

Check out this video. Note the suspension.

[ame=http://www.youtube.com/watch?v=MnVrRzJdJME&feature=player_detailpage]2013 SIUC Moonbuggy at Competition - YouTube[/ame]

Now back to the GT . . . .
 

Chuck

Supporter
Headers

Been a while since we posted, but work has not stopped. This is a project we completed several months ago.

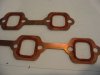
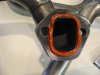
When we installed the headers the first time and snugged them up everything seemed tight. But when the engine was fired up it sounded like there was an exhaust leak – a bit more backfiring, complete with flames. We discovered slight leaks on almost all the cylinders. We found that the AFR heads are not tapped as deep as the Dart heads used on the previous engine. The exhaust system was dismantled, mating surfaces cleaned, and reassembled. We used copper gaskets and Permatex Copper Coat on both sides of the gasket, letting it set up a bit, installing it, then tightening it down after it set up overnight. And this time we filed down the ends of the ARP header bolts shortening them slightly and added washers (used with ARP header bolts) which solved the problem.

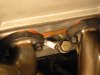
To connect the collectors to the headers on one side and tail pipes on the other, stainless steel socket head bolts and nuts were used. Once in place the bolts were tightened to pull the sections together, then loosened about a turn. A second nut was then added and tightened. Loosening the nut a turn provides room for expansion.

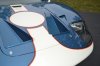
When studying photos of different original GT40s one can see that the exhaust pipes emerge from the square opening in the center of the rear of the clip at different points and varying angles. Which leads the following ‘adjustment.’

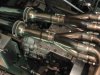
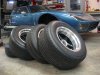
Before assembling the exhaust system we did something else. Recall the top most header just kissed the underside of the clip, which led to the addition of a shield to protect the clip detailed in a prior post. That works just fine, but adding a bit of space between the header and the clip was still desired. Before removing the headers from the prior engine a two foot section of exhaust pipe was slid over the end of each of the eight pipes and pushed downward, bending the headers a bit. This would probably be much easier on new pipes that had not been 'heat treated' with a few thousand miles driving. But it did work. This adjustment required that the support bracket mounted on the transmission be modified by lowering the resting point of the mufflers about an inch. The tail pipes emerge from the rear of the clip at the lower end of the opening rather than centered, but we don’t consider that a problem since once can see variations including our location. This helped add a bit of clearance between the clip and the header.
 

Attachments

  • HeaderGasket.JPG
    HeaderGasket.JPG
    256.4 KB · Views: 485
  • HeaderSeal.JPG
    HeaderSeal.JPG
    287.1 KB · Views: 507
  • HeaderComplete.JPG
    HeaderComplete.JPG
    287.2 KB · Views: 526
  • HeaderCollector.JPG
    HeaderCollector.JPG
    389.8 KB · Views: 761

Chuck

Supporter
Those headers look great. Where did they come from? Did you weld the bolts to them?

Those are the stainless headers provided by Fran, RCR. Bolts are not welded. Quarter inch long section of stainless tube on the header and collector through which the bolt passes.
 

Chuck

Supporter
Retired

The time comes when one should retire. After five years we decided to replace the BF Goodrich tires with their 400 tread wear and 118 mph speed rating that came with the GT and get serious:. a new set of Avons.

The Avon’s have a tread wear of 80. Our tire installer hoped we would be able to get them home before they wore out (and that was carrying them in the back of an SUV).

Front tire size: 215/60R15. Rear tire size: 295/50R15. Perfect fit.
 

Attachments

  • TiresAvon.JPG
    TiresAvon.JPG
    414 KB · Views: 591
  • TiresAvon2.JPG
    TiresAvon2.JPG
    321.5 KB · Views: 564
  • TiresSept2013.JPG
    TiresSept2013.JPG
    357.6 KB · Views: 627

Ron McCall

Supporter
Retired

The time comes when one should retire. After five years we decided to replace the BF Goodrich tires with their 400 tread wear and 118 mph speed rating that came with the GT and get serious:. a new set of Avons.

The Avon’s have a tread wear of 80. Our tire installer hoped we would be able to get them home before they wore out (and that was carrying them in the back of an SUV).

Front tire size: 215/60R15. Rear tire size: 295/50R15. Perfect fit.

It's going to feel like a new car!!! Those BFGs are pretty terrible. The Avons will last longer than you think.

What's up with the white nose?? Pics!
 

Chuck

Supporter
Fresh Paint

Hey Ron, since you asked . . .


Some years and miles had created a bit of road rash to the leading edge of the front clip. From the outset, we had contemplated adding a mustache and stripe, similar to the Shell GT40 #1036. Ford GT40 Restoration - Chassis 1036

This was a good time to do it.

Like the Shell GT40, the roundels and stripes were outlined with orange/tangerine and black stripes.

The hood roundel, mustache and stripe were painted Wimbeldon white. Vinyl roundels in Wimbeldon white are not available, so we opted to paint the hood roundel because of its close proximity to the stripe.

The side roundels, however, are vinyl appliques. We decided that their location was remote enough from the stripe to avoid clashing with the slight color variation of the stripe. Spent Saturday Afternoon putting them on after Ryan left to start his new job at Ford in Dearborn, MI.

The pattern for the hood roundel, the side roundels, and the striping were provided by Raceline Digital. Excellent work and customer support. I highly recommend them. www.racelinedigital.com

Although we have the Shell decals and other markings to simulate 1036, I am not inclined to use them since we are not trying to exactly duplicate that car, just copy the general color scheme.

I know a GT40 is never supposed to be finished, but we are about out of upgrades and changes to make to this car. So I am going to declare if FINISHED. Now if only we had another project to work on . . . .
 

Attachments

  • GT40Sept2013ACompressed.JPG
    GT40Sept2013ACompressed.JPG
    358.9 KB · Views: 597
  • GT40Sept2013BCompressed.jpg
    GT40Sept2013BCompressed.jpg
    258 KB · Views: 577
  • GT40Sept2013CCompressed.JPG
    GT40Sept2013CCompressed.JPG
    260.3 KB · Views: 556
  • GT40Sept2013DCompressed.JPG
    GT40Sept2013DCompressed.JPG
    266 KB · Views: 701
Hi Chuck. Where did you find the Avon tires in the sizes you mentioned in the US? I have been looking everywhere but have been unsuccessful to this point. Thanks!
 

Chuck

Supporter
Hi Chuck. Where did you find the Avon tires in the sizes you mentioned in the US? I have been looking everywhere but have been unsuccessful to this point. Thanks!

Two options: Sasco Sports in Alton, Virginia, or Roger Kraus Racing in Castro Valley, California. Both were able to supply them and the prices were essentially the same.

I went with Sasco because it is closer.

Regardless of the source there may be a long wait for the next shipment from England.
 
Back
Top