Chuck and Ryan's RCR Build

Chuck

Supporter
...and some Avon stencils :) Very nice Chuck, was wondering when you were going to paint.

Chris

Hey Chris: Took a bit longer to get it painted than we thought, then another several months before took the time to add your roundels on the doors.

The vertical markers you use to align the roundel with the orange and black trim stripes was helpful. Nice touch.
 

Dwight

RCR GT 40 Gulf Livery 347 Eight Stack injection
Chuck did you hook up your heater?

If so, how did you plumb it?

Thanks
Dwight
 

Chris Kouba

Supporter
I know a GT40 is never supposed to be finished, but we are about out of upgrades and changes to make to this car. So I am going to declare if FINISHED. Now if only we had another project to work on . . .

You're not done yet sir, 1036 has a little extra booty:

1036-008.jpg


Think about it...
 

Chuck

Supporter
Chuck did you hook up your heater?

If so, how did you plumb it?

Thanks
Dwight

Yes, it is hooked up.

It is detailed on the blog, but finding stuff is a bit of a pain. Here are a couple of links to pages where it was discussed.

http://www.gt40s.com/forum/gt40-build-logs/22083-chuck-ryans-rcr-build-6.html

http://www.gt40s.com/forum/gt40-build-logs/22083-chuck-ryans-rcr-build-6.html

Briefly stated, the heater hoses were tapped of of the hoses going to the in and out side of the radiator. Connecting one line at the engine would be better but would significantly complicate the install and the amount of hose running through the tunnel.


This approach does work okay, although it does not heat up as quickly since the thermostat will have to open before coolant flows.


The most important thing is getting the air purged from the heater core. It is high in the system and will require several driving cycles before it will work effectively.


Hope this helps.
 

Chuck

Supporter
Chris:

1036 has a bit more booty than we need. Our paint scheme pays homage to it but did not intend to duplicate it. Indeed, if we really wanted to duplicate 1036 a drag chute would be in the cards, and that would just be wrong on a GT 40.
 

Chuck

Supporter
Reversion Plate

Virtually all original Mark I GT40s running Webers had a reversion plate over the carbs. Different purposes for this device have been described, including keeping the mechanic’s cigarette butts out of the induction system and reducing the risk of fire. My impression is that it had a more functional purpose: to keep the ‘reversion’ gasses over the carbs to enhance the performance of the induction system.

One rarely sees a reversion plate on modern reproductions running Webers, probably because anyone that has gone through the challenge of Weber ownership wants the world to know. I can certainly relate to that notion, but we also want our GT to look as aesthetically original as possible. So we decided to add the reversion plate.

Four supports were cut from stainless steel straps, .025 x ½”, sourced from McMaster Car (part #7163), cut to 9.75 inches long. These are thin pieces, so the four sections were taped together and then cut and drilled carefully on a drill press to prevent them from bending. When in place the bottom of the reversion plate was 3 3/4 inches above the carb bodies. Of course one would have to adjust the height for their specific application to clear the rear glass. Our goal was a space of 1 inch between the opening of the carb horn and the bottom of the plate.

The reversion plate is made from aluminum with a 3/4 inch lip, painted with high temp satin black. Fran at RCR made the plate per our dimensions. Four hex head black bolts hold it in place. Note that the location of the four mounting holes will depend upon the particular intake manifold / carb location used.
 

Attachments

  • photo(2).jpg
    photo(2).jpg
    130 KB · Views: 651
  • photo(1).jpg
    photo(1).jpg
    187.6 KB · Views: 650
  • photo(3).jpg
    photo(3).jpg
    167.7 KB · Views: 735
  • photo.jpg
    photo.jpg
    135.1 KB · Views: 691
Splendid, as usual !

Another option could be using a V-shaped plate, to clear a (little) bit more the rear glass...

Here on 1074 :
 

Attachments

  • 489211.jpg
    489211.jpg
    329.5 KB · Views: 759

Chuck

Supporter
Splendid, as usual !

Another option could be using a V-shaped plate, to clear a (little) bit more the rear glass...

Here on 1074 :

The V plate follows the angle of the carbs resulting from the particular manifold used. I would expect that the air horns should be perpendicular to the reversion plate. Don't think that angle was to create clearance. Since mine are all vertical a flat reversion plate was the only option.
 

Randy V

Moderator-Admin
Staff member
Admin
Lifetime Supporter
Fabulous execution Chuck!

I also like the inlet screens!
 
Hi Chuck

Could you please tell me where you purchased the teacup filters in your carby trumpets and if different diameters are available?

Many thanks
Bill
 

Chuck

Supporter
Polycarbonate back window

The back ‘glass’ on the GT is subject to deterioration and wear. Sitting over the Weber carbs it is exposed to gas vapor that can discolor the polycarbonate. Since it is not glass it can be easily scratched. So one should expect to replace it from time to time if optical clarity is desired.

We replaced it once in the six years our GT has been on the road. The last time we used a sheet of polycarbonate 7/32” thick, because it was cheap and available locally. This time we ordered a 24” x 48” sheet from McMaster Carr, opting for “scratch and UV resistant” material. Part # 870K135. It is listed as quarter inch but is actually 15/64”. It will be interesting to see if it proves more durable than the previous polycarbonate.

The reversion plate over the Webers noted in a prior post should go a long way to extending the life of the window.

The old glass was used as a pattern for the new. The perimeter was marked with a Sharpie. It was then cut with a sabre saw using an 18 TPI metal blade along the edge of the Sharpie line so that it was just slightly over size. Next the edge was sanded with 40 grit paper on a long board, taking care to taper the edge at about a 20 degree angle all the way around. (Picture shows the angle). The edge was then finished off with 180 and finally 400 grit sandpaper. This is a slow process with repeated test fittings. Note that a bit of a gap is desirable to accommodate expansion of the material.

The holes were drilled, again using the old glass as a pattern. It is difficult to achieve a perfect alignment with the Nutserts on the clip, so some of the holes had to be carefully elongated with a small round file. The bolts covered the hole openings even with this adjustment.

I did not use a gasket or adhesive tape around the perimeter of the polycarbonate as before. The “non sticky” side of the tape will stick to the clip and pull apart. A water tight seal is of no real consequence. It is best to simply fasten it directly to the clip.
 

Attachments

  • photo.jpg
    photo.jpg
    98 KB · Views: 568
  • Cut.jpg
    Cut.jpg
    109.7 KB · Views: 541
  • Sand.jpg
    Sand.jpg
    76.1 KB · Views: 576
  • Complete.jpg
    Complete.jpg
    111.7 KB · Views: 672

Randy V

Moderator-Admin
Staff member
Admin
Lifetime Supporter
Very helpful as usual Chuck...
I have the anti-reversion plate high on my list to implement on my build.

I don't recall which mfgr it was, but someone some where along the line had offered a glass window option that was bonded to the bodywork.. I suppose that there may be enough variation in the rear clips from one mfgr to another that no single rear window option could be had to fit across the board..
 
Jim:

Will post a more objective response when time permits.


Stunning car. I originally stumbled across your build thread when I was researching Webers for my car.

Hadn't followed your progress for a while, but I spent most of the morning getting caught up on your progress. Nice to see the Webers back on. :)

I would like to hear more detail on your observations on the 'before and after' driving impressions when you have time to post them.
 
Hi Chuck and Ryan. I originally applied my Lexan engine cover window directly to the body without any gasket. It became scratched up around the perimeter from vibrating on the body. I added small black o-rings over the screws between the Lexan and the body to slightly separate the window from the body. The spacing and the O-rings are invisible and it really stops the "drumming" sound of the Lexan laying directly on the body and will stop the scratching.

Mark C.
 

Chuck

Supporter
Stunning car. I originally stumbled across your build thread when I was researching Webers for my car.

Hadn't followed your progress for a while, but I spent most of the morning getting caught up on your progress. Nice to see the Webers back on. :)

I would like to hear more detail on your observations on the 'before and after' driving impressions when you have time to post them.

Here is a summary of the results of the recent upgrades. I wrote this some time ago but never got around to posting it. Hope this answers the question in a reasonably objective fashion.

1. Suspension: Changing the springs and shocks made a noticeable difference. Contrary to expectations, increasing the spring rates to 650 front and 500 rear did not ruin the ride, since the shocks are adjustable and in the softer range will still give a rather docile feel. The GT corners flat. I suspect the stiffer shocks keep the suspension settings closer to the 'sweet spot.'

2. Steering: adding those welds and machining the steering column where it passes through the bearing took out that bit of annoying play in the steering column. The only noticeable play present now is in the quick release hub, and that is insignificant.

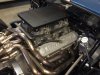
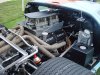
3. Engine: What can I say. Another 100 horsepower really made a difference. The power does not kick in until 3000 RPM but when it does, hold on.

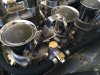
The Weber carbs came from Jim Inglese. He pre tuned them based upon the engine specs. It must be some sort of Vodoo magic, since from the driver's seat it feels like he nailed it. Our engine builder commented that they were much more 'crisp' in their response than the Holley's he was accustomed to. They start and idle promptly. The dreaded dead spot between 2500 and 3000 is inconsequential. All we had to do was balance the carbs and set the mixture screws and idle speed.

4. Instruments: The GPS speedo, with the little information window, is much easier to install and dead on accurate than mechanical systems. The data one can scroll through on that little window, like trip odometer, clock, 0-60 times, quarter mile times, and altitude, provides interesting information. The 270 degree sweep and illumination makes the gauges easy to read at a glance.

5. Fuel tanks: Ah, yes. Probably the biggest single project in this rebuild. But no regrets. Yes, we gave up some capacity (I am estimating about nine gallons per tank, eighteen gallons total). But one feels a bit more secure knowing there is a very solidly constructed fuel tank inside the sponsons. The anti slosh foam does not eliminate the rearward / foreward movement of fuel in acceleration or braking, but certainly slows it down. The electronic fuel gauge pick ups have a bit of a delay as well, so the needles do not bounce around as they would with a conventional mechanical pick up.

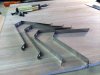
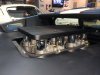
6. Expansion tank: This is what started the rebuild project. Ryan spent many hours designing and building the expansion tank to resemble the original style tank. It took a fair amount of adjusting of the coolant tubes to bring it all together. But it does not leak and going from one quart with the Canton to four quarts can only help. The Schroeder fitting which was temporarily used to compress the system while adding the coolant proved to be an excellent idea. Once filled we added little more to top it off. And the heater worked well from day one suggesting it was at least mostly if not completely bled by the compressed air. The recovery tank (the non pressurized tank connected to the expansion tank) is still in use. The coolant level typically goes up when the engine is hot and back down as it cools – working exactly as intended. Increasing the size of the expansion tank did NOT eliminate the need for the recovery tank.

7. Fan relay: The Waytek electronic fan relay that permits the engine compartment cooling fans to remain on after shut down for a pre set time period is great. Don't have to come back to the car to manually shut off the fans anymore. And using the ground as the switch point enables one to simply shut it off completely any time.

8. Avon Tires. Going from Goodrich tires with a 400 tread wear to Avons with an 80 tread wear . . . Ryan won't be braking traction in fourth gear any more.
 

Chuck

Supporter
Hi Chuck and Ryan. I originally applied my Lexan engine cover window directly to the body without any gasket. It became scratched up around the perimeter from vibrating on the body. I added small black o-rings over the screws between the Lexan and the body to slightly separate the window from the body. The spacing and the O-rings are invisible and it really stops the "drumming" sound of the Lexan laying directly on the body and will stop the scratching.

Mark C.

Small O rings. That is an excellent idea! I have not had any issues with the plexi scratching where it contacts the body, but I had searched for tiny washers just to keep things from sticking, however never found something suitable. O rings is a great solution.
 
Back
Top