You are using an out of date browser. It may not display this or other websites correctly.
You should upgrade or use an alternative browser.
You should upgrade or use an alternative browser.
Darrin's MMR BOSS based GT40
- Thread starter darrinps
- Start date
Darrin..Looking good...progress for sure. do you have the motor and gearbox ready? That will be a big step forward when it goes in.
For what its worth do yourself a favor and get rid of that 110 v work light, I have seen too many fires with those if dropped. Some of the new LED worklights are really nice, and really take a beating.
Keep posting
Cheers
Phil
For what its worth do yourself a favor and get rid of that 110 v work light, I have seen too many fires with those if dropped. Some of the new LED worklights are really nice, and really take a beating.
Keep posting
Cheers
Phil
The transaxle should be in next weekend. Coming from Scott at Advanced Automotion. It's an Audi 01E with custom first and second gears (with a 27" tire it hits 60MPH in first gear at 7100 RPM), a Wavetrac differential, and a cryogenic treatment to help strengthen it (overkill maybe, but it was reasonably priced).
The engine choice is still up in the air. My sister lives beside Jack Roush's lead tech (guy has a chassis dyno in his garage). He is supposed to call me tomorrow to talk it over. I'm going with either an Aluminator NA with Cobra Jet intake, an Aluminator NS, or a custom build Aluminator NA (from him). Goal is 500 rear wheel horsepower although I may settle for 450 or so.
I hear you on the light. It's one of the new bulbs and doesn't generate hardly any heat although I know the things are a bio hazard if broken! LOL
Darrin:
500 is not an unreasonable number for a 302, and I have a friend that just did his 65 mustang over to a 331 stroker and it is well over 400hp without getting really crazy, and I know he could get more but he also wanted a reasonably tame driver.
Sounds like that gearbox will handle the power if you don't hammer it, I have seen a lot of Audi boxes take a lot more power than they should, and I think if you are reasonable with it in 1st and 2nd gear it should hold up...a lot cheaper than my gearbox for sure.
Do you know what the final drive works out to be? I know there were a few versions of ring and pinion combos for those boxes but I am not very familiar with the specs.
I can tell you that my box has a really low 1st (2.58) and I forget what 2nd gear is but 3rd is 1.04...almost direct,... 4th and 5th are both overdrive, and much needed because the ring and pinion is 4.22. I should get a decent highway ride although I would have liked a 3.90 R & P.
Just throwing out my concern on the light....A friend of mine up the road here just burned down his garage with the car inside...he was lucky only minor burns but the light fell off the car and there you go.
Cheers
Phil
This will be running the Aluminator (strengthened Coyote) and 500 for them is pretty much commonplace (dual overhead cams really help the thing breath).
The final drive ratio according to Scott is 3.875
The speeds at 7500RPM (not quite red line, but a good shift point) with a 27" tall tire are (in MPH):
64
88
120
150
181
219
I would have liked second to be a bit taller, but that's what the only quasi custom grind I think they had without going big bucks. Was really glad to see an option to hit 60 in first though. This thing should be very quick 0-60 given that it won't need a shift.
I talked to the guy from Roush today. He suggested a Coyote specialist that he works with on side projects. Going to give him a shout in a few days then to see what he has to say.
For you folks building a Coyote/Aluminator based car, this is a pretty good write up.
Ported Coyote Heads Dyno Test - Killer Coyote Cardio - Muscle Mustangs & Fast Fords Magazine
In short, a normally aspirated Aluminator makes over 600HP at the flywheel with bolt on mods and a little CNC porting. Another article fresh out shows that the Cobra Jet intake is superior to the Boss, which is far superior to the stock one.
Here is one guy's real world results which is typical from the article I recently read:
http://www.svtperformance.com/forum...ntake-manifold-cobra-jet-intake-manifold.html
Another one here...same thing:
http://themustangsource.com/cobra-jet-vs-boss-302-intake-manifold-dyno-test-the-results-are-in-4429/
I did some digging and it looks like, unless you are going for all out high RPM power, the dual oval throttle body is the way to go. I've placed my order for the Cobra Jet intake with that. Now I'm waiting on some bids to see which way to go...get the Aluminator NA in then ship the heads for porting (either initially or after some time) or get a complete engine from the shop already ported. I was contemplating the Aluminator XS, but I think the newer CNC port jobs done are superior when coupled with the Comp Cams Stage 2 setup and you might still save a few dollars too (depending on how much of the work you do uninstalling/installing the heads).
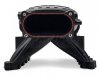
Here are a couple pics of the intake. Might end up needing to make some space for it on top as it sits higher than stock. Will see.
Ported Coyote Heads Dyno Test - Killer Coyote Cardio - Muscle Mustangs & Fast Fords Magazine
In short, a normally aspirated Aluminator makes over 600HP at the flywheel with bolt on mods and a little CNC porting. Another article fresh out shows that the Cobra Jet intake is superior to the Boss, which is far superior to the stock one.
Here is one guy's real world results which is typical from the article I recently read:
http://www.svtperformance.com/forum...ntake-manifold-cobra-jet-intake-manifold.html
Another one here...same thing:
http://themustangsource.com/cobra-jet-vs-boss-302-intake-manifold-dyno-test-the-results-are-in-4429/
I did some digging and it looks like, unless you are going for all out high RPM power, the dual oval throttle body is the way to go. I've placed my order for the Cobra Jet intake with that. Now I'm waiting on some bids to see which way to go...get the Aluminator NA in then ship the heads for porting (either initially or after some time) or get a complete engine from the shop already ported. I was contemplating the Aluminator XS, but I think the newer CNC port jobs done are superior when coupled with the Comp Cams Stage 2 setup and you might still save a few dollars too (depending on how much of the work you do uninstalling/installing the heads).
Here are a couple pics of the intake. Might end up needing to make some space for it on top as it sits higher than stock. Will see.
Attachments
Last edited:
Have a look at "Jason's Coyote Powered RCR40 Downunder".his combination makes over 500hp on a stock Aluminator, 550 with cams. Current dyno version of this engine is making 630hp 455ft/lb.
Thanks Roger. Yes, that's in line with everything I have been seeing too. The Aluminators make a bit more than the stock Coyote and when you could it with the exhaust system we use on the GT40, even stock it is really quite impressive. My goal, eventually, is 525 at the wheels.
I'll have a look at Jason's RCR (great cars I hear BTW).
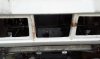
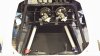
Going to need touch up paint and such but the vast majority of the brake setup is now done. Lockheed boosters fed by a Wilwood pedal assembly. The lines are hand bent by me (if you can't tell...LOL). The brackets I made too as there was no place to bolt the bottom to on the originals with the shallow ledge we have to work with.
Attachments
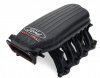
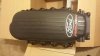
Some Ford Racing parts made it in. Cobra Jet intake and 65mm dual throttle body. The throttle body is a real work of art. Polished to a mirror finish. Now we just need to figure out how we are going to squeeze the engine in to mount these things onto!
Attachments
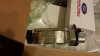
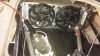
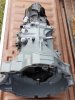
Picked up the 01E. Scott with Advanced Automotion flew it in to an airport close by. It's now at A&E Automotive (KitCarChassis) where Eric is making a cable shifter and adapter plate for it. Hope to have it in the car before the end of the year to test the fitting of everything. Gotta come up with engine placement before it can go in permanently.
Attachments
Last edited:
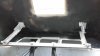
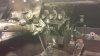
Pedals and steering in place. LOT of work when into this and it's not the prettiest thing but it won't be seen. It was made to be adjustable for other drivers but it's kind of a pain to move given the brake lines would need to be altered so it's probably just as well if I weld it all up into place. For now though the thing is as solid as can be (more so than my 370 even). There is enough room between the pedals for my fat feet and all works well. The Rattletrap on the bottom is just there to protect the Dynapad so overlook that. My plan is to add a curve to the top pipe where the driver's foot is to give some more room. There is enough there, but by the time I add a tunnel, insulate the pipes, and add carpet your foot would be rubbing the floor every time and I don't want that. My plan is to encapsulate all of the pipe inside an aluminum tunnel all the way from the fire wall to the back of the car.
Attachments
Darrin,
Do you mean the aluminum will be the finished product?? If so I think you need to rethink that. You can use pipe wrap closed cell insulation like I am using, but that may not be enough. You will transfer the heat eventually to the interior and your feet. You might have to add a layer of the Dynapad to truly insulate that tunnel. Resting your foot on the tunnel takes me back to my old 57 Chevy and the worn out hole in the carpet next to the accelerator pedal. But that came from the bottom of the shoe. not the side of it. I think when you finally finish the covering to the tunnel, a heavy grade of leather would be nice, it won't really wear if you treat it nice and give it some"hyde food".
Bill
Darrin:
I use a ceramic insulation for those tight areas....1" thick is enough to protect against a direct oxy/acetylene flame..good stuff.
I am not at the shop now but I will post up the name shortly, and if you need some pieces I have some now I could send you. We tear it in 1/2 to fit tight areas and it also has a good sound deadening value.
Cheers
Phil
Darrin:
Dsindustries.us has the insulation
DS Industries Supplies
If you can't get the small quantity you need PM me and we will do something
Cheers
Phil
Dsindustries.us has the insulation
DS Industries Supplies
If you can't get the small quantity you need PM me and we will do something
Cheers
Phil
Gosh Phil I really appreciate this!
Will check into it today.
Thanks so much!
Will check into it today.
Thanks so much!
Darrin:
Dsindustries.us has the insulation
DS Industries Supplies
If you can't get the small quantity you need PM me and we will do something
Cheers
Phil
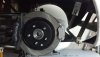
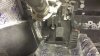
I need to trim some things, polish the metal, and change out a bolt here and there but the rear clip suspension is at least roughed in now. It works perfectly and rotates directly about the edge of the clip. Ended up using heim joints to allow for some adjustment up and down and slotted the bolt holes for fore and aft movement. Left and right can be adjusted by the bolts with washers added/subtracted (may replace the washers with a lock nut though).
Everything is done in either 6061 T6 aluminum or stainless steel. The plates that rest on the clip were drilled and slotted to allow for the epoxy to have a place to grab then glassed in on top of that. The setup is very strong and isn't overly heavy.
Everything is done in either 6061 T6 aluminum or stainless steel. The plates that rest on the clip were drilled and slotted to allow for the epoxy to have a place to grab then glassed in on top of that. The setup is very strong and isn't overly heavy.