
- Forums
- GT40 Replica Manufacturers' Corner
- RCR Forum - RCR40/SLC/917/Superlite Aero
- The SLC Clubhouse
You are using an out of date browser. It may not display this or other websites correctly.
You should upgrade or use an alternative browser.
You should upgrade or use an alternative browser.
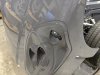
If you got enough coats of dip (7+) it will peel of in nice big chunks. If you are thin.... it's going to suck. Xylene is cheaper than GooGone. Put it in a spray bottle and coat real good, once it starts to bubble scrape off with an old credit card or hotel key.
There's plenty of coats, just with all the individual spokes it won't be fun getting between the spokes. Still worth the effort, beats having the wheels bronze past 6 months.
")
Popped off the SLC emblem since I mounted it too high so wanted to see how this one looked in that spot, still prefer the SLC letters.
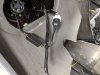
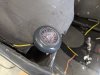
Had a chance and wired up one of my new "custom" signals and added in a Morimoto Fade-In driver, nice little detail for $2.50 and was already wiring it. Still need to mount the signal and do the other one.
Video of fade-in driver:
Had a chance and wired up one of my new "custom" signals and added in a Morimoto Fade-In driver, nice little detail for $2.50 and was already wiring it. Still need to mount the signal and do the other one.
Video of fade-in driver:
Attachments
-
 IMG_20191214_163039.jpg191.4 KB · Views: 442
 -
 IMG_20191214_163048.jpg207.5 KB · Views: 452
 -
 IMG_20191214_163102.jpg218.2 KB · Views: 421
 -
 IMG_20191214_163105.jpg202.3 KB · Views: 444
 -
 IMG_20191215_144724.jpg184.1 KB · Views: 391
 -
 IMG_20191215_144733.jpg179.2 KB · Views: 399
 -
 IMG_20191215_144749.jpg156.5 KB · Views: 399
 -
 IMG_20191215_144756.jpg165.2 KB · Views: 401
 -
 IMG_20191215_144856.jpg150 KB · Views: 381
 -
 IMG_20191215_144903.jpg153.4 KB · Views: 419
No pics, but also swapped in some Chinese 5000K LED high beam bulbs, wanted the low and high beam color temps to match. The parking lights are still ~6000K and won't match, but will keep an eye open for some 1157 Harley Davidson full amber LED signal boards that look like the current ones.
While looking I did come across a set of boards like the current ones, but with a black board. They make full red versions and 1156 versions with all amber.

While looking I did come across a set of boards like the current ones, but with a black board. They make full red versions and 1156 versions with all amber.
2x Motorcycle 2 Inch LED Inserts 1156 Socket Turn Signal Light Red Turning Lamp for sale online | eBay
Find many great new & used options and get the best deals for 2x Motorcycle 2 Inch LED Inserts 1156 Socket Turn Signal Light Red Turning Lamp at the best online prices at eBay! Free shipping for many products!
www.ebay.com
Their dip dissolver works really well too, not sure how it compares to goo gone but the dissolver is great stuff!
A few pics of it in action here: https://socalslc.com/2019/09/06/70-the-emperors-new-clothes/
A few pics of it in action here: https://socalslc.com/2019/09/06/70-the-emperors-new-clothes/
Their dip dissolver works really well too, not sure how it compares to goo gone but the dissolver is great stuff!
A few pics of it in action here: https://socalslc.com/2019/09/06/70-the-emperors-new-clothes/
Several years ago I read it was the same stuff, even looks it, but zero experience with it dissolver. The Xylene or Naptha may be equally as goods to reliquidfy the stuff. Think once I get the big parts off, pressure washer can get in between the spokes without having to rub a blister on my thumb, lol.
Well, 2 of my 3 windows are tinted and no issues. side window is straight tint, rear window is pre-tint and tint. Hindsight is I shouldn't have been honest telling them I was in no hurry for the windows. They should be all done by tomorrow, let dry over the weekend and hopefully get them in route back to me next week.
I don't think my whole idea of doing vinyl frit is do-able, least not by getting vinyl pre-cut before installation. The vinyl will need to shrink and contour the window so I'm not sure how it would be drawn in 2D so would look right. I do have some knife tape I could lay down in the right place, wrap window and peel up the tape. Feasible, but don't think I have the skills to get the vinyl to contour to these windows. When windows return, I may go talk to the guy that tinted my license plate to see if he's up to the task to do it
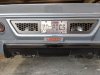
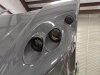
Since I'm already in middle of wiring the new signals, the 6000K color temp of the current LED boards is already bugging me. Don't know why, just looks tacky to me and I really have no reason to do it since I rarely drive at night.
Ordered the 1156 (2-wire) all amber boards and picked up this little run/brake/turn module so they will operate as a signal and parking light. It'll be wired in series with the Moritmot Fade-In driver, which could cause either of them to act wonky, time will tell. This module allows my parking light and signal to be full brightness as well, so will be bright even with the tint on the back of the projector lens. Stuff I'm doing makes no sense because I'm adding 4 modules (that could fail) to a simple circuit, even worse is I'm going from 3 wire to 2 wire which is backwards, lol. The one positive is if I like how they look, it'll be very easy to make them my DRLs and should be very noticable with the focused beam of the projector lens.
The Blinker Genie could be of some use to other builders since we are limited on options for signals and it's easier to find a decent looking 2-wire than a 3-wire signal.

 www.customled.com

Ordered the 1156 (2-wire) all amber boards and picked up this little run/brake/turn module so they will operate as a signal and parking light. It'll be wired in series with the Moritmot Fade-In driver, which could cause either of them to act wonky, time will tell. This module allows my parking light and signal to be full brightness as well, so will be bright even with the tint on the back of the projector lens. Stuff I'm doing makes no sense because I'm adding 4 modules (that could fail) to a simple circuit, even worse is I'm going from 3 wire to 2 wire which is backwards, lol. The one positive is if I like how they look, it'll be very easy to make them my DRLs and should be very noticable with the focused beam of the projector lens.
The Blinker Genie could be of some use to other builders since we are limited on options for signals and it's easier to find a decent looking 2-wire than a 3-wire signal.
Blinker Genie 2 - for Automobiles (pair)
The Blinker Genie 2 runs single-intensity automobile lamps as running and turn signals. LED or incandescent, USA-made by Custom LED.
www.customled.com
2X Bullet Style 1156 Rear Brake Light Turn Signal Light Inserts Amber For Harley | eBay
Find many great new & used options and get the best deals for 2X Bullet Style 1156 Rear Brake Light Turn Signal Light Inserts Amber For Harley at the best online prices at eBay! Free shipping for many products!
www.ebay.com
Thanks for the link! Just ordered the blinker genie 2 for my custom GTM LED taillights. Fronts are Morimoto switchbacks from theretrofitsource.com...
Welcome! Mine is due in Monday and plan to test them out, should be just what I needed.
All windows are successfully tinted and drying, should be in route to me soon.
Wife got me a set of C6 fuel rail coves for the car for Christmas, looking forward to fitting them on the car. I plan to sand smooth, fill in the embossed logos and paint body color. Haven't decided what to replace Corvette logo with, possibly Superlite lettering? Any ideas?
Hoping over next few days I'll get my wheels removed and peeled while weather has been warm (consistently had 70deg highs all week) so I can bring to get tires removed and them powdercoated. Also came across a couple of other items to get done in orange as well.
Joel K
Supporter
All windows are successfully tinted and drying, should be in route to me soon.
Wife got me a set of C6 fuel rail coves for the car for Christmas, looking forward to fitting them on the car. I plan to sand smooth, fill in the embossed logos and paint body color. Haven't decided what to replace Corvette logo with, possibly Superlite lettering? Any ideas?
Hoping over next few days I'll get my wheels removed and peeled while weather has been warm (consistently had 70deg highs all week) so I can bring to get tires removed and them powdercoated. Also came across a couple of other items to get done in orange as well.
Hi Del, looking forward to seeing the tinted windows. Also, I would think this logo would look good on the fuel rail covers...
Hi Del, looking forward to seeing the tinted windows. Also, I would think this logo would look good on the fuel rail covers...
View attachment 102874
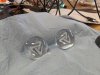
That's actually exactly the logo I've been thinking about too since there's really not Superlite logo on the car. While a decal would be very simple to do, I may take the time to draw it in 3D and get it printed to add a little more depth to things.
Joel K
Supporter
That's actually exactly the logo I've been thinking about too since there's really not Superlite logo on the car. While a decal would be very simple to do, I may take the time to draw it in 3D and get it printed to add a little more depth to things.
Del, although extremely expensive, I was thinking about that logo for the custom engraved LT4 Valve covers made by Weapon-X. But for now I have the stock plastic ones for about $50 each.
Del, although extremely expensive, I was thinking about that logo for the custom engraved LT4 Valve covers made by Weapon-X. But for now I have the stock plastic ones for about $50 each.
Had to Google them to see, yikes they aren't cheap for sure.......but man, they look awesome! I considered relocating the coil packs or Edelbrock coil covers to clean up my engine bay, but FRCs are hard to beat. Not sure when I'll get around to smoothing, filling and painting mine but it'll be on my to do list. Will have to play with some variations and sizes to see what looks best.
If you or anyone needs the file to get stuff done, I'm glad to share whatever I have.
Attachments

Johan
Supporter
Hi Joel, where did get hold of this logo? I might be interested of one.Hi Del, looking forward to seeing the tinted windows. Also, I would think this logo would look good on the fuel rail covers...
View attachment 102874
Joel K
Supporter
Hi Joel, where did get hold of this logo? I might be interested of one.
Hi Johan, I did not label that photo but I think this is Del’s design but not sure.
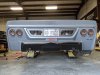
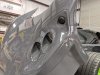
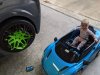
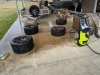
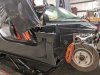
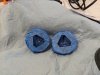
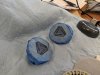
While driving the kid around, decided to take a quick break and peel one of the wheels finally. Came off in one piece, the silver ones not quite as much but still easy. This started the whole process of removing and cleaning all wheels. Soaked with GooGone one time and pressure washed the barrels and in all the nooks and crannies. Disappointed that an electric pressure washer peeled the powdercoat off every lug hole on all wheels as well as spots on the barrels. Thank goodness I had already planned to get them redone so I can have a permanent set of matching wheels finally. While I have a color picked out, I'm not 100% confident it'll look good as it's not a typical supercar wheel color....time will tell. Also getting the splitter rods and radiator box brace powdercoated illusion orange to dress up the nose a little bit. The radiator box brace may be too much, can always paint or sand blast if it is. May change out splitter rod hardware for black versions while I'm at it.
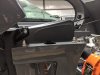
Also made some rub plates to replace the PPF. I wanted to go with HDPE, but ABS is so much cheaper so I'll see how it goes. I'll end up removing and making a little smaller I believe.
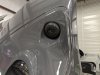
Tested the Morimoto and CustomLED modules, they don't play well together so will just use the CustomLED modules since they allow the 1156 full amber boards to operate at full brightness for both parking and signals. Won't be painting the boards black on these, looks much better behind the lens and tint as a solid color when off.
Also made some rub plates to replace the PPF. I wanted to go with HDPE, but ABS is so much cheaper so I'll see how it goes. I'll end up removing and making a little smaller I believe.
Tested the Morimoto and CustomLED modules, they don't play well together so will just use the CustomLED modules since they allow the 1156 full amber boards to operate at full brightness for both parking and signals. Won't be painting the boards black on these, looks much better behind the lens and tint as a solid color when off.
Attachments
-
 IMG_20191227_142711.jpg238.1 KB · Views: 398
 -
 IMG_20191227_150220.jpg242.2 KB · Views: 394
 -
 IMG_20191227_203122.jpg220.1 KB · Views: 409
 -
 IMG_20191228_142821.jpg273.9 KB · Views: 374
 -
 IMG_20191228_145218.jpg187.2 KB · Views: 372
 -
 IMG_20191228_145225.jpg199.3 KB · Views: 367
 -
 IMG_20191228_145230.jpg182.8 KB · Views: 357
 -
 IMG_20191228_154638.jpg202.4 KB · Views: 385
 -
 IMG_20191228_154639.jpg169 KB · Views: 374
 -
 IMG_20191228_154640.jpg224.3 KB · Views: 405
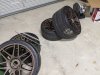
Everything dropped off yesterday. Learned powdercoat place is closed wed thru rest of the week so won't be ready until next week sometime, hopefully. Figuring out a wheel color is harder than expected when you think silver is too much contrast and don't want black. I picked the most unsupercar wheel PC color, super chrome... Kept coming back to this color, but I think it'll either look good or look bad, nothing in between. Fingers crossed it looks like it does in my head, worse case at least all 4 wheels will match and be easy to clean.
Tossed on one of the FRCs on my wife got me. Will have to do something about the red inlays ASAP.
Tossed on one of the FRCs on my wife got me. Will have to do something about the red inlays ASAP.
Attachments
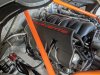
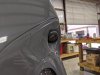
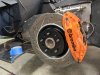
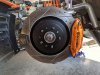
While piddling around in the shop, it's funny how you get sidetracked to do stuff you didn't plan to do while out there. Painting the rotor hats was one of those things and unsure why I didn't do this when I originally painted calipers white. I probably didn't need need to paint the face of them, but without the wheels around I wasn't sure. When I get my wheels back from powdercoat, I'm kicking around the idea to plasti-dip the barrels black to hide brake dust and road grime, just depends how much I'd need to tape off to do it as I'll be excited to see them back on the car.
Also painted the eye bolts for the splitter rods. Swapping out all the hardware for them to black SS versions and didn't have a replacement for them in black so I painted. The 4 splitter rods are with the wheels and getting powdercoated illusion orange
Was thinking of ways to hide the LED board and thought about etching the backside of the projector lens, which lead me to go ahead and etch the Superlite logo on them. I need to get the heat gun out and think the tint will stick better to the etched part.
Attachments
-
 IMG_20200104_211831.jpg233.8 KB · Views: 334
 -
 IMG_20200104_211832.jpg223.4 KB · Views: 352
 -
 IMG_20200105_132752.jpg205.3 KB · Views: 339
 -
 IMG_20200105_132753.jpg233.1 KB · Views: 386
 -
 IMG_20200105_132754.jpg201.4 KB · Views: 322
 -
 IMG_20200105_132755.jpg220.8 KB · Views: 378
 -
 IMG_20200105_142452.jpg212.8 KB · Views: 323
 -
 IMG_20200105_142756.jpg204.6 KB · Views: 343
 -
 IMG_20200105_143025.jpg201.4 KB · Views: 342
 -
 IMG_20200105_143829.jpg168.7 KB · Views: 340