
You are using an out of date browser. It may not display this or other websites correctly.
You should upgrade or use an alternative browser.
You should upgrade or use an alternative browser.
Duncans GT-Forte Scratch Build
- Thread starter Duncan
- Start date
Just take a deep breath and dive in.
The panels dragged on and on for me and the others i think... its just one of those jobs that has to be done.
Found the fourm very good for ideas and help....someone has done it all before !
Biggest issue for me was thinking about where the services and hardware go. Did not want to make and fit all the panels to find i had to drill lots of holes or remake them.
One year on and i still have a couple of small panels left to do, but nearly done.
Andrew
Sorry for lack of updates - I'll try to catch up to where I am now over the next couple of days....
*SNIP*
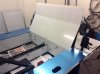
I've started on the simple interior panels, thinking I get these in place first as I'll fold the sills over the interior panels by15mm or so to meet IVA requirements. Also, they are fairly simple as I build confidence! As I've gotten to the front footwell panels I'm just tackling the first complex panel with multiple folds. Okay, but might need redoing. (unfinished in photos below)
*SNIP*
I've started on the simple interior panels, thinking I get these in place first as I'll fold the sills over the interior panels by15mm or so to meet IVA requirements. Also, they are fairly simple as I build confidence! As I've gotten to the front footwell panels I'm just tackling the first complex panel with multiple folds. Okay, but might need redoing. (unfinished in photos below)
Attachments
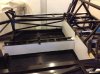

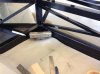
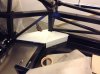
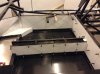
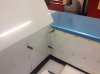
I did spend a bit of time and thought to cover the 20x20 triangulation tube in the corner of the floorpan. As I've got dropped floorpans I didn't want to put a large folded panel in to cover this up as others have done - there's no 3mm steel bar across the floor to rivet too (1.6mm steel floorpan only), and there space might be useful. I mean there's nearly 100mm of depth there, doubling the luggage space in the car! Being serious it may be a useful place for a cabin fire extinguisher on the passenger side. I also wanted it to line up with the 40x40 tube coming from the front. As you can see I added a bent ali bracket to the 20x20 tube to pack out and stiffen up the panel. This is held on with rivetnuts and the bike frame shaped panel will be riveted to it for strength. I'm thinking I may add a 3mm rubber edge strip on the edges of this panel where it touches the floorpan etc.
Think I'm going powdercoated panels (which may bankrupt me), black rivets, either acid etch and paint the sealed ali ones I have, or going non-sealed (open) rivets on the interior, and painting or leaving natural closed rivets on the outside. I release open rivets aren't quite as strong, but I figure they won't be working at UTS anyway - the silkaflex will be doing it's job and many of the sections will be panelled both sides.
Think I'm going powdercoated panels (which may bankrupt me), black rivets, either acid etch and paint the sealed ali ones I have, or going non-sealed (open) rivets on the interior, and painting or leaving natural closed rivets on the outside. I release open rivets aren't quite as strong, but I figure they won't be working at UTS anyway - the silkaflex will be doing it's job and many of the sections will be panelled both sides.
Attachments
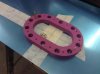
When bored in a meeting at work a couple of weeks ago I designed a jig to cut the fuel sender cutouts. I then modelled it at lunchtime and printed it on the 3d printer.
Excuse the colour, reel of filament was bought for Christmas cracker gifts! Made the right shape, with the smaller holes serving as pilot holes for drilling the rivnut holes, plus they are used to clamp the jig in place when routing the sender hole. You can see I added alignment features to line up on the construction lines. The bolts holding it in place are countersunk into the aluminium - being m3 the countersink is completely removed when drilling out for the rivnuts. Big holes just save plastic!
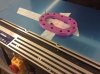
Whole lot then placed on router table with pilot hole. Used straight cutter with bearing to follow the profile. Slowest speed with plenty of cutting fluid.
Cut out, taking slowly.
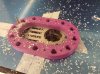
End result. Nice burr free edge. Job jobbed. Intend to use same technique for the different cut outs, more convenient than laser cutting or doing it manually.
Also got one of the interior panels drilled ready for riveting.
Excuse the colour, reel of filament was bought for Christmas cracker gifts! Made the right shape, with the smaller holes serving as pilot holes for drilling the rivnut holes, plus they are used to clamp the jig in place when routing the sender hole. You can see I added alignment features to line up on the construction lines. The bolts holding it in place are countersunk into the aluminium - being m3 the countersink is completely removed when drilling out for the rivnuts. Big holes just save plastic!
Whole lot then placed on router table with pilot hole. Used straight cutter with bearing to follow the profile. Slowest speed with plenty of cutting fluid.
Cut out, taking slowly.
End result. Nice burr free edge. Job jobbed. Intend to use same technique for the different cut outs, more convenient than laser cutting or doing it manually.
Also got one of the interior panels drilled ready for riveting.
Attachments
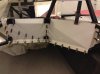
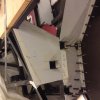
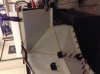
Got the main part of the rear bulkhead roughed out in one piece. Still needs cutouts for the access panel and rear window, but cut, folded and nice fit at the intersection of the cockpit/sill panels.
Had to build a big wooden folder to get the fold done + bit of wood and some "persuasion" with a mallet. Getting there though.
Now onto the front wheel well panels....
Had to build a big wooden folder to get the fold done + bit of wood and some "persuasion" with a mallet. Getting there though.
Now onto the front wheel well panels....
Attachments
Looking great there Duncan. Just a little thought: wait with riveting and sikaflex/bond until you have sorted out all your mechanicals, i.e. Steering, uprights, windshield wiper motor location, steering colounm, cooling pipes, aircon, loom location etc. Once all is sikaflexed/bonded/rivited its a real bugger to take any ally sheets off if you need to rework any brackets.
Best of luck and good times ahead.
Morten
Best of luck and good times ahead.
Morten
Duncan,
Totally agree with Mortens comments. I've actually had to remove some well places panels from being a bit over enthusiastic and getting ahead of myself.
I actually made a pigs ear of my front wheel arch panels and learnt a lot from those early mistakes. Hence, my engine bay was much better thought through and implemented.
Keep up the good work and posts.
Nick D.