Ford F3L and David Piper

Gents,
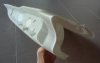
sorry for posting so late, but I had a very rough last week. Good news is that mould making is completely finished and the ply layup on the front is to 85% done. I will post some pictures of the finished part in the next few days, I hope it demoulds properly...
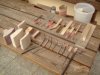
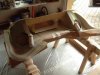
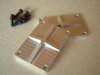
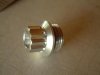
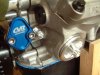
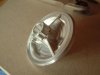
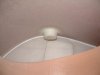
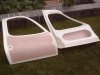
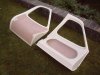
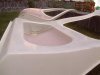
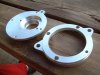
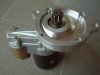
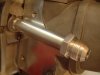
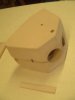
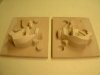
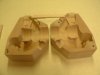
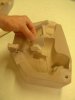
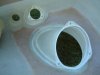
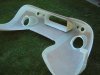
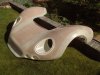
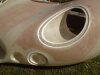
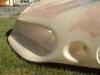
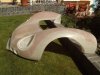
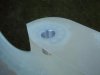
Attatched are some pictures of the rear upright model plates and the core box. The core box has five pieces with undercut which are demoulded as they split from te main part.
All parts are still awaiting fine sanding and sealing.
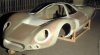
 

Attachments

  • DSCF0061.jpg
    DSCF0061.jpg
    9.7 KB · Views: 550
  • DSCF0062.jpg
    DSCF0062.jpg
    18.5 KB · Views: 659
  • DSCF0064.jpg
    DSCF0064.jpg
    19.9 KB · Views: 670
  • DSCF0066.jpg
    DSCF0066.jpg
    12.6 KB · Views: 688
..completion of the front of the F3L.

  • ~100 man hours fabrication time in honeycomb
  • 6.2kg weight less headlight bulkheads but with composite nuts and fittings
  • 11 different mould pieces to make the part in one shot
  • 7 hours of totally frustrating demoulding time (no joke), but in the end we got it out.
 

Attachments

  • DSCF0078.jpg
    DSCF0078.jpg
    32.5 KB · Views: 633
  • DSCF0079.jpg
    DSCF0079.jpg
    50 KB · Views: 609
  • DSCF0081.jpg
    DSCF0081.jpg
    52.8 KB · Views: 728
  • DSCF0082.jpg
    DSCF0082.jpg
    36.5 KB · Views: 592
  • DSCF0083.jpg
    DSCF0083.jpg
    45.5 KB · Views: 683
  • DSCF0084.jpg
    DSCF0084.jpg
    57.3 KB · Views: 603
  • DSCF0080.jpg
    DSCF0080.jpg
    15.6 KB · Views: 565
hi Leopold,

wo in Österreich geht ihr zu Werke...ich lebe im Großraum Wien ( NÖ ) & würde gerne mal Eure Fortschritte live in Augenschein nehmen. Beziehungsweise hoffe ich natürlich das Gerät irgendwann mal in Aktion zu sehen ( road legal ??? ) oder wenigstens auf ner Rennstrecke !!!
Ich wünsche gutes Gelingen & vieeeel Spaß
 
Some shots from the Silverstone Classic at the weekend.
 

Attachments

  • Silverstone Classic 2009 (63).jpg
    Silverstone Classic 2009 (63).jpg
    41.2 KB · Views: 953
  • Silverstone Classic 2009 (64).jpg
    Silverstone Classic 2009 (64).jpg
    27.9 KB · Views: 845
  • Silverstone Classic 2009 (65).jpg
    Silverstone Classic 2009 (65).jpg
    29.4 KB · Views: 905
  • Silverstone Classic 2009 (66).jpg
    Silverstone Classic 2009 (66).jpg
    47.5 KB · Views: 1,066
..thank you very much for the positive comments. Paul, good to see those pictures, I didn't know that the Alan Mann F3L would come to Silverstone. Always nice to see.

Bryan, we work at two different locations. I do all the development work in Munich where I also have my regular job. At home in Austria I do all the practical work, which is a quite good deal, by this way I can focus on both tasks very well.
If you want to spend the time to come to our place, you surely can, just keep in mind that I have very limited time at home (exactly: Winklern, Carinthia), and most of the time have to be in Munich (due to job reasons). So please don't expect much of this (at least not very soon, my schedule is explodingly full).
 
hi leo,

oh okay ( Winklern ) is the opposite direction from my place ( near vienna ) > means i have to cross the hole country....:cry:
so my only chance is to wait & watch this thread...hoping to see this car in future ( maybe on road or race track )
iám so interested in building such cars, specially from scratch - like yours, but time, space & knowlege are always to little :cry::cry::cry:
but iám happy to see other "freaks" doing my dreams, so good luck for this ongoing project >>> thats really a "NASA" job & outstanding quality....
best wishes from vienna, B.
 
Bryan,
thanks a lot for wishing us luck, that is definetly welcome. I think I have to retire after finishing this project ;), but it surely will take another one and a half years at least.
Yes, we also want to aim for a road license, but I'm sure that is gonna be a whole other story.
 
..had to do many little tasks in the mean time. So there is not much visible progress. One of the most akward jobs was fine sanding the patterns/molds. Check the picture for my in the mean time quite large selection of sanding tools ;).
I inserted the headlight bulkheads in the front, which added quite some stiffness and completes the part.
More to come.
 

Attachments

  • DSCF0093.jpg
    DSCF0093.jpg
    50.4 KB · Views: 666
  • DSCF0086.jpg
    DSCF0086.jpg
    41 KB · Views: 718
..in the mean time I fabricated the doors (inner and outer shells), I centered and glued them together today, so maybe tomorrow I am gonna be able to post some pictures of the finished doors.
I also did some metal fabrication in the mean time, because I am fed up with the composite stuff like never before.
In the pictures are the oil system plugs (for alternate feed, internal pump inlet and filter port), the customized timing chain cover for external water pump, and the plates to cover the bellhousing ports. All those alum parts are gonna be anodized and colored gold. These parts are all made manually, I didn't use any CNC technology for them.
Attatched is also a picture of the inside of the door, where you can see the gluing gap. Visible is also the pocket for the door handle and the opening for the lock.
 

Attachments

  • DSCF0094.jpg
    DSCF0094.jpg
    23.1 KB · Views: 534
  • DSCF0096.jpg
    DSCF0096.jpg
    34 KB · Views: 615
  • DSCF0109.jpg
    DSCF0109.jpg
    27.3 KB · Views: 541
  • DSCF0111.jpg
    DSCF0111.jpg
    17.1 KB · Views: 562
  • DSCF0116.jpg
    DSCF0116.jpg
    41.4 KB · Views: 675
  • DSCF0117.jpg
    DSCF0117.jpg
    25.7 KB · Views: 550
  • DSCF0122.jpg
    DSCF0122.jpg
    22 KB · Views: 533
..as promised, the pictures of the finished doors.
They surprisingly turned out very well, I am quite happy with the result.
A assembly picture of the body is on its way..
 

Attachments

  • DSCF0126.jpg
    DSCF0126.jpg
    47.6 KB · Views: 595
  • DSCF0125.jpg
    DSCF0125.jpg
    48.5 KB · Views: 532
  • DSCF0127.jpg
    DSCF0127.jpg
    29.6 KB · Views: 574
..aah, i nearly forgot:
although they weigh 1.57 and 1.55 kgs each, respectively, they have considerable stiffness (in torsion and bending).
 
sorry for the delay, but as usual I was busy fabricating stuff.
In the mean time we built a wooden pallet, to place the body parts on and thereby allow assembly. Don't be too critical, this is just very roughly assembled, so the gaps don't look very precise (but they are ;-)).

Currently i am cranking on the dashboard, the schedule says it will be finished on sunday. I will post some pictures as soon as I have demoulded and trimmed it.
 

Attachments

  • DSCF0135.jpg
    DSCF0135.jpg
    26.6 KB · Views: 1,470
  • DSCF0136.jpg
    DSCF0136.jpg
    31.6 KB · Views: 1,719
  • DSCF0151.jpg
    DSCF0151.jpg
    26.9 KB · Views: 1,099
  • DSCF0156.jpg
    DSCF0156.jpg
    36.1 KB · Views: 1,056
  • DSCF0157.jpg
    DSCF0157.jpg
    22.5 KB · Views: 984

Brian Hamilton

I'm on the verge of touching myself inappropriatel
Absolutely friggin stunning!!! This is an insanely beautiful work of art, I'm just sitting here with my mouth open in amazement. Wonderful job!!
 
Thanks a lot, guys. Well, I just discussed this assembly with my father, and the funny thing is, that our stadium of the build just looks like not much, especially if you consider that it took us two years to produce the parts in the pictures. But making the prototype tooling (the moulds) is just so much work...

Attatched some pictures of the last parts I fabricated. Dashboard, engine oil inlet extension/adapter and new starter flange to clear the dry sump connections on the oil pan. I had to make up an eccentric inner part to help adjust the play on the gear and clear the oil pan. I also had to drill some guide bushings, as, unfortunateley the ZFQ bellhousing doesn't have any means of centering the starter.
 

Attachments

  • DSCF0145.jpg
    DSCF0145.jpg
    46.8 KB · Views: 515
  • DSCF0147.jpg
    DSCF0147.jpg
    32.6 KB · Views: 594
  • DSCF0148.jpg
    DSCF0148.jpg
    32.4 KB · Views: 559
  • DSCF0161.jpg
    DSCF0161.jpg
    15.3 KB · Views: 573
  • DSCF0162.jpg
    DSCF0162.jpg
    21.8 KB · Views: 589
Back
Top