You are using an out of date browser. It may not display this or other websites correctly.
You should upgrade or use an alternative browser.
You should upgrade or use an alternative browser.
Formula Junior..Volopini replica
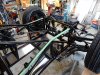
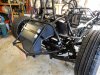
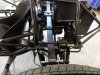
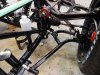
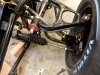
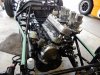
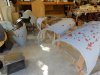
Well it`s always a pleasure bolting shiny new bits and bolts into a nicely painted frame. Got most of the running gear in place now so wiring, fuel and brakes will be next. The rear spring will need to be beefed up a little as it is softer than I had planned. The frame / wheels have aligned up really accurate, having the MX5 subframe made this a doddle. The front shocks / leverage ratio`s appear to be about right so will wait until I have the motor installed before I make any changes. Started gathering materials for the buck now which I will start once this is rolling or drivable. The green tape is to protect the paint.
Attachments

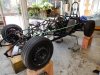
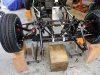
Well must be the season....looks like Santa has been, nice shiny new bits in the front now with the engine put back in the car today. I had stripped the motor down and found that it was not as good condition as hoped for so it`s now quite an expensive little block of bits. Rebore and new 1mm oversize pistons / rings, cam and big end bearings, stage 4 cam, stronger valve springs, followers re ground, head / block skimmed, all valves seats re cut and seated and a new paint job! Spent the last couple of days, quietly assembling the motor and trying to find where all the bits are. Now that its in the car, I can get back onto the body mould buck.
Anyway Merry Christmas to one and all.
Regards
Russell


Anyway Merry Christmas to one and all.
Regards
Russell
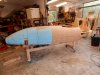
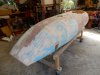
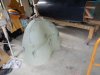
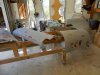
Now its time to do the dusty part, lots of sanding and shaping. Set up the profiles and planked it with strip bison board and glued it all together with Gorilla glue which expands like a foam. The curved sections turn out really strong. Once I had the nose planked on one side, I found that I was not happy with the shape. I had cut a good side profile jig from a photo I had scaled up but had to use my `eye ometer` for the top down profile. After some serious thinking it was out with the jig saw and re cut the front profiles to what I thought was better shape and then filled in the spaces with the blue construction foam that you can see. Its a very fine dense foam that is easy to sand. I was originally not going to make mold`s from the buck but will now do the full process.
The motor is back sitting in the chassis waiting for some more attention but will just have to wait. At least its rolling and the brakes are all connected.
The motor is back sitting in the chassis waiting for some more attention but will just have to wait. At least its rolling and the brakes are all connected.
Attachments
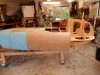
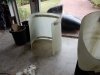
The rear section is now starting to take shape, will need a little more foam to do the tail end curves. Starting to look like a really large slug!
Amazing how you can achieve compound shapes by just forcing the appropriate curve in each strip laid down. This whole section will get a skim over to remove variations.
Cheers

Amazing how you can achieve compound shapes by just forcing the appropriate curve in each strip laid down. This whole section will get a skim over to remove variations.
Cheers
Attachments
When people ask me what I have been doing....turning tins of bondi into dust!
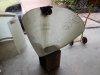
The tail section is all but shaped now and once I fill in the `hollows` will skim coat and then sand back for the mold surface.
Shame there is no market for dust.
Russell

The tail section is all but shaped now and once I fill in the `hollows` will skim coat and then sand back for the mold surface.
Shame there is no market for dust.
Russell
Attachments
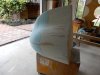
Well I have been busy, got the buck finished last week so was straight into molding. Have molded it in 4 sections and the bitch will be to get everything to line up. I will start with the tube first as that is really the key, so my chassis will just have to endure some dust for a while. Today I am doing the final part being the wind screen mounting rim on the buck before it all goes to the dump.
Might even produce a short wheelbase version!!
Might even produce a short wheelbase version!!
Attachments
Terry Oxandale
Skinny Man
Some fine work there Russell!
More cutting, itching and scratching with the engine section in place, many small cuts and test fits. The nose section is now also fitted so I have cut out the engine bonnet section so that I can fabricate the body mounts onto the chassis. The side scoops are now done on the rh side with the engine side tomorrow followed by the smaller vents on the bonnet. Starting to look like the real thing. (Beneath the dust)


Looking really good Russell.
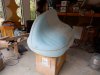
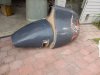
Well thank goodness...that`s all the major body fabrication done with, all vents and bits added, fuel flap in, radiator baffles in, screen surround molded, and rear clip fitted around roll bar. I have made some screw in panels to fill the gaps needed to allow the body removal past the roll bar. The electric fan will be mounted in the nose clip as there was not enough space to share behind the radiator. (Had to down size the smallest Chevy radiator to a Honda Civic one) Now its just lots of fine sanding, Duratec filler primer, undercoat and top coats. With more sanding between. The I can put the body aside, clean the dust away and get the car wired and running. Meanwhile I am chief bottle washer, cook, cleaner, wardrobe assistant, driver and dogs body for the next several weeks as my dear lady has broken her left arm badly...as if she does not have enough to deal with.
So progress will be a little slower....at least it`s now starting to look like a car. Whilst this was based on a Volopini, I have added a few touches to make it My car, a McCopy mk5
Russell


So progress will be a little slower....at least it`s now starting to look like a car. Whilst this was based on a Volopini, I have added a few touches to make it My car, a McCopy mk5
Russell
Guy`s, time for an update of sorts. With the announcement last Tuesday that we were going into lock down in 48 hours, I made sure that I had supplies for home as far as I could. On the Wednesday I thought that I should go and try for some hi build undercoat and fortunately the paint shop was open having had a record previous days trade. Well after a couple of days settling into lock down, I set up for undercoat and managed to get a good coat on the raw fibre glass using Duratec Hi Build.
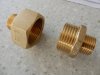
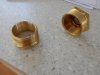
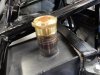
Playing with other bits I realize that I have no radiator hoses nor a fuel tank cap. I managed to create one for the sum of 10cents.
I was walking up the road for my exercise when I came across a water works truck doing a mains water leak...his truck door was open displaying all his spare brass fittings.....so I asked him if I could `borrow` a couple. So down to the shed and onto the lathe, and now you can see the results, total cost, the 10c coin filling the hole. Necessity is the mother of invention.....Now to find some 1 1/4 hose.
Meanwhile its just slowly do a little bit daily to keep the brain going, got to keep some positivity going.
Attachments
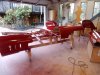
Well in these difficult times we learn what we are made of, our local area of Murray`s Bay is almost bliss. Everyone is really taking the social distancing rule very seriously and every one says hello and being super friendly. Our supermarket has returned to almost
 normal stock level`s. Respectfully to others who may be not so well placed, this is what is keeping me mentally connected, a shed full of work. Once that is all done then its time for a big clean out. I plan on doing the final undercoat tomorrow and all going well some RED next week. Stay safe.
Terry Oxandale
Skinny Man
Nothing's keeping you down (except maybe waiting for paint to dry).
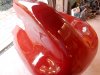
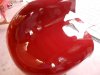
Well Terry, you are right, yes its waiting for the paint to dry time now. Choosing the red was a nightmare...he showed me a color book that had at least 500 plus shades of red, well that`s what it seemed. Trying to match the color to my photo was almost impossible so I just took pot luck with my choice which is quite a black red so I am pretty happy with the outcome. I had enough paint to give two full coats on everything, 3 coats on the nose and engine cover and have 1/2 a teaspoon left! close!