Geoff's Build Thread

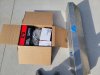
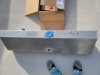
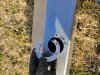
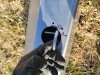
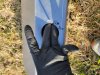
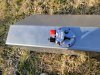
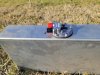
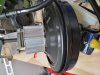
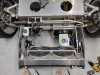
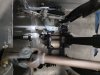
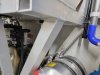
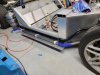
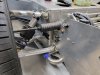
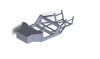
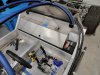
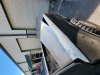
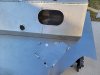
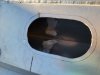
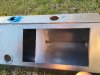
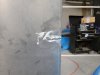
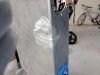
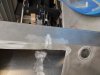
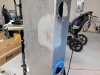
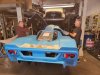
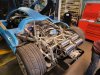
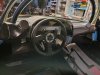
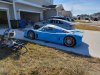
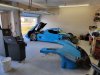
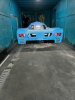
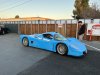
Hey everyone! I wanted to go ahead and start a build thread to log any of the work I'm doing on my SLC. I have spoken with a few of you via FB Youtube etc. and look forward to getting to know the rest of you as well. The story for my car is I found mine here on the forum as an incomplete kit. basically some body work had been done and the engine and trans set in place. LS376 crate motor mounted to a graziano 6 speed. the steering rack is mounted and the radiator and ac condensor is also in place on rubber mounting brackets. all the fab work done is really nice! I took delivery of the car 2/1/2022 and already started going over everything trying to develop a plan of action. I think the first step for me is to get all the plumbing of the car finished up. I have purchased the fuel kit parts and they should be here today. next will be the Heater plumbing and brake lines. Unfortunately it looks like the brake lines had been cut by the previous owner so ill measure up and make braided steel ptfe lines front to rear. I first went to see the car and payed a deposit back in november 2021, however I wanted to wait until the car was delivered before I created this thread as the whole venture really seemed like a bit of a dream. I cant wait to have a running and driving SLC! Here are some pictures of the current state and the delivery!
 

Attachments

  • 20211111_122933.jpg
    20211111_122933.jpg
    359.1 KB · Views: 485
  • 20211111_123136.jpg
    20211111_123136.jpg
    522.2 KB · Views: 495
  • 20211111_131437.jpg
    20211111_131437.jpg
    401.3 KB · Views: 449
  • 20211111_134825.jpg
    20211111_134825.jpg
    320.7 KB · Views: 460
  • 20220201_110239.jpg
    20220201_110239.jpg
    770.8 KB · Views: 451
  • 20220201_122447.jpg
    20220201_122447.jpg
    329.1 KB · Views: 453
  • on truck.jpg
    on truck.jpg
    287.4 KB · Views: 446
  • side view.jpg
    side view.jpg
    551.6 KB · Views: 488

Brian Kissel

Staff member
Admin
Lifetime Supporter
Nice introduction Geoff. Congratulations on your purchase. I will be following your build closely.
Enjoy the forum.

Regards Brian
 

Ken Roberts

Supporter
Looking forward to following along Geoff. I would definitely rethink the brake lines. Teflon lined hose the full length of the car would give you spongy brakes. I highly recommend copper/nickel brake tubing. Easy to flair and bend. Plus it will not corrode.
 
Looking forward to following along Geoff. I would definitely rethink the brake lines. Teflon lined hose the full length of the car would give you spongy brakes. I highly recommend copper/nickel brake tubing. Easy to flair and bend. Plus it will not corrode.
Thanks Ken I'm excited to dig into it. As for the brakes, actually that's not the case Braided steel brake lines have long been the choice for racing applications due to their high flexibility, resistance to swell and firm braking. There's no compromise to braking feel, the only compromise would be price haha.
 

Ken Roberts

Supporter
That is a true statement for the short jumper lines at the brake calipers, pedal assembly and clutch. Stainless braided teflon lined hoses are what we all use. All these hoses (except the clutch) must be certified (fmvss) for use on public roads in North America. You’ll never get that certification for the lengths needed to plumb the whole car. I wouldn’t make up any brake hose myself. It should be done professionally, tested and certified.
 

Kyle

Supporter
Can’t speak for the certification as it depends what state you’re in. However I would also do copper nickel. Super cheap, easy to bend and flare. I have a professional flare tool if you change your mind and would like to borrow it.

Whats Up with the exhaust? How does that flow?

I’ve long debated about splitting that long tail spoiler, your pictures make me nearly 99% set in doing it.
 
That is a true statement for the short jumper lines at the brake calipers, pedal assembly and clutch. Stainless braided teflon lined hoses are what we all use. All these hoses (except the clutch) must be certified (fmvss) for use on public roads in North America. You’ll never get that certification for the lengths needed to plumb the whole car. I wouldn’t make up any brake hose myself. It should be done professionally, tested and certified.

I was an engineer for Staubli and we designed and did the Brake components for Ferrari's Formula 1 team. Per the spec we used 3AN connections for the lines and Invented the dry break brake line quick connect for their braided lines to change lines quickly without needing to bleed the brakes during a race. In fact now used by almost every Formula 1 team on the track, They paid $1000 per connection point in the lines. I managed to save a few and theyll be going on the SLC too :)....We also use them heavily on every RX7 racecar I used to build. Delete the crappy ABS, replace the lines with Braided steel, so i have quite a bit of professional experience with them and I'm comfortable enough to continue in my preferred method, but i do appreciate the concern. If its good enough for Ferrari its good enough for me :).
 

Attachments

  • 20220202_175557.jpg
    20220202_175557.jpg
    158.4 KB · Views: 463
Can’t speak for the certification as it depends what state you’re in. However I would also do copper nickel. Super cheap, easy to bend and flare. I have a professional flare tool if you change your mind and would like to borrow it.

Whats Up with the exhaust? How does that flow?

I’ve long debated about splitting that long tail spoiler, your pictures make me nearly 99% set in doing it.
Thanks Kyle I appreciate it, Ill let you know if i change direction!
 
I got a goody box from Summit today with the necessary parts to start on the fuel system. Im opting to use an in tank sending unit and Ill be cutting a standard 6 x 10 service port in the tank to weld some baffling and fuel doors to prevent fuel starvation. It will be mostly a street car but i often spend an afternoon in the twisties of tale of the dragon so will be doing some slosh testing. However the pump is attached to some hydromat and with the in tank work it should be very solid. Heres a video and some pictuires of the beautiful 70 degree weather work from this afternoon. I was pretty picky about the fitment of the fuel hat and im really happy with how it turned out. Its a perfect fit for the top of the Fuel tank.


Attachments

  • 20220202_154734.jpg
    20220202_154734.jpg
    693.7 KB · Views: 357
  • 20220202_160515.jpg
    20220202_160515.jpg
    480.2 KB · Views: 327
  • 20220202_163248.jpg
    20220202_163248.jpg
    545.7 KB · Views: 325
  • 20220202_163301.jpg
    20220202_163301.jpg
    469.9 KB · Views: 373
  • 20220202_163325.jpg
    20220202_163325.jpg
    438.5 KB · Views: 293
  • 20220202_163628.jpg
    20220202_163628.jpg
    584.5 KB · Views: 302
  • 20220202_163638.jpg
    20220202_163638.jpg
    572.9 KB · Views: 372

Neil

Supporter
I got a goody box from Summit today with the necessary parts to start on the fuel system. Im opting to use an in tank sending unit and Ill be cutting a standard 6 x 10 service port in the tank to weld some baffling and fuel doors to prevent fuel starvation. It will be mostly a street car but i often spend an afternoon in the twisties of tale of the dragon so will be doing some slosh testing. However the pump is attached to some hydromat and with the in tank work it should be very solid. Heres a video and some pictuires of the beautiful 70 degree weather work from this afternoon. I was pretty picky about the fitment of the fuel hat and im really happy with how it turned out. Its a perfect fit for the top of the Fuel tank.

You will install Riv-Nuts to secure the sender fasteners, right?
 

Neil

Supporter
That C-backup plate should do fine. BTW, closed-end Rivnuts are available and would also be OK with some sealant around the OD when installing them. A gasket would be used as well.
 
Going to be backlogging some of the work i was doing while waiting on the kit to arrive. I decided pretty early on that I wanted to eliminate many of the push buttons and toggles from the dash for things like heater controls door actuator open and close etc. so I decided to builds a headunit that would have android Auto as well as a screen that controls my a/c system and blower motor. I found a good heater bypass valve that works well with an LS setup where you cant block the flow of coolant, and its pwm controlled for controlling the amount of coolant going to the heater core instead of potentiometer controlled, and the best part is its a factory ford part that cost me less than $20! perfect, so i wrote a bit of code and picked one up and the valve worked perfect. Heres a youtube video i did on the valve itself and controlling it.


The second part was developing a head unit that would controll it. So heres a couple videos on the development of the head unit itself. I built it using a raspberry pi and 7" touch screen.


and finally a video of the complete software

 
Furthering the conversation on thermoplastic brake lines and to eliminate any confusion for anyone who finds this post at a later date, here's the definitive pressure ratings on parkers thermoplastic hydraulic lines. On page 72 you can find that a 1/8 hose with a single layer reinforcement braid has an operating pressure of close to 6000 psi. If you read the entire handbook it explains negligible swell at operating pressure. Aka you will not have a soft brake pedal using a braised steel PTFE line, as braking pressures are typically under 1000 psi but certainly don't exceed 6000psi.

https://www.parker.com › CA...PDF
CAT 4900 - Parker Hannifin
 
Continued the plumbing of the various systems this weekend, and i have a brake booster in place which fits very nicely. Its off of a sport model mini cooper and the master cylinder was designed forthe 6 pot Brembo system so i feel like it will work just fine. IIRC its a 1 inch bore master and of similar design to the camaro master cylinder. The booster comes with a firewall spacer attached via a double sided tape gasket. it came right off with a screw driver and behold, the bolts through the spacer were fully threaded so just cut them to a manageable length and you are good to go! it fits nicely with the extended footbox. Ill be using an adjustable proportioning valve in conjunction with this setup. A also have designed a linkage system that mounts to the back of the brake pedal in place of the dual master cylinders to reduce the brake pedal ratios to an acceptable range and since the mini cooper brake booster comes with a rod end connected it will be a simple matter of connecting the 2.

I have also mounted the heater core lines and the heater control valve. Im waiting on insulating sleeve for the lines to arrive. I was able to press out the factory water heater ports on the LS water pump housing and thread in some AN fittings to use with parker push lok hose and hose ends. I dont like the port configuration of the firewall A/C bulkhead(as it sits its a #10, #6 #10 #10 config and Ill be replacing with a #6 #10 #10 #10 to swith the placement of the lines. Four seasons makes some very neat A/C male insert to-ring to JIC flare converters which i used to convert the A/C #10 lines for the heater lines to -10 AN seeing as the thread on both patterns is actually the same.
 

Attachments

  • 20220206_142411.jpg
    20220206_142411.jpg
    329.1 KB · Views: 353
  • 20220207_113615.jpg
    20220207_113615.jpg
    499.9 KB · Views: 334
  • 20220207_113648.jpg
    20220207_113648.jpg
    251.5 KB · Views: 322
  • 20220207_115954.jpg
    20220207_115954.jpg
    241.3 KB · Views: 344
  • 20220207_120022.jpg
    20220207_120022.jpg
    429.5 KB · Views: 331
  • 20220207_120046.jpg
    20220207_120046.jpg
    331.4 KB · Views: 358
I think i saw this on an RX7 forum. I could be convinced to sell my FD to start one of these builds. I have been reading all these threads. Excited to see the progress you're making on yours.
 
I think i saw this on an RX7 forum. I could be convinced to sell my FD to start one of these builds. I have been reading all these threads. Excited to see the progress you're making on yours.

maybe! I'm a mod on some of the forums. I'm the go to cluster repair guy so you may have seen my posts around. I dont think ill ever be able to pull out of the rx7 world lol
 
Havnt had much time until this week to make much progress on the car. Ive got the brake system 95% complete at this point but i decided to take a bunch of time and careful measurments of the chassis to create a solidworks file so i can start building virtually before purchasing parts. Ive ordered and reording things 2 and 3 times because i didnt like little particulars, so in order to keep that from ballooning in the future i figured the CAD route would be preferrable. I may end up measuring suspension components as well to complete a "rolling chassis" model for now its all measured and checked and accutrate to a 16th of an inch for now.

I also decided to go ahead and chop the fuel tank up to make the internal modifications i need so i went to my local supplier and picked up a 4x8 sheet of 1/8 aluminum which ill use for close out panels firewall etc and got the jig saw out. I didn't realize that there was already some baffling in the tank and i accidently hit it with the saw when cutting my 24 bolt 6x10 opening so i ended up having to cut the welds out from the outside of the tank and remove the baffle then weld the tank back up. 4 hours i didnt want to spend but its done and ready for my internal surge tank and Holley fuel mat. Silver lining is i finally got to unpack the new Vulcan protig 205 i picked up last summer at a super discount to replace my lincoln squarewave 200. I have to say i link it better than the lincoln. much better settings etc. Butt hats all the updates for now.
 

Attachments

  • Solidworks chassis.png
    Solidworks chassis.png
    876.3 KB · Views: 272
  • 20220228_205758.jpg
    20220228_205758.jpg
    423.9 KB · Views: 264
  • 20220301_125701.jpg
    20220301_125701.jpg
    542.7 KB · Views: 254
  • 20220301_173132.jpg
    20220301_173132.jpg
    471.4 KB · Views: 225
  • 20220301_173142.jpg
    20220301_173142.jpg
    252.2 KB · Views: 366
  • 20220301_175823.jpg
    20220301_175823.jpg
    423.2 KB · Views: 207
  • 20220301_192722.jpg
    20220301_192722.jpg
    347.2 KB · Views: 209
  • 20220301_193230.jpg
    20220301_193230.jpg
    273.5 KB · Views: 189
  • 20220301_194637.jpg
    20220301_194637.jpg
    351.1 KB · Views: 194
  • 20220301_195455.jpg
    20220301_195455.jpg
    318.4 KB · Views: 197
Back
Top