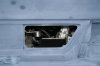
Here are some pic’s of the oil cooler brackets I made with two Setrab 625 coolers. I drew these up in CAD and had them water jet cut then welded them together they worked out quite well. Fran had mentioned in a earlier post it would be wise to rubber mount them. So I got on Ebay and found some Vibration isolators that fit the bill perfectly. I spoke with the Tech’s at Setrab to see if there could be any other issues with the way I installed them as I don’t want a catastrophic failure that will take out my motor. So they wanted pictures of the car, some details of the engine and some showing how I had place them. Here’s their reply “ Very cool car never seen one before what is it called, please send us pictures when its done, we want to use it for a newsletter.” Hmmm So Im guessing they should be ok, LOL.

- Forums
- GT40 Replica Manufacturers' Corner
- RCR Forum - RCR40/SLC/917/Superlite Aero
- The SLC Clubhouse
You are using an out of date browser. It may not display this or other websites correctly.
You should upgrade or use an alternative browser.
You should upgrade or use an alternative browser.
Grant's SL-C Build tread
- Thread starter deadshot
- Start date
Ken Roberts
Supporter
Thanks for sharing Grant. I'm using the same style of Moroso coolant tank and overflow tank as you in almost the same areas.
Don't cap the heater outlet 10AN fittings on the water pump. They must be hooked in a loop for correct operation of the coolant system.
Don't cap the heater outlet 10AN fittings on the water pump. They must be hooked in a loop for correct operation of the coolant system.

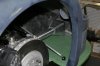
I made some Alum. Sq to round tubes to direct the air flow from the front clip to my front Calipers, these will be a two piece deal when completed. The long tubes will be permanently mounted into the front clip and will terminate flush with the inner wheel well. I will have second short stub tube mounted to the rear of front splitter in line with the long tubes where the Flex hose will be attached, so I will not have to disconnect the hoses when I remove the front clip. I will post more pic's of this when I receive the Brake ducts from Toby at CRC He's made a few of them, knows all the angles and where to put the holes and the price was right so what the heck I can't have all the fun.
Attachments
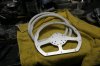
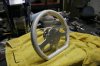
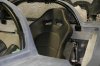
Steering wheel this has been a hot topic lately on the forum. I like the old school race wheel look and could not find anything that suited my needs I wanted it to have a flat bottom for leg room and it needed to have eight buttons, horn, start engine, four for the digi dash, one for lift up and one for down. I didn’t want to have go searching for those buttons on my dash or console.
So eventually I gave up looking and just made one, here what its looks so far but it will get the buttons soon as I just received them from China a couple of days ago, good old Ebay, then I will sew some leather on to it and wire in the relays with a quick disconnect coil cord. And Hopefully everything will work as it is a Sh*t load of work for a steering wheel LOL.
So eventually I gave up looking and just made one, here what its looks so far but it will get the buttons soon as I just received them from China a couple of days ago, good old Ebay, then I will sew some leather on to it and wire in the relays with a quick disconnect coil cord. And Hopefully everything will work as it is a Sh*t load of work for a steering wheel LOL.
Attachments
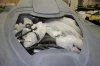
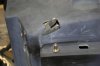
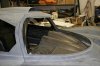
Body work, I choose to do this work myself but while I was doing It had wished I left it for Fran’s guys, I still Etch from time to time. but now that the hard parts are mostly done I am glad I did it. It made me have to do some thinking, not ever seeing a SL-C in person before made poking the hinges in a bit the challenge, and the Aero latches are time consuming but doing this work does give you more control over the way your cut outs are done and lets you radius all your corners. We had some very hot days here in the summer which helped very much to see if there were any air pockets in the gel coat. Pretty hard to find an oven that will fit a car and waving a heat gun around for hours isn’t much fun. After that, I blocked the whole car out with 180 grit and yes I blew through the gel coat numerous times. I was not worried as I will be coating it with an epoxy high build primer and blocking it out a few more times before I paint it. It will be flat and I am hoping not to have any fiberglass telegraph through the primer into the paint as I want a glass like finish.
Attachments
Great work so far.
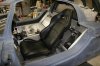
Seats this is still an issue for me. I couldn’t fit into the factory seats even if I lost 100 lbs, it just the way I was made. I am wide, not fat, just wide. I did find a seat that fits into the car. Its a World Performance Pro car seat. They are nice and are about as big as you can go and still fit it in there.
I had the bottom of the seat scooped out so your just off the floor and as much off the sides as you could go without chopping into the actual body. I don’t know if I am still quite happy as I have over a hundred G’s into this and I wanna be real comfortable, I am thinking this may be another custom deal where I am going to have to build my own. I am still looking as I don’t really wanna have to do this if I don’t have to. I will use these for now and who knows what may come along. If someone is interested in them I may let them go and I just get started on some XL gentleman seats. :cry2:
I had the bottom of the seat scooped out so your just off the floor and as much off the sides as you could go without chopping into the actual body. I don’t know if I am still quite happy as I have over a hundred G’s into this and I wanna be real comfortable, I am thinking this may be another custom deal where I am going to have to build my own. I am still looking as I don’t really wanna have to do this if I don’t have to. I will use these for now and who knows what may come along. If someone is interested in them I may let them go and I just get started on some XL gentleman seats. :cry2:
Attachments
Thanks for sharing Grant. I'm using the same style of Moroso coolant tank and overflow tank as you in almost the same areas.
Don't cap the heater outlet 10AN fittings on the water pump. They must be hooked in a loop for correct operation of the coolant system.
Hi Ken I am not doubting you but could you elaborate on this ? I wasn't sure myself and had asked if I could do this before I did it, and was told it should not be a problem, But that doesnt mean they were right either.
So what will happen slow warm up ?? or does it need this to bypass until the thermostat opens ???
Thanks
Grant
I forget why now, but he's right - on an LS loop them together. There's a common hose part # available that will do it.
Supposedly NAPA
Part Number: NBH 10743
Product Line: NAPA Belts & Hoses
Don't know about Napa, but Dayco # 87629 works.
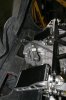
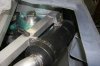
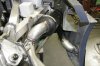
For the A/C compressor pump I used the factory CTS-V pump mount. Welded a small block of Alum to the top as a Hinge and made a small turn buckle which fit nicely into the cavity at the bottom of the mount which allows it to hinge as it tensions the belt its nice because it is all one piece and looks factory. Also there is a flat spot on the bottom of the mount that helps to keep your oil hoses away from the pump and the exhaust if you are using a dry sump system.
Grant - nice thinking on this. I'm using the CTS-V mount also but have been battling finding a way to use the CTS stock compressor (10S17F) unit and I also have the SD508. Alan Grove's mounts will not work with the LS3 stock damper. The 10s17f fits with the CTS-V mount but I've had a little issue finding the compressor manifold/fittings that will work. Bought some a/m fittings from a place in Florida (Nostalgic Air) - they don't appear to fit though?
Is that a SD7 compressor you are using and how is the belt alignment.
Seeing all your fab/welding skills makes me want to go out and buy a welder and learn how to use it. Any recommendations on a good "starter" welder that's affordable. PM me if you don't want to clog up your thread with welder info. --- Sharkey
Last edited:
Mike I have a Square Wave TIG 175 TIG Lincoln Welder, and a Ltec / ESAB prest-o-weld 130 mig welder.
The mig I have had for 20 plus years and never had any issues works great for small stuff up to 1/4" max.
The tig I bought because I got a smoking deal on it and its has worked great as well. I would stick to Miller or Lincoln they are good quality and later if you decide you no longer need them you will be able sell them easily. This Tig when used on the thicker Alum 3/16" and up uses a fair bit of power so you will need a pretty hefty breaker I have a 40 amp and it will kick out if I get on the pedal hard, stainless and carbon no problem. If I had the money I would buy a Miller Dynasty 200 its more portable and will do up to 1/4" Alum. no problem.
The compressor is a Sanden SD7 04670- MTA I left some room on both sides of the hinge so I could move the compressor back and forth for exact alignment and use bushings to take up the space's left over.
Last edited:
Thanks Grant - looks like the Miller Diversion 180 TIG Welder 907460 Miller Diversion 180 TIG Welder 907460 - will do most everything I'd need & more.
I'll figure out this HVAC issue before it gets hot again - don't need A/C in the winter!
I'll figure out this HVAC issue before it gets hot again - don't need A/C in the winter!
Thanks Grant - looks like the Miller Diversion 180 TIG Welder 907460 Miller Diversion 180 TIG Welder 907460 - will do most everything I'd need & more.
The import factor is the duty cycle, that has only a 20% duty cycle
so it is a light duty machine, but you'll be ok with anything you need to build for the car. You'll have fun with it, just don't tell your friends with boats you have one lol.
Seymour Snerd
Lifetime Supporter
Thanks Grant - looks like the Miller Diversion 180 TIG Welder 907460 Miller Diversion 180 TIG Welder 907460 - will do most everything I'd need & more.
The import factor is the duty cycle, that has only a 20% duty cycle
so it is a light duty machine, but you'll be ok with anything you need to build for the car. You'll have fun with it, just don't tell your friends with boats you have one lol.
I have one and I love it, but it also is a bit "dumbed down" in that it does not trouble you with knobs for things like AC Balance or Pulse mode that can come in handy. The upshot being that if I had it to do over again I might go with one that's a bit less of an "automatic transmission" such an Everlast which is typically quite a bit less expensive (amp for amp) than a Miller Dynasty, or one of the more expensive Millers, just so I had a bit more control over what I'm doing.
For example: Tig Welder Demo
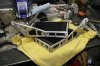
Exhaust I wanted something quiet, So I looked around for a long while searching for something that was quite yet wouldn’t kill HP and decided on the Hush powder from Flow master I made some cardboard mufflers of there largest muffler. Here’s where I am with it so far. I used the factory LS7 manifolds, 16 pc’s 3” 90 degree short radius mandrel bends on a 6” CLR I couldn’t get 180’s
Two Stainless exhaust flexors and two 3” flange couplers, Four 6” HD SS hose clamps, 7’ of 3” exhaust tube and some custom made clamp brackets. After the first start up if there are no rattle issues they will then be sent out for the ceramic coating.
Also with these Flowmaster mufflers they have a cool can technology so they shouldn't be much heat radiating from them.
Attachments

Exhaust I wanted something quiet, So I looked around for a long while searching for something that was quite yet wouldn’t kill HP and decided on the Hush powder from Flow master I made some cardboard mufflers of there largest muffler. Here’s where I am with it so far. I used the factory LS7 manifolds, 16 pc’s 3” 90 degree short radius mandrel bends on a 6” CLR I couldn’t get 180’s
Two Stainless exhaust flexors and two 3” flange couplers, Four 6” HD SS hose clamps, 7’ of 3” exhaust tube and some custom made clamp brackets. After the first start up if there are no rattle issues they will then be sent out for the ceramic coating.
Also with these Flowmaster mufflers they have a cool can technology so they shouldn't be much heat radiating from them.
Perfect for side exit exhaust. Well done
Similar threads
- Replies
- 2
- Views
- 1K