
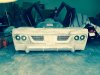
after spending a few weeks on body work, I sent the car to a friend of mine Ken Raichel to get the body fitting closer to perfect. Ken might be one the the best body guys in Western Canada I was lucky to have been able to get him to work on it as he's very much in demand 90 hours later he had it in Primer and looking like it should. I will take it back to him for the final sand and paint.
What's all that white stuff on the ground?


 leased:


")
