Gt 40 steering wheel badge

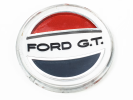
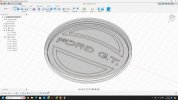
I believed that the "engraving" was done from the backside and the front of the badge being a smooth finish, with radius as shown above.
-They could be 3D printed with clear filament (and painted later) but the finish would probably be a bit too rough.
-They could be cnc machined in plexiglass, lexan or similar but seems a bit overboard?

I guess that some sort of metallic tooling to form or cast clear plastic would be the way to go if one it to make more than one piece?
 
Found these two pictures from a Mecum auction in 2020 - with a supposed original piece. Had never seen the backside. So either they were plastic molded and then painted on the front or a cast metal part and painted. Or were they metal with some form of backed enamel finish such as a jewelry maker would do? ERA also made their own in this style but with E.R.A. on it. Could ask Bob Putnam what they used.
 

Attachments

  • Real front one.png
    Real front one.png
    1 MB · Views: 64
  • Real back one.png
    Real back one.png
    777 KB · Views: 48
Ole, Lee, you are right. The technology that I described is built from btootm to top. But I never see such a part. What you describe rerquires plastic injection and coloration is made from the back. It is not possible to use plastic with cnc machining because it will not be shiny but mat, and it is not possible to polish a recess.
 
The originals were injection molded plastic. I've been trying to make one of these for my own car for some time now. If and when I'm able to make or buy a badge I've solved one of the biggest problems I had, the chrome finish. Forever getting plastic to look like chrome for us poor folk has basically been impossible. I found a product that adds a very nice chrome finish to plastic. It only works when applied to the back side of the piece. I found another product that's pretty good if the chrome finish has to be on the front. That's the pen in the bottom of the picture. I did a quick test on an old tape dispenser and that was without the black paint on the back side. The bottom picture is one a resin printed. Not good enough for prime time but not bad. The layer line are still to thick but SLA printing is getting better all the time. We just need a Star Trek replicator. Maybe Jean-Marc has a better way to do chrome on plastic short of vapor deposition.

20240227_154705~2.jpg

20240227_155106~2.jpg
20221207_143018-001.jpg
 
Last edited:
Douglas great work. I got about as far as you did but without the original drawings. In Fusion 360 you can add draft to the vertical parts of a mold say 3° so the part will release when molded. I couldn't get Fusion to add the draft to the curved parts because the weren't flat. Hope you can figure it out.

I'm sure most of this will be old news to many but I wanted to pass along what I've learned so we're all on the same page. So It took me a while to figure out that front of the badge is flat and what you drew is the detail part of the back side of the mold that made the original badges. Hope that made sense. All the colors and chrome are on the back side of a clear piece of plastic. Covered over with silver paint. If you look around car manufactures have been making badges like these for a very long time. The new 8K 3D resin printers might make an acceptable badge but I think I'll have to make a mold in the end.

If you look at the side view picture you can see where they cut off the sprue. BTW I like you had the periods square for some time but I think there were round, well maybe.


DSCF5015.jpg

DSCF5014-001.jpg


IMG_0339.jpg


DSCF5013.jpg
 
Last edited:
Richard,

I was half asleep when I was doing this lat night and are correct..I didnt notice the periods. It doesn't show it on those pictures, but the back side is extruded on the letters and half moon parts..

I also understand that I do not have an original, and have no issues painting tye outside parts and clear coating and not having a precise remake of an original.

I have purchased one from a GT40 vendor once, and was not excited about the machine quality of the bezel nor the cheap sticker it came with, so I will gladly print or machine my own atbthis point.
 
Last edited:
My son printed one of my designs on his resin printer. As you can see the front side is rough but the back looked really good except for the layer lines. A little sanding took care of the front. I guess if I want to make only one and didn't mind a lot of hand work this process could work. The lower picture is what it looked like with a little paint. The layer lines show up in the chrome areas which would the hardest part to smooth out. A thin clear coat of paint might help to mitigate layer lines. Not great but amazing when you think it was made at home on a machine coasting less than $500. Yellowing caused by UV rays is a problem that only gets worse with age with the current resins used with SLA printers. The same goes for most of the resins used in casting. It seem the plastics they use in injection molding doesn't have that problem.

Image_20230528_1256061938748052327825541-001.jpg
20221207_143018~2 (1).jpg
 
Go without badge - it saves weight and makes you happy - even when the leather is cracked slightly ;-) !!!
 

Attachments

  • Dan-Gurney-GT40-Seminar-Amelia-Island-01.jpg
    Dan-Gurney-GT40-Seminar-Amelia-Island-01.jpg
    51.1 KB · Views: 50
  • S-Wheel-1074.jpg
    S-Wheel-1074.jpg
    153.8 KB · Views: 61
Well, Insomnia caused learning of things I haven't done in years.

Clear, Radiused on both sides, smooth on top and debossed on bottom.

Since I am waiting on my transmission and condenser for fitting things, little things like this can get attention.

So anyone who wants the STEP file PM me, or group up $5K for the molds and then each emblem is $0.27 cents.....lol. This is a joke.

SLA printer is how I'm gonna go.

I have zero issue sharing the STEP file as anything I make for myself is one off. You take it as you please and do as you like. All on the information to make the drawing was from publicly available information. This issue of an emblem has been beaten dead in many posts in the past.
 

Attachments

  • Emblem 3.0.jpg
    Emblem 3.0.jpg
    741.1 KB · Views: 59
Last edited:
Hi David, would the weight give you the answer you're looking for. A better question might be could someone with a real badge please let one of us sit down with it and take a bunch of pictures and measurements. Including weight. What might help just as much is a readable blueprint.
 
Hi Richard , weight should also work. I'd like to know if some of the DIY plastic injection parts available have the capacity to make the badge. I have found one that is 3 cubic inches .
 
I'd like to say for the record that many of the pictures I've post here were not mine. Sorry to say I didn't keep track of the people that went to the trouble of taken them. Thank you all.
 
Back
Top