Headlight installation help needed

Ken Roberts

Supporter
Looking for some advice on how to modify the low beam modules.

I understand how you are supposed to cut one of the 4 legs off each module to fit due to interference with the fiberglass (10 oclock position for left side) (2 oclock position for right side). The problem is the housing on the low beam projector module isn't the same as the housing on the high beam module.

The high beam module body is one piece while the low beam module body is made up of 2 pieces. The assembly manual shows them both being the same (one piece) (i guess they didn't use a projector low beam in the picture). The high beam module is easy to work with. Just chop off one leg, nothing else protrudes. The low beam module has more parts that need to be removed to fit where it needs to go. If you remove these parts then the two piece housing will only be held together with one bolt. The two other bolts need to be chopped off to fit. How then do you hold the housing together?

Here is the one piece body of the high beam housing...easy just chop one leg off!
004-6.jpg


Here is the 2 piece housing of the low beam. My 2 fingers and thumb are touching the areas that need to be removed for clearance (for the left side).
003-3.jpg


Here is an addition view of the differences.
001-2.jpg
 
Last edited:

Ken Roberts

Supporter
I'm guessing the only clear answer to this is to separate the two piece housing, remove the rubber/foam gasket and epoxy the halves back together permanently.
 

Ken Roberts

Supporter
Thanks for the picture Mike. I see that you mounted the low beam "projector lamp" to the outside. I'll try that position and see what needs to be cutoff.

I hate to be the bearer of bad news though..... your low beam module isn't mounted level. On the back there is a "top" mounting position written on the very back portion where the connector is. It is important that this be at the 12 oclock position due to the internals of the light assembly. There is a cutoff plate inside that limits the beam pattern. The cutoff plate must be horizontal.

I have projector lamps on my every day car and you can see how the light output is shaped and if this beam cutoff plate isn't level it will seem odd. When you pull up to a wall you'll see what I mean.
 
I didn't like how the low beams fit the cutout area so I just replaced them with another set of high beams (Hella makes 2 types of high beams - the ones Fran sends along fit well in the low beam cutout, and the second type (it has a black ring around it) fit really well in the high beam cutout area). The adjustments on them were infuriating so I glassed aluminum mounts into the body, stuck the headlights in, made sure i liked how they looked visually, then bolted down (i.e., no adjustments available on them)

Nobody will want to play highbeam war with me on the road :D
 
Stick the Hella high beam light Fran supplies into the low beam cutout
Stick this high beam module:
Susquehanna MotorSports - Auto Performance Product
In the high beam cutout.

Each will require very minor sanding of the cutout area to fit like a glove (very very minor sanding) and it will look good. Illegal, but good :)

I Know some thing about projectors. Which these head lights are. It is very important to get them installed right. Even with using normal bulbs, and the HIDs type bulbs. Weather there fixed or adjustable. A slight angle can blind the person coming at you head on. Then they could crash, Or nail you head on.

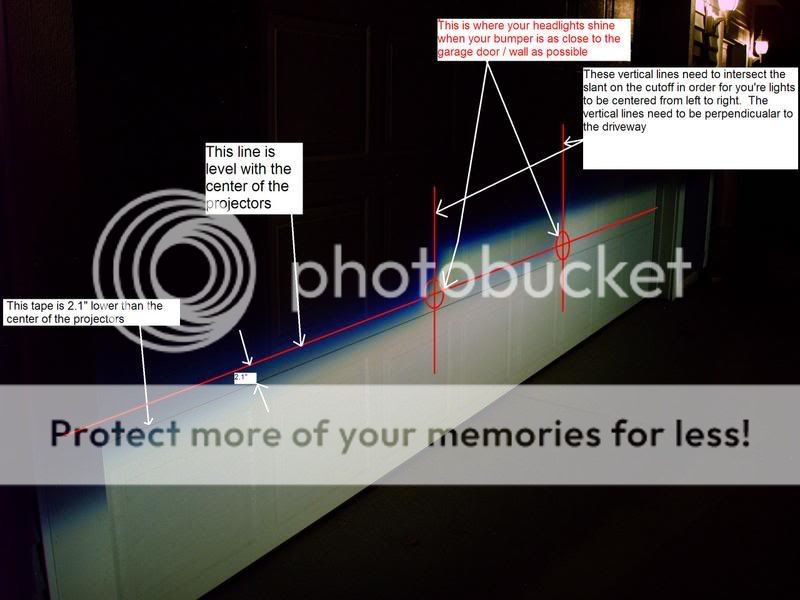
You can mount them permanent. If you do it the right way. It will take you and a buddy some time. Here is what the beam will look if mounted right. Notice there is a level cutoff. Also make sure you have them in the right side. As you can tell the shoulder side is up a little higher also.
ProjectorAiming.jpg
ProjectorAiming.jpg
 
I Know some thing about projectors. Which these head lights are. It is very important to get them installed right. Even with using normal bulbs, and the HIDs type bulbs. Weather there fixed or adjustable. A slight angle can blind the person coming at you head on. Then they could crash, Or nail you head on.

You can mount them permanent. If you do it the right way. It will take you and a buddy some time. Here is what the beam will look if mounted right. Notice there is a level cutoff. Also make sure you have them in the right side. As you can tell the shoulder side is up a little higher also.
ProjectorAiming.jpg

Too much work, I just stuck them in however they looked straight in the body. They're both high beams so I didn't care ..... if I turn on my lights in this car it's because I want to screw you over, lol
 
Mike thats not a SLC. It will vary on cars. Most of the time its about 10 feet or so. Kind of like the old school way to aim head lights. Also if you do some googling retro fitting headlights. You will find all sorts info. Retro fitting is when you take a normal head light fixture. Then you take a set of projectors, and put them in the normal fixture. Granted your not doing that. But it will be the same in a way.

Alex I like your way of thinking. I think I might have met you your American Cousin. A few years ago I was driving down the road. I saw a blinding light coming. It was a jacked up truck. With 4 off road only lights on. With driving lights aka moose lamps up there. Then the normal head lights. I had to pull over after he went by.
 
Has any one considered using the 90mm L/H beam Hella unit below. I was thinking of using this and putting a 50mm as a DRL in the small cut out.

Susquehanna MotorSports - Auto Performance Product

I like those. I have the Xenon equivalent (sort of) in my Touareg- high beam and low beam are combined in one unit, and a shutter lifts to make a high beam. In the VW, there is a separate halogen high beam to use for flashing, but by default it stays off when the high beams are selected- only the shutter on the Xenon lights comes up. This is to prolong life on the Xenon bulbs, which don't tolerate frequent start-stop cycles as well as a traditional halogen bulb.

In the SLC (at present) I have the standard 90mm low beam, and the 60mm projector high beam.

But I wonder if Wayne is gonna cause me to break out that water-cooled credit card and get a pair of the combo units above...:idea:
 
"But I wonder if Wayne is gonna cause me to break out that water-cooled credit card and get a pair of the combo units above...:idea: "

Finally, the roles have reversed.

I love spending OPM!!!:thumbsup:
 
I have some experience with retro-fitting non-projector headlights use with OEM projectors. The principle appears to be similar with the SLC in regards to the key factors including mounting method, aiming, and output.

The Hella projectors seem to have a solitary advantage, aside from price, in regards to its use with this car. The advantage is that it is a sealed unit which will function reliably outside of an enclosed/sealed headlight housing.

The SLC does not have an enclosed headlamp, meaning the rear portion behind the mounting point is open to dust, dirt, and moisture. In this situation, a standard OEM projector such as an S2000 (considered the best), TL, and most others do NOT have sealed projector casings and are designed for use in a sealed headlight unit.

I have yet to see a Hella projector even come close to the output of an OEM HID projector using proper bulbs and ballasts. I think the SLC, in most cases, deserves to have the light output and appearance consistent with your standard supercar. The way to accomplish this would be to fabricate a mount and rear shroud for the projectors. You'd have to JBQuik-weld (yes that's the best way of doing it) the projector to the mounting piece, and then adjust from there. Conversely, you can sand the rear fiberglass of the projector hole and test fit the projector to ensure it is aimed to the correct height, then rotate as needed.

Unfortunately you'll need to do this while the car is on level ground, situated exactly as you plan on driving the car. Once you can place the projector into the hole and verify everything is aligned, a small bead of JB-Quik can be used to bond the projector to the fiberglass (again, I'd recommend a solution other than JB-welding directly to the front clam).

The retrofit source sells some OEM brand projectors from cars like the Acura TL, but they also sell kits like the Mini H1 (garbage in my experience, tried a $300 kit I bought from them on several of my cars and each time it was disappointing and no better than stock Halogens). I'd recommend them for anything but the Mini H1 kit, as they are probably about as customer oriented as Fran and will answer the phone and talk you through any questions or situations. Great customer service! Their own Morimoto Ballasts are excellent quality, as are their bulbs.

If you want the best bang for your buck, I'd suggest either the TSX, TL, or FX-R v1.0 projectors. S2000 projectors have the best output, cutoff, and width but cost $400+ and are difficult to find. I ended up going with the FX-R 1.0 projectors on my daily driver and they're excellent. Width and output is just below that of the TL's (I have a 2010 TL so 100% OEM is the comparison). Its not quite as bright, but its excellent @ $160 for the two projectors. The FX-R v1.0 parts have a slight gap in the housing which allows for for heat transfer when using 55W ballasts without damaging/burning the reflector bowl finish, thus giving even more light output.

The FX-R has a less defined cutoff than the TL projectors and slightly less uniform light output (slightly brighter on centerline). The FX-R does, however, have a brilliant "flicker" and color range in the beam cutoff, ranging from pure white to purple (like Lamborghini and some other super cars).

The FX-R's are bi-xenon, so you could use two pairs between the two headlights and have a ridiculous amount of night driving visibility. I can give more info if you would like, but definitely make sure you get the v1.0 and not the later v2 or v3 (which are lower quality and overall worse output characteristics).

Here are some examples:

Color of the projector:
http://www.youtube.com/watch?NR=1&v=wjE8fU16D1Y&feature=fvwp
 
Last edited:
Back
Top