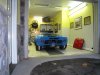
Removed the doors and moved her in. Interesting to see the relative size and to compare the shape to the Ferrari, 10 years old but more than 30 years her junior. Hard to believe how fantastic the GT40 design is after 40 years!

You are using an out of date browser. It may not display this or other websites correctly.
You should upgrade or use an alternative browser.
You should upgrade or use an alternative browser.
J. Salmon RCR-40 Build
- Thread starter salmjo1
- Start date
Actual Build Begins
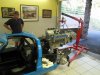
OK, so now the real fun starts. The doors are off, the next thing I will do is pull and store the front and rear clips. I will then pull the motor.
Since there are very few using an LS motor, I figure I will try to document as much as I can. Hopefully people will point out when I screw something up!
The Ricardo box is huge, so the motor is absolutely as far forward as it will go. To simplify the front of the motor, I am going go use a remote water pump from Meziere, as Ron has done. So I have already removed the factory pump. Now I have to locate the AC compressor and the alternator. Fran is working on some goodies to help with those.
In the meantime, I am afraid that when I remove the motor I will lose some relationships with the chassis, firewall, and suspension. I want to be able to at least have a rough idea if things are going to fit, so I made a template and went around and marked out distances and relationships to the firewall and such. Hopefully this will reduce the guess work when the motor is on the stand.
Attachments
Your template is a pretty good idea. I fabbed all my own brackets for my motor on a stand and just hoped everything would fit. It did but it was very close.
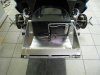
Engine out today, safely directed by my much more experienced buddy Ron. Pulled the tranny off and set it aside. Need to get some bolts to mount the engine in the stand. The LS7 seems to have a funny mix of SAE and metric bolts. By the end of the day tomorrow, everything should be settled and I can start on the brakes.
Attachments
At least there are no Whitworth fasteners
At least there are no Whitworth fasteners
aghhhh you spoke the name that should never be spoken
") I find those to be even more difficult to deal with than Lucas. Sorry for the thread jack
I find those to be even more difficult to deal with than Lucas. Sorry for the thread jackSome progress and some notes. I cannot begin to add any ideas here, but only hope to adequately pirate the techniques laid out by others. But I will point out some of the things I have noted as I am going along. Maybe this will help others like me.
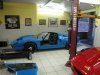
First of all, when the car rolls into the garage, it seems like there is not much to do. Don't be fooled. Everything you see has to be taken down and reassembled. This is a good thing, but I did have a moment where I had to tell myself... you are building a car, and it is going to take awhile. Don't rush.
I have now completely dissassmebled everything. My approach for reassembly is this:
(1) you have limited access to the center tunnel with the motor in, so get all the things that are going to run though the tunnel in place. This means brake'clutch lines, cooling tubes, AC hose. I am not going to run my wiring through the tunnel, so that makes it easier.
(2) build up the motor/tranny and put it in so you know where everything else will go.
(3) get the accessories on and fit the firewall because...
(4) you can't really locate the seats until the firewall is done and...
(5) you cannot really locate the pedal box, wheel, and shifter until the seat is in.
So, at this point I have pretty much finished the front suspension and all of the in-tunnel brake lines. I am working on the AC and cooling system to complete the hoses through the tunnel. I need to get and add the front sway bar.
Attachments
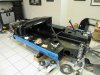
The rear suspension is apart, but I want the parking brake caliper brackets before I put it back together. Though I think I might be able to drill and tap the holes in situ, I would prefer to do them well and then put it back together. Shimming the lower A-arms on the front suspension is a complete PITA, but the back just goes right together. Getting it aligned is a whole different matter, but one for another day.
Attachments
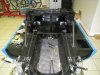
Began fitting the dash. It is an interesting build, in that so many things overlap, makes it difficult to say "do this, then this, then this." Despite the under-dash AC being plumbed by Fran et al, I couldn't help yanking out the evaporator to see how it all worked I want to rig up the pull for the flap that directs heat down or AC up. I think with the rear cage supports in place, I can still reapproximate the firewall to set get the accessories on the engine.
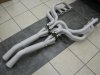
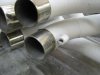
The LS7/ricardo combo is going to make things a bit interesting. More on that later.
At this point the family says it looks like I have gone backward in the build, but I think we are making some progress under the surface.
I want to rig up the pull for the flap that directs heat down or AC up. I think with the rear cage supports in place, I can still reapproximate the firewall to set get the accessories on the engine. The LS7/ricardo combo is going to make things a bit interesting. More on that later.
At this point the family says it looks like I have gone backward in the build, but I think we are making some progress under the surface.
Attachments
J.,
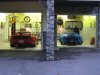
You will find that almost any build requires some reverse moves in order to go forward. Good to know how thing go together, for that rare instance that you may have to take it down in the future. I have only one observation/complaint. Your garage is way too clean! Get busy(er)!!
Bill
You will find that almost any build requires some reverse moves in order to go forward. Good to know how thing go together, for that rare instance that you may have to take it down in the future. I have only one observation/complaint. Your garage is way too clean! Get busy(er)!!
Bill
Make sure that you fit the spider / dash together so that the leading edge of the dash is underneath the spider / windshield area... I had to trim a lot of material from the Dash "legs" to make the dash fit far enough forward and so that the doors would not hit the sides of the dash...
Your work area seems way too clean... Start grinding on some fiberglass - that should take care of it!!!
Your work area seems way too clean... Start grinding on some fiberglass - that should take care of it!!!
Make sure that you fit the spider / dash together so that the leading edge of the dash is underneath the spider / windshield area... I had to trim a lot of material from the Dash "legs" to make the dash fit far enough forward and so that the doors would not hit the sides of the dash...
Your work area seems way too clean... Start grinding on some fiberglass - that should take care of it!!!
Thanks Randy, I did not think about the the doors not fitting. We'll have a look.
Congrats for the toy mate ! and great progress so far !
i just remembered something that might be of interest: http://www.corvetteforum.com
there you will find all the info you need for this great engine !
PS: you're GT40 is gonna have cohones !!!
i just remembered something that might be of interest: http://www.corvetteforum.com
there you will find all the info you need for this great engine !
PS: you're GT40 is gonna have cohones !!!
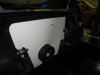
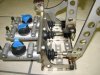
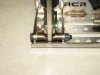
Got the meat of the pedal box completed. I am using a 3/4" on the clutch for the Ricardo, and 7/8" for both front and rear brakes. This is going to give me a little more pedal throw than the 1 inch, but with a touch more leverage and modulation. I will be using the residual valves to keep the contact point high in the pedal stroke. I shortened all three of the piston shafts after careful measurements. When the rods are completely bottomed in the threads and the cylinders are tight in the pedal box, the pistons are at the top of their travel.
As usual, I followed Chuck and Ryan's lead and shimmed the pivot sleeves with thin sheets of brass. In addition, I got thin brass washers/shims from McMaster-Carr and used them to snug up the play left-to-right also. It definitely takes a bit of fiddling, but the finished product is worth it. The pedals move smoothly with zero play.
As usual, I followed Chuck and Ryan's lead and shimmed the pivot sleeves with thin sheets of brass. In addition, I got thin brass washers/shims from McMaster-Carr and used them to snug up the play left-to-right also. It definitely takes a bit of fiddling, but the finished product is worth it. The pedals move smoothly with zero play.
Attachments
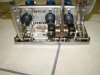
Full stainless pedal system now...
Pedals look good. Not sure if that is stainless. If not, might want to consider a squirt of spray paint to fend off the rust. Mine have stainless pedals but the supporting frame is steel, so we gave it a shot of engine low gloss black.
Yeah, they are stainless. I polished them a bit, and I thought about powder coating, but the more I look at them the more I like the raw look.
Full stainless pedal system now...
Fran: It just keeps getting better and better!
Similar threads
- Replies
- 14
- Views
- 5K
- Replies
- 1
- Views
- 449