
You are using an out of date browser. It may not display this or other websites correctly.
You should upgrade or use an alternative browser.
You should upgrade or use an alternative browser.
J. Salmon RCR-40 Build
- Thread starter salmjo1
- Start date
FWIW: i went through a set of BP-20's in four 20-minute sessions on the track in a MINI Cooper. if you plan any track time, get some poly h's or poly b's to put in for track use.
At this point, I just want a good high performance pad to use initially. Since everything is laying around in pieces, the thought of burning through a set of pads is a blurry dream. But I do look forward to trying them out!
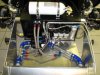
Finally got all the lines run through the spine, except the hardline for the engine bay fire supression, which I will do next. I think I am an AN addict. I seem to be using them like chrome on a Harley.
Remote water pump from Meziere. The -12AN on each side are heater lines. The -8 goes to the overflow, and the -6 is the thermostat return.
Chuck and Ryan, I owe you for you selection of the Dorian/Help grommets for the reservoirs. I was unable to find anything close, and they do work perfectly. Cheers!
I ruined both of my residual valves (don't ask), but other than that the pedal box is ready to hook up. I had to run -4 (up from -3) line for the clutch, as it apparently requires more flow than others (discovered in testing by Fran et al). My tranny also has the hydraulic line on the opposite side, so I would have had to rebend the tubing anyway. I will need new line clamps for the larger line too.
I am excited to turn my attention to the motor now.
Attachments
Jay,
looks great but is there a minor kink in the drivers side hose....exiting the rad....may just be the camera angle too....
looks great but is there a minor kink in the drivers side hose....exiting the rad....may just be the camera angle too....
Jay,
looks great but is there a minor kink in the drivers side hose....exiting the rad....may just be the camera angle too....
Fran,
Not necessarily the camera angle. The hoses are 45 degree, but of course it is not exactly that angle. This is the best I could achieve. Please advise if this is not going to cut it.
And A.J. has a great question - just exactly how do you get air out of the heater circuit?
Attachments
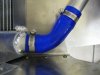
Jay - I think you're probably going to be just fine. NASCAR engines use AN16 fittings for coolant lines. AN16 is 1" (the 16 is indicative of 16/16th's of an inch). Your 1.5" hose may be slightly restricted but certainly not to the degree of reducing it by 1/2"...
Here's my water-pump turned Water Manifold with AN16 fitting;
http://www.gt-forty.com/GT-Forty/Cooling_Sys.html#11
http://www.gt-forty.com/GT-Forty/Cooling_Sys.html#11
Thanks, I appreciate it. Believe me, I am posting this in hopes that folks will keep me from doing something stupid. The more build threads I read, the more I think I probably should have coughed up the dough and let Fran build me a turn-key car. I guess I can always send it back for finishing...
Heck no....being involved in your build is some of the fun...
We will make the next one a turn key for you though...wink
We will make the next one a turn key for you though...wink
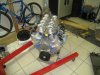
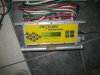
Doing a little straightening up I got a wild hair. I was reading today about the upcoming V10 version of Audi's R8. In the info, Audi stated that the 5.2 liter V10 puts out 525 hp, 390 ft/lbs, and weighs 569 pounds. Now I assume that is fully dressed, but I was curious... just how much will my LS7 weigh?
So I plopped it on a pair of my Intercomp scales. I am missing alternator and AC compressor, plus related hoses. Obviously, the manifolds are just sitting there. But those chains are completely slack. 360 pounds as is! I figure it will be about 400 when done. But that's 170 pounds less than the V10, with more power and torque. God bless the USA!
So I plopped it on a pair of my Intercomp scales. I am missing alternator and AC compressor, plus related hoses. Obviously, the manifolds are just sitting there. But those chains are completely slack. 360 pounds as is! I figure it will be about 400 when done. But that's 170 pounds less than the V10, with more power and torque. God bless the USA!
Attachments
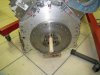
Bolting up the flywheel and clutch. A local guy made an alignment tool for me, but now that I have it all together, there is almost no need. The flywheel is going to seat around the LS7 pilot bearing, which stays in place. The clutch tucks into the rim of the flywheel, so it gets aligned automatically too. It did make it an easy one man job though.
For the record:
Flywheel bolts are 22 ft/lbs first pass, 40 degrees second pass.
Clutch bolts are 19 ft/pounds.
I decided to torque the adapter plate bolts to 40 ft-pounds. Someone let me know if that is out of wack.
Dowel pins from Ford are supposed to arrive today.
I found a Ford GT parts supplier that is great, in case any 40 or SLC guys need something GT related. He's a GT owner, and I believe that includes a twin turbo that should put out a wee bit o power:
Torrie R. McPhail
Fast Parts Network - Home
Unleashed Tuning- Horsepower is easy, traction is the real problem! | Unleashed Tuning | Tuning, Unleashed, Sct, Images
Ford/GM/Dodge/Chrysler/Jeep SCT Custom Calibrator
OEM Ford Parts Specialist
[email protected]
Attachments
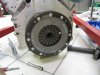
Clutch bolt up, part 2:
Fran cautioned me that perfect alignment was needed between the splines of both clutch plates or the tranny would be dern near impossible to install. I had looked and it was close... but not absolutely perfect. So I decided to redo it. What the heck, I have done everything else twice, why stop now? I found it interesting that all of the paint marks I had put on the clutch bolts lined back up when I torqued them the second time around. So, here's the REAL install instructions:
1. Put in your line up tool.
2. Load up the clutch and get the bolts started.
3. Snug them down until they begin to compress the clutch.
4. slowly ease them down in a star pattern, periodically checking to see if the clutch plates are getting tight (it only took me maybe a single turn after the bolt heads made contact)
5. Pull out the alignment tool. If the clutch plates slip easily out of position, the bolts are too loose.
6. Now line up the splines on the two plates EXACTLY. Fran suggested a piece of sheet metal. I just jiggled with a screw driver until they looked dead-on.
7. Gently - without twisting - slip the alignment tool back in.
8. Continue tightening the clutch bolts down progressively until they bottom out, then torque to 19 foot pounds.
When you pull the tool out, the splines should still be lined up perfectly.
We'll see if I got it right tomorrow, when I finally mate 'em.
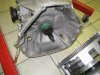
Splines aligned, and ready to mate. Note that the dowel pins are in the tranny. Don't put the in the adapter plate first, as the holes do not have a bottom. It would be possibly for the transaxle to simply push them into the plate instead of seating properly. This is probably obvious to you experienced guys.
Attachments

Similar threads
- Replies
- 14
- Views
- 5K
- Replies
- 1
- Views
- 450