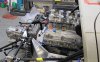
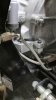
Hi keith just seen your engine pic you cannot use that thermastat housing and the pipework coming from it as you will not be able to fit engine into chassis will give you a call tommorow.regards mick.

You are using an out of date browser. It may not display this or other websites correctly.
You should upgrade or use an alternative browser.
You should upgrade or use an alternative browser.
Keith Baker's Southern gt on the build
- Thread starter Keith Baker
- Start date
Keith, I agree with Mick, you need a custom made therm housing to suit, with an air bleed to the expansion tank. Also, move the dip stick into the sump pan, and calibrate it carefully, I have just drained down a 40 engine with a 9 quart sump that had just 2 quarts to take it to the mark on the dip stick - it didnt like it! Frank
When I fitted the sandwich plate it did look tight therefore I ordered a cap for the sandwich plate making it a take off block and will have a remote oil filter.
Dont understand about an air bleed on the oil thermostat PLEASE EXPLAIN !
Why move the dip stick ?
With the engine filled with the correct amount of oil I would check the dip stick and engrave the level on it
The sandwich or now take off block has not got a thermostat in it, it's and oil pressure take off point or I can plug it.
As Steve said, I refering to the need for air bleed from the highest point of the cooling system to the expansion tank, small pipe no bigger that -3, Frank
I thought that was what you meant....Moment of panic Frank !
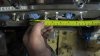
I am installing an 8mm water hose from the top of the radiator, length of the car and to the top of the expansion tank in the engine bay.
As for the oil lines, from the oil take off block which also has a capillary -4 for the oil pressure gauge, run to a point at a later date to an in line Mocal oil thermostat thereafter to a rear mounted Mocal oil cooler of about 19 rows
The Mocal thermostat also shows a right and wrong way for the route of oil pipes
Question though ;
At what point should the remote oil filter be installed.. after the oil take off block ?
Whoa Keith, go back one DONT put a dash 8 in as you suggest - all wrong and will materially affect your coolant flow !
As the cars away at the moment I decided to do a couple of small jobs.
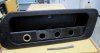
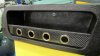
As the air con unit covers one of the demister vent holes I decided to add a second vent to the dashboard.
Also decided to mock up the drivers side door pocket.
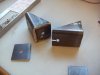
I have seen this done on a car many moons ago so I machined up some bronze rings and cut up a sheet of carbon fibre I had which has a moulded 90 degre return.
This is 2.5mm thick carbon and is stronger than steel and lighter than fluff.
Easy to cut using a straight edge clamped to a bench and can be sanded with a block.
The door box will of course be prepared and painted black.
Picture don't do it justice, looks good
As the air con unit covers one of the demister vent holes I decided to add a second vent to the dashboard.
Also decided to mock up the drivers side door pocket.
I have seen this done on a car many moons ago so I machined up some bronze rings and cut up a sheet of carbon fibre I had which has a moulded 90 degre return.
This is 2.5mm thick carbon and is stronger than steel and lighter than fluff.
Easy to cut using a straight edge clamped to a bench and can be sanded with a block.
The door box will of course be prepared and painted black.
Picture don't do it justice, looks good
Attachments
Last edited:
The door box looks great along with the rest of your build.
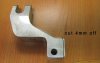
The clutch operating arm on the ZFQ locates on a splined shaft
then an 8mm high tensile bolt secures it.
But the arm would not go back far enough for the bolt to locate and the arm rubs against the bellhousing therefore a small modification was required.
I Milled 4mm off the inside edge.
Just in case anyone has the same small problem
The new Mocal sandwich plate cap is on, clearances are fine.
I wont fit any -10 fittings until the engines in and then I can order the Mocal remote oil filter unit
Also made the passenger door box, same as the drivers side.
I may paint the door boxes to make sure I'm happy with the finish.
Attachments
Last edited:
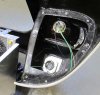
The Valeo Cibie Headlights are now fitted and fully adjustable.
Ally plates first bonded to the inner body then the adjustable plates fitted to them.
Adjustment is made from the front. The holes will be made good prior to painting.
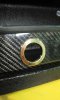
The spotlights are also fitted these being high intensity lamps, slightly smaller in diameter at 92mm but these will have an aluminium ring of about 15mm around the outside of the lamp similar styling to the Ford GT's.
The indicator of course will not stay where it is but will comply with IVA regs thereafter a small clear lenses indicator with orange bulb will be fitted using the same small cable hole.
Ally plates first bonded to the inner body then the adjustable plates fitted to them.
Adjustment is made from the front. The holes will be made good prior to painting.
The spotlights are also fitted these being high intensity lamps, slightly smaller in diameter at 92mm but these will have an aluminium ring of about 15mm around the outside of the lamp similar styling to the Ford GT's.
The indicator of course will not stay where it is but will comply with IVA regs thereafter a small clear lenses indicator with orange bulb will be fitted using the same small cable hole.
Attachments
Engine and gearbox is going in next week, once that's in I can route the handbrake cables, hoses etc then got to get the exhaust made. I made sure that the dashboard can be removed with the screen bonded in, this ensures that I wont need to lay upside down to fix the wiring when something goes a miss.. and it usually does.
I'm putting in some extra fused cables for things like alarms, trackers, sat navs etc.
One possiblilty is that I make every switch, gauge etc wired into multipoint connectors, so two or three disconnections and the dash is out.
Forward thinking " maybe ? ".
I'm modifying the rear Lemans 9 hole grill and planning the rear deck grilles next to the exhausts.
Still plenty to do.
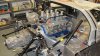
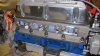
Engine is now in, air con pump and alternator clears.
The next item is the exhaust to be made, I want SGT to make this as I want it to look and sound right and I would like to be a loyal customer... which I am. This is of course an SGT car.
As they are busy at the moment I will have to be patient, not something I'm used to being.
The remaining fuel system parts are on back order from the USA but should be with me before Christmas, fingers crossed.
IVA is planned for February.
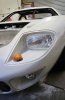
New SGT door handles and recesses have replaced the Tornado ones.
Headlights with internal sidelights, spotlights, fog light and reverse lights are in to IVA requirements.
The next item is the exhaust to be made, I want SGT to make this as I want it to look and sound right and I would like to be a loyal customer... which I am. This is of course an SGT car.
As they are busy at the moment I will have to be patient, not something I'm used to being.
The remaining fuel system parts are on back order from the USA but should be with me before Christmas, fingers crossed.
IVA is planned for February.
New SGT door handles and recesses have replaced the Tornado ones.
Headlights with internal sidelights, spotlights, fog light and reverse lights are in to IVA requirements.
Attachments
Last edited:
Gear rod assembly is fitted on the ZFQ with all SGT parts except with the addition of a small but usefull adjuster by Frank Catt that gives final adjustment of the gear lever. Pictures to follow when I can.
The wiring loom for the injection system is a nightmare.
The Injection is 8 Stack and the loom is "8 miles".
This is going to have a lot cut out and thrown away. Not by me, I know not how , but I know a man who can.
The wiring loom for the injection system is a nightmare.
The Injection is 8 Stack and the loom is "8 miles".
This is going to have a lot cut out and thrown away. Not by me, I know not how , but I know a man who can.
About a month ago I knew the build was starting to slow up, mainly due to not being able to get all the parts I needed fast enough and that work was getting busy and it's work that pays for the toys and the bills.
I have asked someone to help me to get the build back on track, and with me as well. This should speed things up.
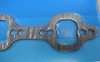
The Dart PR01 head gaskets have been sent to SGT so that laser cut blanks can be made prior to the exhaust build.
The water expansion tank and swirl pot has just come back from the polishers ( London Chroming ).
The suspension is now set roughly for the IVA as is the steering caster / camber.
The brake and clutch lines and are all in ready for fluid.
Some parts are going to the powder coaters.
Downloaded the IVA application forms to get rolling on the paperwork side and the engine builder who is registered with VOSA is sending me all the correct paperwork.
I have asked someone to help me to get the build back on track, and with me as well. This should speed things up.
The Dart PR01 head gaskets have been sent to SGT so that laser cut blanks can be made prior to the exhaust build.
The water expansion tank and swirl pot has just come back from the polishers ( London Chroming ).
The suspension is now set roughly for the IVA as is the steering caster / camber.
The brake and clutch lines and are all in ready for fluid.
Some parts are going to the powder coaters.
Downloaded the IVA application forms to get rolling on the paperwork side and the engine builder who is registered with VOSA is sending me all the correct paperwork.
Attachments
Last edited:
Posts are just like buses, nothing for ages then 4 come along at once.
The rear brake calipers are Brembo and the cables are SGT which attach to a compensator plate and threaded rod, then finally attach to the handbrake.
The outer cables need to solidly fixed to somewhere under the car.
These brackets were made up that bolt between the engine mounts, they dont move once tight and they are fully adjustable along the slots of the engine mount. Picture dont show the locating lug that stops the bracket twisting but it's there.
This allows perfectly straight route and alignment of the cables to the compensator rod and clears everything, these will be powder coated.
Attachments
Last edited:
Decided to make the door closer straps so as not to pull on the carbon panel although the panel is solid and aint going anywhere.
I used the same belt webbing as the Willans seat belts I have but 50mm wide. These were clamped with a 50mm wide alluminium polished plate.
The door box itself will be trial painted this week in satin black 2k and if I like it will be the colour for the inside of the spider which I will hand paint.
For the IVA you need an immobiliser and I will be using a Thatcham approved Toad unit.
Attachments
Keith,
I must have missed that in the IVA manual! Are your sure you need an immobiliser for the IVA? I thought that was an option which if fitted needed to meet certain criteria? I was going to fit, but after the IVA
I must have missed that in the IVA manual! Are your sure you need an immobiliser for the IVA? I thought that was an option which if fitted needed to meet certain criteria? I was going to fit, but after the IVA
Similar threads
- Replies
- 1
- Views
- 564