Keith's RCR GT40 Mk I Build

Keith
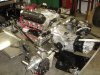
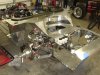
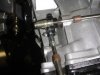
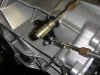
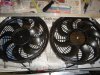
From the picture i thought that the heater hoses where tapped into the cooling pipes and adimired the smart routing.
Why did you choose to run the heater lines all the way from the back of the car ?
Wouldn´t it be enough heat there in the front ( I assume you don´t drive the car in the winter) or is there any specific reason out of engine cooling issues.
I have no glue about Ford has intended the cooling system. As i run a super victor intake do you have an suggestions ( may be JAC MAC can join) for this setup ?

TOM
 

Keith

Lifetime Supporter
Tom,
In order for coolant to flow thru the heater there has to be a negative pressure generated on one of the hoses so that coolant is "pulled" thru the heater core. If the heater hoses were hooked up to the coolant pipes as we have seen on the originals there would have to be a significant pressure drop (restriction) across the radiator before the heater would get any coolant flow. In other words the pressure drop across the heater core would have to be less than the pressure drop across the radiator before the coolant would flow thru the heater core (the coolant will take the path of least resistance). That is why in normal automotive heater applications there is a seperate heater hose going to the suction side of the water pump and a seperate heater hose going to a point before the thermostat so that heated coolant will always be availlable to the heater regardless of the position of the thermostat (open or closed), and regardless of the temperature of the coolant in the radiator.
It is my opinion that in the race cars no one cared much about heater operation and really only thought about how to get enough outside air in the car to keep the driver from overheating.
Stay tuned, I should be able to tell you in a month or so how well it works...........
Keith
 

Keith

Lifetime Supporter
I had a relatively productive weekend working sixteen hours on Saturday and twelve on Sunday. I installed the rear suspension, engine and trans, cooling system tubes, radiator and condenser assembly, all the AC tubes and fittings and the shifter assembly.
My goal is to be able to run the engine next weekend.
Keith
 

Attachments

  • GT40 158.jpg
    GT40 158.jpg
    146.3 KB · Views: 6,344
  • GT40 159.jpg
    GT40 159.jpg
    153.8 KB · Views: 9,579
Keith

Thanks for the explanation of the heater system. Makes totally sense. Will probably do the same. Have to wait until i pick up my engine this week and see how it is set up.

Your installation is impressive, very nice finish.

TOM
 

Chuck

Supporter
keith:

Looking good. Still like the black and silver scheme. I assume those are insulation covers on the shifter cables. The rear most one will need it since it comes right up to the muffler. Good idea.
 

Keith

Lifetime Supporter
You are welcome Tom, I should know by this weekend how well it works.

Chuck, I got the covers from Jegs after I saw how close it would be to the exhaust. I have not decided how I will secure them yet but I am leaning toward pushing them over the jam nuts and using a plastic tie wrap if it will stand the heat, or possibly a wrap of safety wire.
I am happy with the look of the powder coated belly pan, makes a nice contrast.
Keith
 

Keith

Lifetime Supporter
Denny,
Great idea! I just looked at Jegs, I guess I never knew they existed, I will order some ASAP.
It says you are a fabricator at RCR, did you have a hand in fabricating my car? Even after a long 12 hour day of working on it, I still find myself just standing and looking at the car.
Thanks, Keith
 

Keith

Lifetime Supporter
Last evening I spent some time fitting/adjusting the shifter. The unit is very well made and the adjustment instructions are pretty straight forward.
I will share this in hope that others do not get caught in the same do loop that I did. The instructions call for placing the trans in first or second gear, adjusting the length of the rod end, then adjusting the "gate", then installing the shoulder bolt. I would do all of the steps then the actuatior would not fit back on the trans shifter shaft and operate. After the third attempt it occured to me that the bolt holding the rod end was contacting the side of the trans case. I turned the bolt around so the head was facing the trans and all was well.(see photos)
It easily will shift first thru fifth with very little effort, I will wait on reverse until I get the engine started........
Keith
 

Attachments

  • GT40 160.jpg
    GT40 160.jpg
    144.3 KB · Views: 1,042
  • GT40 161.jpg
    GT40 161.jpg
    141.3 KB · Views: 996
The cable shifters work extremely well once dialed in....

The New Ford GT uses a two cable system also and is very positive and slick shifting....
 

Keith

Lifetime Supporter
I would have to agree Fran, the shifter has a much more "positive" feel than I had expected. As this is my first exposure to this type of shifter I did not know what to expect, but, if it feels as good on the road as it does in the shop I will be more than satisfied.
Keith
 

Keith

Lifetime Supporter
I got the dash, switch plates and grill back from the painters last night. It cost a little more than twice what I had expected but I am very happy with the way it looks.
Again, following Chuck and Ryan's lead, I purchased AC vents with aluminum trim rings. I had to turn a 45 degree chamfer on the back side of the aluminum rings to make them fit the dash. Since they were already in the lathe I decided to give them a quick polish. I believe they add a tasteful bling to the dash.
Keith
 

Attachments

  • GT40 163.jpg
    GT40 163.jpg
    158.8 KB · Views: 1,039
  • GT40 164.jpg
    GT40 164.jpg
    151.6 KB · Views: 883
  • GT40 168.jpg
    GT40 168.jpg
    147.4 KB · Views: 1,006
  • GT40 071.jpg
    GT40 071.jpg
    147.2 KB · Views: 971

Chuck

Supporter
Keith:

Looking very nice. Must be nice to have a lathe. I beveled those vents with a hand file. Way too much time . . . .

Like the DC socket too.

Looks like a really nice finish in the pics. It always costs more than you expect, but five years from know you will appreciate the quality and cost will be forgotten.

Heading home early from the office today to get the body, which is now painted, installed for the last (hopefully) time!
 
Denny,
Great idea! I just looked at Jegs, I guess I never knew they existed, I will order some ASAP.
It says you are a fabricator at RCR, did you have a hand in fabricating my car? Even after a long 12 hour day of working on it, I still find myself just standing and looking at the car.
Thanks, Keith

Keith,

No I haven't been assembling any of the GT40's yet. Fran has been keeping me busy helping on the SLR's and my new project, the 917. Yeah, it's cool!

I'm glad my suggestion worked out. Glad to help. If you have any other questions or would like some other suggestions I'd be happy to help any way I can. Good luck on the car.
 

Keith

Lifetime Supporter
IT'S ALIVE!

My goal this weekend was to test run the engine. I installed the exhaust system fresh out of the box from Jet-Hot and I was very pleased with the coating job. I pulled the distributor and primed the oil pump, filled the cooling system with water and some rust inhibitor, purged the air out of the radiator, purged the air out of the heater core with a suction bulb on the heater hose, then set up a temporary coil, resistor block, and coil wire so I could run the engine. My frist attempt to set the ignition timming was met with no spark; after a little testing it appeared that my "brand new in the box" Mallory Promaster coil was DOA. A forty year old coil that was in the bottom drawer of my tool box was installed and we had spark.
The fuel supply came from my lawn mower gas can duck taped to the top of a step ladder with a hose running to the carb (I intend to use Weber IDA's in the future but for now I am going to sort the car out with a known good Holly system).

The engine started on the touch of the starter button! It actually spooked me into jumping back...........that is why I will probably not post the video. The good news; 60 psi oil pressure, no oil leaks, no coolant leaks, the transmission shifts into all forward gears, the alternator is putting out 14.2 volts and last but not least, the exhaust note is very pleasant, definately not as loud as I had expected. The bad news; the cooling fans were pushing not pulling (just another reminder to test everything no matter how small). I will change the polarity of the leads tonight and by the looks of it I will need to flip the fan blades over also (if anyone can confirm this I would appreciate it).
All in all a productive engine test!
Keith
 

Attachments

  • GT40 172.jpg
    GT40 172.jpg
    142.2 KB · Views: 1,239
  • GT40 171.jpg
    GT40 171.jpg
    144.6 KB · Views: 1,224
Keith
Some electric fan blades can be flipped,are these the ones from rcr? If they are let me know and I will look into it further.Also if they are not ours let me know whose they are, and I still should be able to help. I have used many different kinds. How did you wire up your fans, did you use a relay? Looks great!
denny
 

Chuck

Supporter
Hey Keith:

Yes you need to flip the fan blades over and reverse the polarity. The black lead is positive and the blue lead is ground.

The other good news: your gauges are working!

You have reached a major milestone.

Chuck
 

Keith

Lifetime Supporter
Thanks for the information Chuck and Denny.
When I pulled the fans off it was obvious as the fan blades are marked "push" on one side and "pull" on the other, with directional arrows. I attached a photo that shows the fan on the left in the push configuration and the one on the right in the pull configuration.
I am not too sure why I did not see this when I was putting it together. Anyway, I flipped the fan blades over and rewired it so the blue is ground and the black is wired to the relay. I tested it on the bench to ensure they were turning in the correct direction before I reinstalled them (something I should have done the first time).
Keith
 

Attachments

  • GT40 178.jpg
    GT40 178.jpg
    138.9 KB · Views: 799

Keith

Lifetime Supporter
I purchased a very well designed battery hold down off E-Bay made to fit an Optima battery that clamps the battery by the base to eliminate the need to have it held down by something over the top.
Aluminum spacers were machined to bring the mount up so that the battery cables would clear the chassis. It appears to make a very secure mount for the battery.
Keith
 

Attachments

  • GT40 030.jpg
    GT40 030.jpg
    151.3 KB · Views: 896
  • GT40 176.jpg
    GT40 176.jpg
    137.4 KB · Views: 908
Back
Top