Kiwi scratchbuilt

Russ Noble

GT40s Supporter
Lifetime Supporter
Yeah, can be a nuisance at times, but it's just another factor to consider when doing things.

Nothing's all bad though, if I had both eyes I wouldn't be on this forum building a race GT40. I'd be out there now going hammer and tongs in a Formula Ford. I really love the cut and thrust of close competitive open wheeler racing. I won the FF Championship here in the early eighties when I still had two eyes. Then I got married.......:mad:

But close racing in open wheelers is a no no with limited peripheral vision. So here we are building something with protected wheels...I'd always thought I'd like a big rear engined V8 sportscar anyway....:)

Only because I am here, have I got to know the many interesting and talented guys on this forum and made the great friends that I have. It's all good.:)

Cheers,
 

Russ Noble

GT40s Supporter
Lifetime Supporter
Pedals made and mounted.
 

Attachments

  • Pedals.JPG
    Pedals.JPG
    72.3 KB · Views: 1,973

Russ Noble

GT40s Supporter
Lifetime Supporter
Nearly Christmas and work continues apace. Should be a heap of goodies that were bought in Aug/Sept arrive on the boat in the next week or two. Also a few things recently ordered that are being air freighted in just so I won't run out of things to do over Christmas.:rolleyes: :D

Working on the motor/trans at present. It's the first time I've prepared an American V8 so what I don't know will fill a book!:eek:

Anyway, recently got the new reciprocating assembly back from cracktesting by my mate at the airways NDT facility. All good, so in for balancing (internal of course) last week on a Sunnen DCB-750. Not much to do, one slug of Mallory. All Lim's flywheel/clutch machining was spot on and in perfect balance.

I have increased the step on the triple plate clutch from 3mm to 5mm and will initially fit 2mm shims under the cover to achieve the correct setup pressure. We have machined three sets of shims , 2.0, 1.3, and 0.65 and will fit these in turn rather than replacing clutch plates as the friction faces wear. Should get four times the life out of the plates. :D 
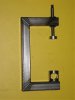
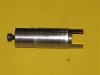
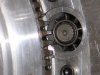
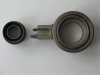
And I haven't even got a Jewish/Scottish ancestry!

Below is the clutch cover with the three sets of shims.
 

Attachments

  • clutch shims 015.jpg
    clutch shims 015.jpg
    41.8 KB · Views: 1,528

Russ Noble

GT40s Supporter
Lifetime Supporter
While the NDT and balancing has been going on, I have been prepping the Dart iron block and Brodix 225 CNC heads.

Reworked the combustion chambers slightly, altered the valve lengths and set up the rocker geometry. The supplied pedestal shims were miles out and Lim machined up an individual set for each side to get everything 100% right. 3.6 for the LHS and 3.2 RHS. Must be shim week this week!
 

Attachments

  • pedestal shims 017.jpg
    pedestal shims 017.jpg
    48.8 KB · Views: 1,490

Russ Noble

GT40s Supporter
Lifetime Supporter
My heavy duty off the shelf spring compressorwas not man enough for the heavy springs and munted itself after compressing half a dozen! :mad: So we turned around and made our own with an aluminium sleeve over a bearing so it turns easily and won't mark the valve head/combustion chamber. Works a treat, nice and simple.
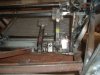
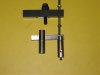
:D
 

Attachments

  • spring compressor 010.jpg
    spring compressor 010.jpg
    14.7 KB · Views: 1,524
Last edited:
Hi Russ

Nice looking chassis. You didn't happen to throw it on the scales before adding all the suspension links / extras, did you? Interested to see why much she weighs.

I assume it's made from 4130 CM? (it has probably been stated, but there is every chance I missed it!)

Good work.
 

Russ Noble

GT40s Supporter
Lifetime Supporter
Hi Troy,

Thanks.

The weight as pictured with full rollcage and including the front and rear subframes comes in at 108 Kg or 238 lbs.

Note it is not finished yet, there are still some brackets to fabricate. Main ones being door hinge mounts and seat belt mounts. There are also lots of little things like fuel pump mounts etc to do so it's likely to end up around 115 Kg or 250 lbs.

Don't forget though that a lot of the stiffness relies on bonded and riveted alloy panels so for any meaningful comparisons that must be taken into account. When that's done I'll weigh it and post it on this thread http://www.gt40s.com/forum/gt40-tec...-chassis-weight.html?highlight=chassis+weight

The really interesting weight though will be the all up dry weight. Anyone care to take some guesses.....

Chassis details, material etc are in Post # 65.

I see I haven't posted a view of the chassis from the front so here goes
 

Attachments

  • Chassis Front 009.jpg
    Chassis Front 009.jpg
    49.7 KB · Views: 1,922
Last edited:
Thanks Russ.

That's a good looking chassis, I'm going to stay firmly planted on the fence and not even hedge a bet on dry weight!

Keep us posted!
 

Russ Noble

GT40s Supporter
Lifetime Supporter
Work continues on the motor. After seeing Satan's ;) TS 875 build thread, I had to do a quick search on standpipes to find out what they were, and then a quick email to Jac Mac to find out WTF they did! Did I mention I know nothing about motors? :eek: Anyway after some clarification, standpipes have been made and fitted. There was also mention of lifter bore mods for oiling the roller lifters....

Whilst I was quite happy to scratch away at the lifter bores with a hacksaw blade in true Kiwi fashion a la Jac Mac, and no doubt it would have worked fine, Lim threw up his hands in horror and said we need to make a tool for that.... Photo's are of the Mk1 tool which did the job. However when we designed the tool we didn't realise the lifter bores were not parallel to the cylinder bores, so the Mk2 tool has a pivoting fulcrum under the lift nut to accommodate the angle.
 

Attachments

  • lifter bore mods 009.jpg
    lifter bore mods 009.jpg
    20.7 KB · Views: 1,259
  • lifter bore mods 008.jpg
    lifter bore mods 008.jpg
    20.4 KB · Views: 1,292
  • lifter bore mods 005.jpg
    lifter bore mods 005.jpg
    57.4 KB · Views: 1,316
  • lifter bore mods 006.jpg
    lifter bore mods 006.jpg
    60.1 KB · Views: 1,316
Last edited:
Check for roller lifter link bar clearance on the 4 corner lifter bores- if it needs extra clearance a simple die grinder & cutter will suffice-no special tools needed:)-- ( Doubt that you wil need to on iron block though.
 

Russ Noble

GT40s Supporter
Lifetime Supporter
Today I have finally fitted up the 928 front mounted starter and assembled the flywheel/clutch/ring gear and offered up the transaxle and set final clearances on the hydraulic release bearing. Everything's going to work a treat. Photos later.

Billet side plate for the 930 has been machined so everything is slowly taking shape. Stick on tags on the original are XY co-ordinates for the hole centres for the mill. Saves doing a drawing, just take a photo.
 

Attachments

  • billet sideplate 001.jpg
    billet sideplate 001.jpg
    40.1 KB · Views: 1,118

Russ Noble

GT40s Supporter
Lifetime Supporter
Rear hub axles have been made both sides. Machined from billet. We had to farm out cutting the splines. The spinners are forged alloy supplied by PSE.

Quite large differences in the machining tolerances for the threads between the PSE supplied articles and Lims Vintage supplied spinners. We're getting used to this now though and have learnt to check everything and machine to suit.
 

Attachments

  • rear axle 013.jpg
    rear axle 013.jpg
    17.1 KB · Views: 1,184
  • rear axles 011.jpg
    rear axles 011.jpg
    28.4 KB · Views: 1,149

Russ Noble

GT40s Supporter
Lifetime Supporter
The starter/ flywheel with these Porsche trannies is somewhat of a mission but I have trodden a slightly different path on this one.

Primary concern was that I wanted a light and compact flywheel which really dictated a forward ring gear. I spent a lot of time looking at how to extend the starter nose forward to suit using the standard Porsche mounts. In the end there were too many problems to surmount and space was tight too.

So I decided a forward starter mounted off the adaptor plate was the best way to go. This made my new Hi Torque starter redundant because the direction of rotation is wrong when it is turned around. So I ordered a new 928 unit from 928 Motorsports.

Anyone in NZ want a brand new, unused, Hi Torque 930 starter at a good price? Fits G50 as well I believe.

I initially wanted to fit it to the LHS because of the dry sump lines on the RHS but after already doing a chop on a couple of chassis tubes it became obvious that configured that way there just wasn't room as my motor sits really low in the chassis. So had a really close look at the RHS and found I could just fit it in and the drysump lines too.

In the end it was quite simple to do and you can see how compact the flywheel is.
 

Attachments

  • Starter 004.jpg
    Starter 004.jpg
    34.4 KB · Views: 1,134

Russ Noble

GT40s Supporter
Lifetime Supporter
It necessitated machining up a new mounting plate with threaded holes for the 6mm mounting capscrews. New plate on left replacing old on the right.
 

Attachments

  • Starter 002.jpg
    Starter 002.jpg
    24.8 KB · Views: 911
  • Starter 011.jpg
    Starter 011.jpg
    27.4 KB · Views: 874

Russ Noble

GT40s Supporter
Lifetime Supporter
It's still a tight fit as I wanted it as high and as close to the block as was reasonably possible. I got quite a bit more angle on it by altering and shortening the live feed terminal.

The notch in the adaptor plate is where the lower chassis rail sits. (The motor is sitting on an angle for the pics) There's just enough room to get the drysump line out between the chassis and the starter
 

Attachments

  • Starter 005.jpg
    Starter 005.jpg
    39.5 KB · Views: 934
  • Starter 006.jpg
    Starter 006.jpg
    55.2 KB · Views: 938
  • Starter 007.jpg
    Starter 007.jpg
    47.5 KB · Views: 960

Russ Noble

GT40s Supporter
Lifetime Supporter
Hydraulic release bearing. I started with a secondhand QM unit from Ebay for about US$80.

The first photo shows this once all the extraneous plates, clips and springs have been stripped out of it. I have had to shorten it and machine up a new nose for the front of the trans.

2nd photo shows the outer lip on this new nose which locates snugly inside the rear of the assembly and holds everthing square.The smaller nose going forward is really redundant as nothing locates on this.

3rd photo side view shows better the way it all goes together. The lug that the bleeder is on will fit nicely between the bosses for the original pivot arm and will be snugged up with a plastic button on each side fitted in the pivot bores. When the buttons are made I'll post a photo of the whole thing fitted in position. Still have to provide the remote bleeder as well. No biggie though.
 

Attachments

  • Concentric relase brg 004.jpg
    Concentric relase brg 004.jpg
    21.7 KB · Views: 778
  • Concentric relase brg 003.jpg
    Concentric relase brg 003.jpg
    22.3 KB · Views: 771
  • Concentric relase brg 001.jpg
    Concentric relase brg 001.jpg
    29.4 KB · Views: 766
Back
Top