LS/Ricardo flywheel and clutch install?

Alex, you need to remove the flex plate on your engine first. Remove everything down to the crankshaft.

Then bolt the flywheel to the crank, using the GM crankshaft bolts, the right torque and Loctite.

Then bolt the clutch to the flywheel using the 9 long bolts, centering the discs using the clutch alignment tool. The thin metal pieces will fall out and can be discarded.

Go around the clutch and torque them according to the manual (you do have the FGT manual, right?).

Email me if you want to talk about it.
 
Those red circles are around the flex plate bolts. Take them off and remove the plate. I don't know about the rest but im interested in watching
 
Alex, you need to remove the flex plate on your engine first. Remove everything down to the crankshaft.

Then bolt the flywheel to the crank, using the GM crankshaft bolts, the right torque and Loctite.

Then bolt the clutch to the flywheel using the 9 long bolts, centering the discs using the clutch alignment tool. The thin metal pieces will fall out and can be discarded.

Go around the clutch and torque them according to the manual (you do have the FGT manual, right?).

Email me if you want to talk about it.

emailed ... (although i'll keep updating this thread since I'm sure it will help others out who are as dumb as me :D )

I don't have the FGT manual but I have the Stillen instruction sheet for installing their clutch into a ford GT, plus Cam's video he took at the factory.
 

Ken Roberts

Supporter
Will when bolting up the flywheel to the crankshaft is the dowel being used?

From the Ford GT factory manual here are the torque specs....

starter mounting-35ft/lb
starter battery cable-89in/lb
transaxle fill plug-20ft/lb
transaxle drain plug-20ft/lb
speed sensor bolt-8ft/lb
reverse light switch bolt-20ft/lb
upper transaxle mounting plate-18ft/lb
clutch pressure plate to flywheel-19ft/lb
transaxle to RCR adapter-35ft/lb
RCR adapter to engine-37ft/lb
RCR flywheel to crankshaft-15ft/lb first pass, 37ft/lb second pass, 74ft/lb final pass
clutch slave cylinder-8ft/lb
 
Some pictures--
 

Attachments

  • 0144.jpg
    0144.jpg
    215.7 KB · Views: 306
  • 202.jpg
    202.jpg
    197.8 KB · Views: 348
  • 222.jpg
    222.jpg
    254.9 KB · Views: 325
  • 262.jpg
    262.jpg
    238.5 KB · Views: 328
  • 272.jpg
    272.jpg
    254.5 KB · Views: 314
Several more for Porsche box
 

Attachments

  • 282.jpg
    282.jpg
    244.2 KB · Views: 286
  • 292.jpg
    292.jpg
    250.6 KB · Views: 316
  • 312.jpg
    312.jpg
    217 KB · Views: 270
  • 333.jpg
    333.jpg
    171.5 KB · Views: 316
I circled 3 series of bolts. There's the red circles (around the snout) , the green circles (on the edge of the thingie) and the blue circles, which are a series of bolts holding something to the back of the engine (with additional bolts behind the spinnie-thingie)

Alex and I speak the same language. And I didn't even know that I spoke Canadianese :)
 

Ken Roberts

Supporter
The blue circles as outlined by Alex are the upper bolts holding on the back cover for the block. LS engines have a front cover and a rear cover. Do not disturb/loosen these bolts as the back cover has a crankshaft seal attached to it that is aligned to the crank.

Here are the bolts I have collected for my Ricardo installation:

(6)Adaptor to block- M10x1.5x35mm (allan head) (12.9)
(2)Adaptor to frame mounts-5/8x18(unf)x2" (grade8) plus 4 washers and two nyloc nuts (all grade8)
(5)Adaptor to Ricardo- M10x1.5x60mm (hex head) (10.9)
(9)Clutch to flywheel- M8x1.25x90mm (flange head) (9.8) Ford #n806178-s437
(2)Alignment pins (dowels)- Ford #f5rz-6397-c

(2)starter- M10x1.5x35mm (flange head) (10.9)
(6)top ricardo mounting plate- M8x1.25x30mm (flange head) (10.9)
 
Last edited:
Mmmm, now trying to figure out if the bushing gets pressed in from the transaxle side of the flywheel (the side w/ the countersunk holes) or the engine side (the side w/ the snout)....I'm getting conflicting information asking people and Fran's at lunch, lol.

I'm pretty sure it's the transaxle side, but this is too expensive to guess, lol
 
The part number is 7600 and cost $18.00 . I have brought this up because I like to help prevent issues I have gone through for my fellow SL-C guys. The machining was $60 for the flywheel. .

Is this
F6ZZ7600-A?

The problem is 7600 goes to every Ford GT bearing, so I want to make certain I ask for 7600 that is for a 2005 Ford GT, correct?

Ok I ordered the Ford bearing M 7600 can someone confirm the machining info?
is it .875 in from the clutch surface?
Thanks,
Grant


80-thousandths from the lip; it gets pushed in from the TRANSAXLE side
 
Last edited:
M 7600 B is for Ford modular 4.6/5.4 engines. This should be what you need.

That's what I was thinking, but I have no idea if M7600B = F6ZZ7600-A

Alex, can you be more precise? Are you saying it should be 80 thou proud of the flywheel, or 80 thou inset from the surface of the flywheel on the trans side.?

I was told (by the factory) you want to press in the bronze bushing from the transaxle side of the flywheel (the side w/ countersunk holes) and that you want to press it in such that it sits 80-thousandths (roughly) below the surface of the flywheel (transaxle side)
 
Okay, here's the first part of how to install the whole shebang (for automotive retards such as myself :stunned: ). the one thing I learned is don't ask people how to do it, lol - everybody is doing their own thing ... pressing in bushings backwards, pressing stuff onto the crank, torquing to 50ft-lbs over spec, etc... etc... Alex is skurrrrrrrrred for some of you.....

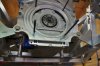
1 - Remove flex plate from engine
the flex plate is held on by 6 recessed bolts in the center of the engine. Remove these 6 bolts (center of flexplate/engine) and pull off the flex plate. it doesn't seem to have much market value and takes ages to sell, so i say junk it

2 - Clean out the holes of any debris, loctite, etc...

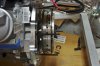
3 - Insert the 5 M10x1.5x60mm (Grade 10.9) bolts that will attach the adapter plate to the transaxle. If you forget to insert them you have to remove everything and start again when it's all torqued up because their inaccessible when it's all together :D

4 - Install adapter plate to LS engine - 5 M10x1.5x35mm (grade 12.9 .... apparently socket caps only come in 8.8 or 12.9 plated, no 10.9 plated socket heads); use anti-seize (aluminum heads) and torque to 37-40ft-lbs

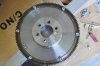
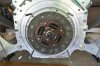
5 - Prepare the flywheel. The factory gives a bronze bushing - have it pressed in, from the transaxle side, and have it sit 60-80thousands below the surface of the flywheel (transaxle side).

Marc told me that they had a bad batch of bronze bushings at one time ... apparently if you got a bad one it'll fail within 10miles or so. I have bad luck so I figured it would happen to me so I opted to replace the bronze bushing with a bearing - after talking w/ others who've used both, apparently the bearing gives a smoother shift, so it's a win-win to use it?

If you want to use the bearing, goto Ford and buy a '2005 Ford GT Pilot bearing'. I think the part number is F6ZZ7600-A. I have no idea if the mustang bearing is the same, but whatever - the part was $15.

Then take your flywheel and bearing to an automotive machine shop and have them machine the flywheel such that the bearing can be pressed into the flywheel (from the transaxle side) and sit 60-80 thousands below the lip).

Note that the bearing is the same dimensions (as far as I can tell) as the bronze bushing, except one end of it (the transaxle side) has a fatter lip. The flywheel must be machined in such a way that the fat lip will sit below the surface, but the rest of the bearing is press fit into the original hole. Apparently it's fairly easy to do - cost me $40.

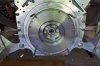
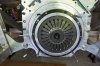
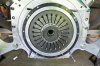
6 - Install flywheel. 6 factory bolts (apparently they're a bastard thread and only GM or ARP carries them). At GM, the flex plate bolts are also the same bolts used on the flywheels, so you can reuse yours. Coat bolts in blue loctite (I use loctite quicktape - way better than the liquid imho) and torque to 74ft-lbs in a star pattern (1,4, 2,5,3,6) in multiple steps - tight, 20ft-lbs, 40ft-lbs, 55ft-lbs, 74ft-lbs. On the last step make certain you don't stop mid-torque to re-adjust the wrench, otherwise you can suffer from breakaway torque (where you undertorque because you need a bit of torque to get the bolt moving again). I found it useful to have somebody hold the flywheel so it can't turn

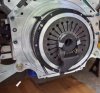
Okay, now to figure out HTF the clutch installs :D
 
Last edited:
You're correct, I meant 5 for #3, typo!

But #4 (adapter to engine) is definately 5, I just checked again outside - all the remaining holes (unless Fran redesigned the adapter plate) are blocked by something, I double checked each one of them
 
Back
Top