LS/Ricardo flywheel and clutch install?

The Ford pilot bearing is also sold by Timken #FC68329 and SKF #B65174.

Those go to a 1996 to 2010 mustang?

They may very well fit, I dunno, I just know several of us are using the ford GT oem bearing and it's a good fit after machining and what the transaxle was designed for ..... since it's only $15 I'd rather pay Ford than gamble :D
 
Amendment to the above - Ken is right, the transaxle adapter plate is held on by 6 bolts, BUT there's massive interference from one of the transaxle bolts.

You need to first grind down the portion of the bolt head that blocks the hole on the block, then you need to grind down the head of the allen bolt in order for it to fit in straight and be able to turn (I had to remove about half the material ont he head of the bolt in order for it to clear the transaxle bolt shaft)

Here's the Alex way of doing the above:

- Install flywhell
- Realize you can use the 6th bolt if you grind down the transaxle bolt head and allen headed bolt
- Rather than remove flywheel, push adapter plate towards flywheel, tape up the whole area (to prevent shit from flying around), then grind the transaxle bolt head.
-However, make certain not to wear safety glasses for a piece of shit gets flicked into your eyes and then you spend 8hrs in the ER, getting your eyeball frozen and shit picked out of it.

Fun times yesterday ... but at least I got the sixth bolt to fit :blank:

Nothing special about it. Its just the 4.6/5.4L bearing. same one in mustangs, trucks, and the GT

It may be, but i'm not about to chance it - when I asked the dealer they had mustang pilot bearings in stock but had to bring the ford gt one in ... it doesn't make sense, if they were the same thing, that the computer wouldn't cross-reference them to the part they had in stock.

In any event, it's your car, do as you see fit :D
 
Success :D

I figured I'd update this with part 2.

So basically the clutch is 4 pieces - 2 discs, a cover, and the pressure plate/ring gear.

The 2 discs are direction-specific and location specific. One of the discs is CP2918-53, the other is CP2918-52. if you're lucky the flywheel side will be stamped FLYWHEEL SIDE. If you arn't lucky, then the flywheel side is the one where, if you hold the disc parallel to the ground, the center portion with the springs is basically flat with the disc. The 'nose' in the middle (where the pilot shaft will go) is elevated upwards.

Conversely, the side which points towards the transaxle, if you hold the disc parallel to the ground, the center portion with the springs will be humped upwards (i.e., not flat), and the 'nose' in the middle of it will be flat.

That description will make more sense to you if you have you disc infront of you.

Basically it goes

Flywheel -> CP-53 -> cover -> CP-52->pressure plate->transaxle

Very easy to install.

First buy 3 packages of N806178-S437 from Ford. These are the bolts - I would only 1 time use them. You'll also need to buy the alignment tool for a Ford GT (don't have part number off-hand).

What you'll do is (Assuming you've done part 1 - install flywheel) :

clean flywheel really throughly

take cover/cp52/pressure plate as a whole assembly and stand it on its side

take cp53 and, with flywheel side pointing to flywheel, hold it against the back of the cover

take your alignment tool and insert it through the clutch unit and into the cp53. Wiggle it around until the splines of the 2 discs line up and it slides through them

with the unit as a whole (including the alignment tool sticking through it alinging the discs) stick it onto the flywheel. The nub at the end of the alignment tool will slide into the pilot bearing. Spin the assembly and line up the bolt holes.

Put in 3 bolts and hand tighten them. (leave clutch alignment tool installed)

Now apply blue loctite to your bolts and install them all hand tight.

Once all 9 are installed, torque to 10ft-lbs (will take several passes to fully seat the clutch assembly).

Then torque to the final spec of 19ft-lbs. I found it took about 5 passes until it was all perfectly settled (and then another 2 passes to confirm no bolts needed re-torquing). Make certain to torque in a STAR pattern (i.e., not 1,2,3,4 but 1,3,2,4, etc...) so it fully seats

If you did it right the alingment tool will slide out like butter. You should be able to insert/remove the tool without any difficulties if you did it right.

All done! :)

now grab transaxle and stab it onto the engine/clutch assembly, torque 5 bolts to 40ft-lbs and you're done done done!
 

Dave Lindemann

Lifetime Supporter
What - no pictures!?! Just kidding, congratulations on having your car one step closer to completion!

Thanks for helping those of us who are not quite at this point yet - much appreciated.

Dave L
 
Just as a note for others, I'm certain it's doable to install the transaxle with the engine in the car, but I couldn't. Tried for 2hrs and then gave up.

However, out of the car...... :idea:


tx1.jpg


Also, note my awesome wooden engine stand/cradle.

That is version 2. This was version 1. :)

enginestandofdeath.jpg
 
You have an engine???????...are you sure thats not photshop...or did you steal one of Cams pics...

I haz engine! :p

But no alternator :(

So my poor lil' drivetrain has to sit on its wooden stand neglected until it shows up :(

Squeeky wheel gets the grease *squeek squeek* :D
 
Go buy one then...and quit your whining....its just a GM unit...

It is

but the bracket isn't

and I don't want to buy the whole cts-v accessory package

so I wait for yours :D

Besides, I'm like the retarded puppy you just have to love, since I prove anybody can really build your cars :D

hah! :p

Oh shit, my engine is gone! Alex?? i had a Carb left on my doorstep....

Wasn't me .... my transaxle adapter plate isn't torqued to 100 ft-lbs ;)

All I need to do is waterpump, alt, back into the car, bleed the clutch, get my exhaust made (happening on the 20th) and I'm done! Wooooooo

Edit: At least until December-ish, then all the fun starts again for me :D
 
Okay, last question and we're done for the drivetrain.

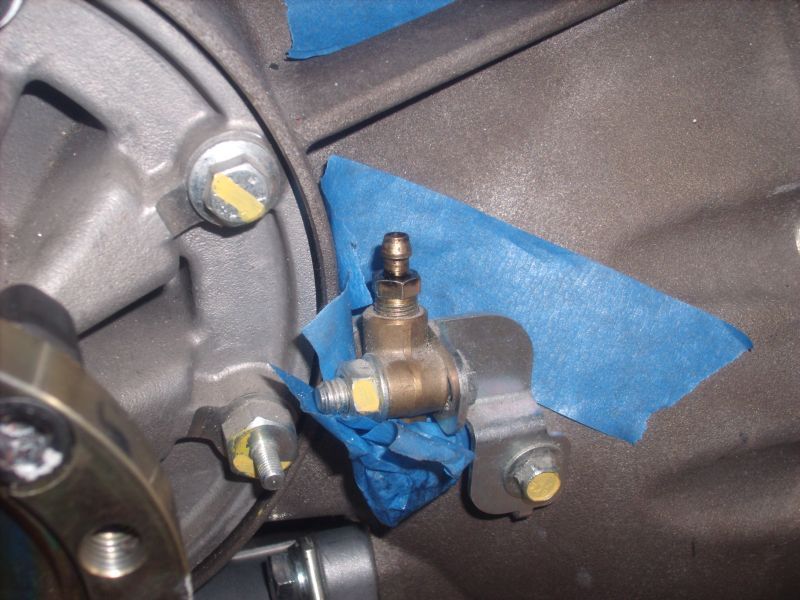
How the heck am i supposed to bleed the clutch - I'm used to the setup of having a fitting threaded into the outlet, and then a bleed screw threaded into the fitting. So one wrench hold the fitting, the other loosen the bleed screw.

Except I only have a solid piece on my transaxle - i.e., the bleed screw is phsyically part of the screw in piece.

How am I supposed to bled this????

txbleed1.jpg
 
Alex it bleeds like the brake system if you have the pressure bleeder fill the reservoir and pump the fluid to the bleed valve with the valve open till it gets fluid. Close the valve, get in and work the clutch pump it a couple of times make sure you have peddle then you are done, if it still is not solid bleed it a couple of times we just went through the same thing yesterday, installing my slave cylinder that the shop blew for me. Use DOT 3 fluid it will handle the heat
 
I understand that, I just don't understand how air won't get past the threads there?

I'm used to this type of 2 part bleeder screw:

31Lh-oG2xoL._SL500_AA300_.jpg


In this case the brass one would screw into the slave cylinder (or brake caliper, or ...), then you'd loosen the top one (black one in that picture), not the one that screws into the unit.

I guess it works since several people have told me theirs looks the same, just seems weird to me that it wouldn't suck air in *shrug*
 
Back
Top