
You are using an out of date browser. It may not display this or other websites correctly.
You should upgrade or use an alternative browser.
You should upgrade or use an alternative browser.
M20 Dreaming
- Thread starter leonmac
- Start date
Hello guys, as you all know the M20 is finished and has had its first few laps and as we also know these things are never REALLY finished there will always be little bits to improve on and change so we will still see a few more posts as I get more track time. One of the issues with that is getting the car to the track, being 2070mm wide it is a real problem getting a trailer that is wide enough between the wheel arches as just about all trailers in this country are 1900mm or less. When we went to the track for the first time I borrowed a trailer and we made ramps that took the car over the Wheels arches. It was difficult to load and unload to say the least. So I'm building a trailer that will be 2100mm between the arches and still within the 2550mm max width allowed in NZ. I'm 3 weekends into it and have just laid the deck down yesterday so hear are some photos to give an idea of what's going on, don't worry this is a short term project ????
Cheers Leon.
Cheers Leon.
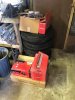
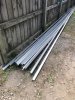
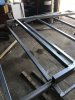
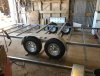
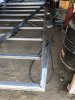
Trailer start, a pile of steel arrives at my mate's shed and then a Trogen Trailer Kit which is everything you need except the steel to build a tandem axle trailer. Next is to cut and tack up the main frame 2.1m wide x 5.5m long I did this on the deck of a truck so I could keep it square and flat. once that was done its transferred to the shed fully welded and then set up side down and the spring hangers welded on. the main frame is 75 x 50 (3" x 2") with 50 x 50 cross runners set 32mm below the top. Next is the draw bar, this is a tilt trailer with the draw bar hinged just in front of the forward axle.
Attachments
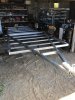
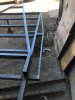
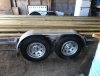
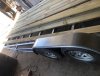
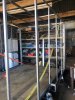
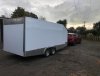
Once this is done the main frame is then flipped over final weld's finished and the wheels laid up to get the axle lengths. they are set up welded and bolted into the springs, wheels fitted and Fender's mocked up. the side's are then welded on, These then take the trailer out to 2.4m which is the inside total width, The covered section is 2m tall inside x 2.4 wide x 4m long it then will tapper in to 2m wide at the front and 1.5m high this will make it less of a brick to pull through the wind.
Attachments
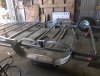
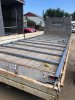
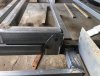
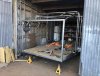
Next was the decking. I chose 32mm tongue & Groove for the decking as Ply is in very short supply at the moment and twice the price the decking is set to be flush with the main frame so it is totally in cased, it will then have the ends capped and a steel strap across the middle by doing this it allows for movement and should stop the issue of the fixings shearing off which is a common problem with wood decks. I didn't take a photo of the finished deck so that will be in the next installment.
Cheers Leon
Cheers Leon
Attachments
Jim Albright
Supporter
Might just be the angle of the pictures, but are you allowing enough clearance between the spring support post and the hanger as the spring length increases when loaded?Once this is done the main frame is then flipped over final weld's finished and the wheels laid up to get the axle lengths. they are set up welded and bolted into the springs, wheels fitted and Fender's mocked up. the side's are then welded on, These then take the trailer out to 2.4m which is the inside total width, The covered section is 2m tall inside x 2.4 wide x 4m long it then will tapper in to 2m wide at the front and 1.5m high this will make it less of a brick to pull through the wind.
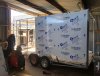
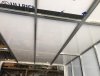
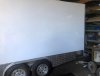
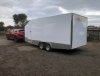
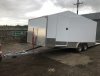
More work on the trailer, I have made the frame work for the covered in body and started to cover with the ACM panels. this stuff is magic to work with you just score with a Stanley Knife and snap it off, it leaves a perfect break line. We then just glue the frame work and stand it up and clamp it, the glue takes about an hour to go off no rivets required.
Attachments
-
 277462244_414247030508593_6157084336676482551_n.jpg151.3 KB · Views: 248
 -
 277517297_675891363530995_1026551537450771189_n.jpg157.5 KB · Views: 240
 -
 277825891_491660895952914_3639481461247025257_n.jpg270.1 KB · Views: 246
 -
 277688882_1164055474421477_123243836231634187_n.jpg138.5 KB · Views: 224
 -
 277542991_1263564624168154_8198873049443638422_n.jpg87.7 KB · Views: 225
 -
 277479404_502056714723123_4637298413605395101_n.jpg97.5 KB · Views: 251
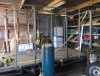
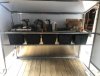
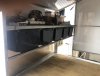
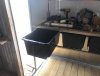
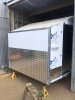
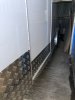
I have put a bench in the front with storage bins under it that slide out like drawers, the tyres will go under them on the floor. the floor will have garage carpet on it. The lower part of the outside panels has alloy checker plate for a bit of stone protection and visual effect.
Attachments
-
 276247751_952144078775099_6095559199355561854_n.jpg99.7 KB · Views: 269
 -
 277231134_1151746522267201_2144269278669557903_n.jpg83.5 KB · Views: 267
 -
 277185463_994686051158669_4694624618689190223_n.jpg91 KB · Views: 237
 -
 277464097_513841470110643_4099083496019109678_n.jpg63.9 KB · Views: 250
 -
 277473414_1364051780767225_5898273024751162383_n.jpg110.2 KB · Views: 261
 -
 277472739_980733499277017_2722876242109345281_n.jpg238.7 KB · Views: 257
I have put a bench in the front with storage bins under it that slide out like drawers, the tyres will go under them on the floor. the floor will have garage carpet on it. The lower part of the outside panels has alloy checker plate for a bit of stone protection and visual effect.
Looking good Leon!! As per usual, great craftsmanship.
Regards Brian
Regards Brian
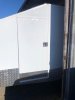
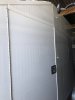
Hi guys, Fitted the personal door last week and was hoping to finish the rear door this long weekend but my friend who's shed its being built in has COVID so staying away for 7 days. Just the rear door, lights and brake lines left to do. Looks to be about 150hrs Labour in this.
Attachments
Howard Jones
Supporter
You will need to figure out a price for one of those because as soon as you take it to the track you're going to get asked to make one for somebody. I am talking about the trailer. Well done!
You will need to figure out a price for one of those because as soon as you take it to the track you're going to get asked to make one for somebody. I am talking about the trailer. Well done!
I get asked that question all the time.
I designed and built mine to transport my open wheel car and GT40.
Break back tilt, plus camping abilities for when away racing at our country track.


That is a nice set up Ricky looking at the landscape I'm guessing you are in Aussie. My mate where I'm building mine has also built one right beside mine, His will carry his 4x4 and he has also set up to use as a camper. He has hot & cold running water, sink, shower, toilet and fold down beds. It is also rigged to carry the little crawler you can see in post #769 it is for his dissabled son to drive around in the bush. It loads through the personal side door. The one I'm building is pretty basic, it will have an electric winch which will both load the car and pull up the rear door/loading ramp
Hey Leon,
yep, Im in Oz.
Mine is pretty basic accommodation but saves on hotel costs when away racing. I don't mind camping and keeping things fairly humble.
So long as the fridge stays cold and i have a comfy bed its all good. I have a camp stove etc for cooking outdoors.
Rod,
The answer is too much to justify....
Both look great! good job Guys. Guess what's next on my projects list between landscaping and house renovations.
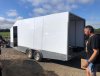
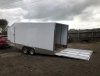
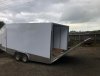
Hi guys. the trailer is almost finished now, just have to wire the lights and run the brake lines last thing will be the carpet. Put the winch in yesterday and tested it on the door, works well. The cable is run though hooks on the roof and down to the door. once the door is lowered the cable is spooled in and hooked to the car to let it out. As the trailer is a tilt you could just get in and run it out on the brakes and just use the winch to pull it in.
Here are some photos.
Cheers Leon
Here are some photos.
Cheers Leon
Attachments
-
 281288230_801991737856152_9038498060044880910_n.jpg116.4 KB · Views: 215
 -
 280357400_412960843725169_6646578914259114113_n.jpg112.1 KB · Views: 216
 -
 280351302_520963769666411_4970157440239845421_n.jpg114.9 KB · Views: 197
 -
 280512858_1235098143961994_5883086417153925698_n.jpg104.1 KB · Views: 204
 -
 280638644_1550405908693788_1679008235183433273_n.jpg108.9 KB · Views: 228
 -
 280313187_668036951113226_6951365275971928459_n.jpg85 KB · Views: 294
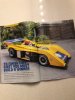
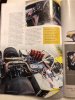
Well it has been several months since the photographer/writer came and did the article about my car for NZ Classic Car Magazine but it has finally made it into print and onto the shop shelves. I'm really pleased with the photos they used including quite a few from my collection of build progress photos and the story that he tells is quite good too. I have put a few on here and if you Kiwi guys want to go and find/buy the mag its quite a good read with several other stories and cars.
Cheers Leon
Cheers Leon
Attachments

Similar threads
- Replies
- 7
- Views
- 872