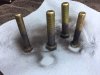
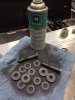
When I get it all looking the way I want it, I am going to have the washers you see replaced with machined spacers.

- Forums
- GT40 Replica Manufacturers' Corner
- RCR Forum - RCR40/SLC/917/Superlite Aero
- The SLC Clubhouse
You are using an out of date browser. It may not display this or other websites correctly.
You should upgrade or use an alternative browser.
You should upgrade or use an alternative browser.
Mark's GT-R Build
- Thread starter mksetter
- Start date
Ken Roberts
Supporter
Mark could you tell me the exact thickness of the front wheel adapters please.
Hi Ken:
I will be going to my shop tomorrow and can get those measurements for you. Do you want them in metric or inches?
I will be going to my shop tomorrow and can get those measurements for you. Do you want them in metric or inches?
Ken Roberts
Supporter
The thickness in inches please. Did you see the posts in Deans thread about "hub centric". Starting at post #160.
http://www.gt40s.com/forum/gt40-build-logs/47686-deans-gt-r-build-thread-8.html
http://www.gt40s.com/forum/gt40-build-logs/47686-deans-gt-r-build-thread-8.html
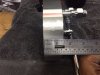
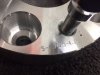
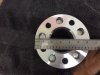
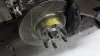
I removed the front spacers and have the measurements in the photos. With the brake rotor on the hub, the spacer fits over the hub to the point that it took a rubber mallet to remove the spacer, so I think the issue raised in Dean's build has been addressed. The shear forces put on the spacer are not being delivered to the bolts, but rather to the hub. I took the last photo of the hub and rotor with the spacer removed, showing the exposed hub that fits inside the spacer. Let me know if you need any more info on the spacers.
Attachments
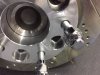
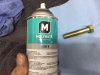
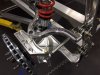
I am in the process of reassembling the suspension. I read in a previous post about the DuPont dry lubricant. I ordered it from an aviation supply company. It is super fine graphite. I don't know if it is significant, but I am lubricating the possible moving parts in the suspension prior to assembly. Messy, but it really does minimize friction.
Attachments
If I understood Ken's comments on Dean's site, he is concerned about the lack of a boss on the spacer that engages the wheel hub. The spacer on my car is flat on the wheel mating surface, unlike the hub surface it mates too. The link is to a spacer that I think responds to Ken's concern.
Wheel Adapters 5475-5475HV Wheel Adapter
I am very familiar with Moly-Kote, and the ingredient that results in the name is molybdenum (sp). Messy, but does not attract dirt and stays put.
Mike
Wheel Adapters 5475-5475HV Wheel Adapter
I am very familiar with Moly-Kote, and the ingredient that results in the name is molybdenum (sp). Messy, but does not attract dirt and stays put.
Mike
Ken Roberts
Supporter
Mike is correct. Those factory supplied wheel adapters are not hub centric. Your wheel will only be held on by the lug nuts/studs when bolted up. This maybe adequate for a daily driver type of car but is a bad choice for a car that is to be driven in a spirited manner. No OEM manufacturer that I know of uses the bolts to take the load. The lip on the hub is meant to take the load. These adapters are missing the lip thus why they are non hub centric.
Mikes link is the type of adapter that should be used. It has the protruding lip that is designed to take the load of the wheel.
Mikes link is the type of adapter that should be used. It has the protruding lip that is designed to take the load of the wheel.
Last edited:
Ron McCall
Supporter
The wheel adapters listed are not the correct match for the wheels that came with the GT-R. ( I assume that they are the same wheels that come standard on an SL-C)
The flange on the hub is not the same diameter as the bore of the wheel.
I had a set made up by US Wheel Adapter that fit correctly on the hub as well as the wheel.
Ron
The flange on the hub is not the same diameter as the bore of the wheel.
I had a set made up by US Wheel Adapter that fit correctly on the hub as well as the wheel.
Ron
Attachments
Ken Roberts
Supporter
Good point Ron. It's best to measure your wheel bore or contact the wheel manufacturer. The link Mike mentioned was for a standard OEM Corvette wheel.
I just contacted Forgestar and the wheel bore is 72.56mm. For reference the wheel bore for a Corvette OEM wheel is 70.30mm.
I just contacted Forgestar and the wheel bore is 72.56mm. For reference the wheel bore for a Corvette OEM wheel is 70.30mm.
Last edited:
That's good info. I wasn't ready to order parts but I had been laboring under the assumption that the wheel/hub interface was GM. Is RCR hub boss sized for Forgestar wheel? Is inboard side of spacer relieved for larger boss for Forgestar wheel?
Ken Roberts
Supporter
Perhaps Ron McCall could verify this info for us. Does this look correct for the required hub centric adapter.....
1.5" thickness.
70.3mm inner (female) bore size
72.56mm outer lip size
5x4.75" bolt pattern
M12x1.50 studs.
1.5" thickness.
70.3mm inner (female) bore size
72.56mm outer lip size
5x4.75" bolt pattern
M12x1.50 studs.
Last edited:
Frank Clark
Supporter
This maybe adequate for a daily driver type of car
Ah... It might be adequate for a golf cart. Maybe. Not OK for any hub that was engineered for a hubcentic wheel.
US WHEEL ADAPTER is already making hubcentric ones for the GTR calm down fellas...
anyone wanting a set just needs to return the initial batch that were supplied ( vendor error NOT US wheel btw..) and receive as speced hubcentric ones...
Kristin (RCR parts) will kindly help ya'll
anyone wanting a set just needs to return the initial batch that were supplied ( vendor error NOT US wheel btw..) and receive as speced hubcentric ones...
Kristin (RCR parts) will kindly help ya'll
Last edited:
Thanks for raising the issue. I am a novice and really appreciate the experience you provide.
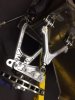
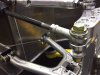
Back to my build, I mentioned in another post that I sent my polished suspension parts to get anodized. After some discussion I elected to try clear anodizing. The company I used told me that the anodizing would not keep the polished surface, and that they would reduce the time used to anodize to try to keep as much polished luster as possible. They suggested not anodizing the rear upper control arm due to the fact that it has a ball joint embedded in it and they were not sure they could block it out completely.
The anodizing certainly creates a quality surface, but it is a satin silver surface. If I had to do it again, I would either leave the polished surface alone and use WD40 on it periodically, as Fran suggested or I would anodize the parts in Black.
As you can see from the photos, the satin silver is different from the polished surface the rear upper control arm has remaining. They both have a quality look, so I am fine with it.
Attachments
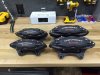
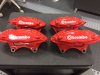
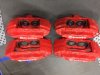
After I removed the calipers I sent them to Armor Tech, a powder coating company in Pompano Beach, Florida. Their web site attracted me initially. After speaking with Carlos, the owner, I knew this was the place. After retiring, he moved to Florida and opened this small shop, doing high end powder coating. He has SEMA cars sending their calipers to him for coating. I have a Ferrari with red Brembos and I have a 911 with red Brembos. The coating on the GT-R brakes looks better than original Brembo coating on the other cars. I had to get them on the car to see what they looked like.
Attachments

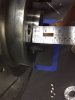
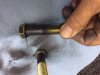
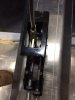
I am re-assembling the suspension, getting everything to torque spec. After getting the control arms mounted and running them through their range of motion, I noticed that the washers used for spacers move as much as any of the other hinge components. Wanting to make sure I cover my bases, I took apart the hinge points and applied the dry Dow Moly lubricant to all of the surfaces. I may be overkill, but I had the stuff already and might as well put it to good use.
Attachments
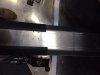
I am getting the interior laid out and wanted to mount the shifter. I have heard noises in videos that others have posted coming from the shifter, so I used Spectrum, from Second Skin, in the tunnel and used Damplifier on the interior side of the tunnel. I also mounted the shifter box on a sheet of Damplifier to serve as a rubber mounting. I drilled a few additional holes on the shifter box to assure it being securely mounted. Next come the seats, foot pedals and the dashboard.
Attachments
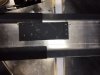
Just as an aside, the guys at Armor tech did not have to disassemble the brake calipers to powder coat them. They just do a precise job of block out, to protect the pistons and the seals as well as the openings for the bleeders vents and the brake lines. After they apply the color coats, they apply the decals, them apply a clear coat over the decals. The heat used in powder coating is less then the heat the calipers are exposed to in braking function, so no problem keeping them assembled.
Similar threads
- Replies
- 3
- Views
- 2K
- Replies
- 9
- Views
- 822
- Replies
- 5
- Views
- 969
- Replies
- 63
- Views
- 7K