
You are using an out of date browser. It may not display this or other websites correctly.
You should upgrade or use an alternative browser.
You should upgrade or use an alternative browser.
McLaren replica build base on a Manta
- Thread starter blueovalz
- Start date
Terry Oxandale
Skinny Man
I wet-sanded all the orange off, and it's white (light grey) now. This white coat will go down as a final layer before the colour coat. The base-coat (orange) sprays a little differently than I've experienced in the past, so that was more an experiment in application and colour, than anything else. I used to paint much more often in the past, but automotive paint changes quite frequently (chemicals, ratios, character, etc.), and it takes some warming up to get it "right" if you've not sprayed in a while (does it gloss out early, late, what is the "run" threshold, can runs be painted out, how quickly does it flash, how effective is a retarder, etc). Also, the orange covers the lighter coloured sealer better than over the darker grey.
I'm trying to be as cautious as possible being this is the end-game on the bodywork. I could easily hand it off to someone else, but after doing everything thus far, I can't see myself handing this last step off to another person.
I'm trying to be as cautious as possible being this is the end-game on the bodywork. I could easily hand it off to someone else, but after doing everything thus far, I can't see myself handing this last step off to another person.
Last edited:
Sounds like you need to have a talk with your paint supply guy.He can fill in all the gaps and steer you in the right direction. There are some good explanations on Utube. Nice thing about 2K systems is that you can correct mistakes as you go along.
Bill
Bill
Terry Oxandale
Skinny Man
The paint shop advice was invaluable, but I'm one of those that has to see and feel it before I accept it. They provided their recommendation on the reducer, based on the expected temperature at spray time, as well as recommendations for adding a tiny bit of activator into the basecoat. The only reason I continue to use a 2-stage paint system is simply because of the ease of repair. I'm still a dyed-in-the-wool single-stage kind of painter, but I'm coming around. Don't know that I can ever adapt to water-based paints though.
Terry Oxandale
Skinny Man
That's were a good rivet gun is worth it's money in gold.
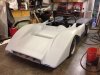
Making progress on sealing the bodywork. The scoops have finally been finished into the nose corners, and a lot of time is being put into ensuring all gaps are even and adjacent panels perfectly aligned from one panel to the next. This is where the time is getting consumed on attaining that last 10% of quality in the body details, fit, and finish.
I'm still wresting with the headlights. I want (need) them on the car being this will be street driven. There is little chance of night driving, but local requirements dictate working headlights. There isn't much tire clearance under the panel for retractable headlights, even with the small projection units commonly available. It would be easy to simply insert a headlight bucket and cover it with acrylic, but I'd like to keep the front nose visually "clean" of any fixed headlights.
Attachments

Last edited:
Can you provide some receivers and electrical receptacles to plug in some lights? You can just snap them out and store them during the day. You could argue it is no different than pushing a button to open the headlight doors on an old Stingray, only you are getting out of the car to do it manually.
Terry,
You have about the same slant that the old Lotus Turbo Esprit had. You could fix a flip up light like they used(or find them on ebay and glass them in). Looked terrible when they were up but during the day they were hidden and didn't break the visual appeal of the front. You should be able to do something like that. If it was good enough back in the 80s it should hold for today. If you need it for registration then you have to do something. Otherwise you don't need them exposed to drive around during the day. Half of them never worked right anyway.
Bill
Terry Oxandale
Skinny Man
Re: McLaren replica build based on a Manta
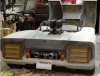
Thought I'd take up Leon's and Russell's slack until they return with more excellent updates on their projects. I guess somebody has to keep these orange "doorstops" bumped up to the front of the postings list, so I'll do it once again.
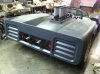
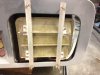
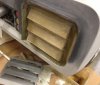
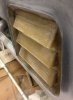
The more I looked at the rear vents on my project, the less I liked them. They did resemble the later M8 series rear venting, but this project needed the early vent design. So I set out to spend a weekend fabricating some rear vents that actually do justice to the early M8 series rear vents used on the McLarens. I molded the individual slats, bonded them to a plate, and then cleco'd the plate to an aluminum frame that held the fiberglass vents perfectly in place while I bonded the picture frame around it.
Thought I'd take up Leon's and Russell's slack until they return with more excellent updates on their projects. I guess somebody has to keep these orange "doorstops" bumped up to the front of the postings list, so I'll do it once again.
The more I looked at the rear vents on my project, the less I liked them. They did resemble the later M8 series rear venting, but this project needed the early vent design. So I set out to spend a weekend fabricating some rear vents that actually do justice to the early M8 series rear vents used on the McLarens. I molded the individual slats, bonded them to a plate, and then cleco'd the plate to an aluminum frame that held the fiberglass vents perfectly in place while I bonded the picture frame around it.
Attachments

Last edited:
Terry Oxandale
Skinny Man
Re: McLaren replica build based on a Manta
And to make it more interesting, I'm attaching a photo of my winch. I lack the sense needed to make an attachment appear in the same orientation as the thumbnail, so here is the insert:
Any hints on how I can get her to serve the ale in a timely fashion during the Dubai race?

And to make it more interesting, I'm attaching a photo of my winch. I lack the sense needed to make an attachment appear in the same orientation as the thumbnail, so here is the insert:
Any hints on how I can get her to serve the ale in a timely fashion during the Dubai race?
Last edited:
Hey Terry, I like what you have done with the vents, every time I see your car i keep thinking there is one piece missing ??? I think it needs the little rear hip spoiler that the M8As had, I think a big M8B wing would be too much but the M8A spoiler would look good. I'm thinking it's probably starting to cool down over there now so do we have to wait till next summer to see it painted??
I have been pottering away in the workshop but nothing to really show and I know how you like pictures, i have been sorting selecter rods and shift forks on the T/A so not much on the car as such. I want to get the B/H cast so I can get this thing to rolling chassis stage which was the goal for the end of this year could still happen with luck. Keep up the orange car front for the rest of us mate. Cheers leon
I have been pottering away in the workshop but nothing to really show and I know how you like pictures, i have been sorting selecter rods and shift forks on the T/A so not much on the car as such. I want to get the B/H cast so I can get this thing to rolling chassis stage which was the goal for the end of this year could still happen with luck. Keep up the orange car front for the rest of us mate. Cheers leon
Terry Oxandale
Skinny Man
Leon, Yes, I've got some 3/8" and 1/2" foam sheet used for composites that I've set aside solely for the purpose of the "A" rear spoiler. I agree that the wing thing would be too much, and the the "A" spoiler would be a good balance between too much, and not enough. So with the cooler weather, I'm returning to the mechanical issues that need to be taken care of (sway bar brackets and bars, dry sump modifications, head lights, and perhaps exhaust modifications for the mufflers.
On your headlight thoughts. Here is a source to check out. Found it cruising Stacey David's videos.
https://www.youtube.com/watch?v=JMT0x4yfno0
Bill
https://www.youtube.com/watch?v=JMT0x4yfno0
Bill
You have a difficult problem there, sir!I'm still wresting with the headlights. I want (need) them on the car being this will be street driven. There is little chance of night driving, but local requirements dictate working headlights. There isn't much tire clearance under the panel for retractable headlights, even with the small projection units commonly available. It would be easy to simply insert a headlight bucket and cover it with acrylic, but I'd like to keep the front nose visually "clean" of any fixed headlights.
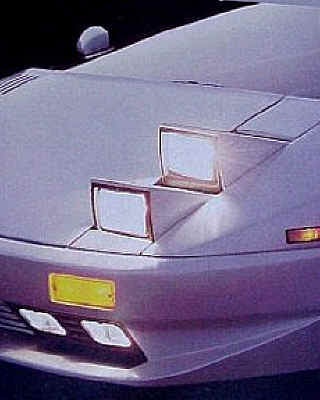
Here is just a suggestion. In the 1980's, two other men who were building a new car faced a problem similar to yours. They were Giorgio Moroder and Claudio Zampolli. They had Marcello Gandini design their new car, the Cizeta Moroder V16T .
Gandini came up with a novel approach to cramming a lot of headlight into a tiny supercar space: the photo is below. Gandini used pop-up (retractable) headlights, but he separated the low beam lights from the high beam lights, stacking them vertically atop the front fender (wing). Small lights, stacked vertically, do take up too much space in a cramped supercar front fender.
Though back then, Gandini was confined to working with sealed beam headlamps, might his approach to locating retractable headlamps (using, perhaps, LED's or small projector headlights) solve your problem?
Outside the box,
I remain yours,
Les
")
P.S. OFFICIAL CIZETA WEB SITE - cizetav16 - cizetav16t - cizetav16th - cizetausa - sponsored by tipooil
Terry Oxandale
Skinny Man
All good suggestions...Thanks! I'm shooting for the smallest LED headlights that I think I can get away with, but still have a decent number of lumens in case I'm asked to demonstrate the lights. I don't ever plan on driving this at night, so it's more a compliance thing than actually using them. Some of the challenges are minimum height, which is attainable, but then they would be located nearly over the front tires, which has minimal tire-to-fender clearance. So to ensure the tire doesn't rub the lights, the lights would need to be moved down the nose below the DMV's minimum. Lastly, weight. This thing is at 2100+, and I'm getting tired of adding yet another 2 or 3 lbs.
Thinking out of the box, I thought about retractables that are on the flat portion of the bodywork between the fenders (over the radiator outlet). They would be exposed to some warm air, but would not be too visible when retracted (unless you look deep down into the radiator, and could be controlled through a rod by a single actuator.
For now, and for purposes of getting paint on the car, I'm going to go ahead and make what I think will be an appropriate cut-out for the lights, and then finish the removed cut-out (edged and painted) so that it can be screwed back into place (much like a headlight cover would be attached). That will at least get the bodywork ready for a future install of the lights.
How about mounting lights in the front of the side view mirrors?
I mentioned plug in lights before. You need to meet the letter of the law, they really don't need to be practical.
Does your state law say that you can't get out of the car to plug the light housings in place at dusk?
How about clamping them on the roll bar like an off-road vehicle? Rectangular or projector lights under the roll bar might not be objectionable. Does your vehicle code state that they need to be at the front of the car, or just facing forward?
Similar threads
- Replies
- 9
- Views
- 777
- Replies
- 1
- Views
- 361