
You are using an out of date browser. It may not display this or other websites correctly.
You should upgrade or use an alternative browser.
You should upgrade or use an alternative browser.
MDA Mk1 with Gulf Arches - Martin P
- Thread starter Martin Potts
- Start date
Hi Martin
Where are you going to put your front indicators - for SVA purposes? This has been a bit of a pain on my build as you can't get the range of vision if they are mounted in the lower light housing.
Chris
Where are you going to put your front indicators - for SVA purposes? This has been a bit of a pain on my build as you can't get the range of vision if they are mounted in the lower light housing.
Chris
FYI - 3M transparent film comes in many thicknesses, the stuff now being promoted for front gross protection of bumpers and hoods looks relatively nice if applied professionally. But is not up to the task in areas you are concerned about. For that you would need a "stone guard" film which is much thicker (commonly seen in clear on the front side of some 911 flares and 944 fear flares). This film can take much more abuse although in the end it might start looking shoddy after many years and miles.
Dutton
Lifetime Supporter
Fabulous job you're doing there, Martin. Love the work you did with the sill panels!
I wonder if, instead of using transparent film behind the wheels to slow down the wear from road grit, there might be a good color match for the bed liner material which some of the other builders are using under the chassis. We've all seen the grey, black and a few other colors but being able to come up with something in the right shade of Scuderia Filipinetti might be an appealing option.
Best,
T.
Thanks for the helpfull advise guys.
Chris - I was thinking of mounting my indicators within the headlamp recess towards the front. I've seen a few cars with them mounted there and they look O.K. For SVA there will be no covers fitted but finally, when the covers are fitted, I think it will disguise them enough not to be an eye sore. I really wanted the Gulf Spots below, so it was never an option for me to mount them there.
Chris - I was thinking of mounting my indicators within the headlamp recess towards the front. I've seen a few cars with them mounted there and they look O.K. For SVA there will be no covers fitted but finally, when the covers are fitted, I think it will disguise them enough not to be an eye sore. I really wanted the Gulf Spots below, so it was never an option for me to mount them there.
I wonder if, instead of using transparent film behind the wheels to slow down the wear from road grit, there might be a good color match for the bed liner material which some of the other builders are using under the chassis. We've all seen the grey, black and a few other colors but being able to come up with something in the right shade of Scuderia Filipinetti might be an appealing option.
Here's a DIY tintable bed liner. I bought some for my Pantera engine compartment but haven't used it yet. Click on "Products" then "Speciality Coatings".
United Kingdom - Products and Info
After much admustment, sanding, filling, grinding, shaping and more sanding, i'm finally happy with the fit of the rear body and i've gapped the passenger side from front to back. The drivers side is still to do but it shouldn't take me as long as it's quite close already. I've also dropped the car on the springs to see what it will look like when the weight is on. It still has about 1.5cm left to drop before it's right, but it's close enough for now. Hope you enjoy the pics,
Cheers,
Martin
Cheers,
Martin
Attachments
![Fit and Gaps 1[640x480].JPG](/data/attachments/16/16158-19818cbbb64884c1bfd1dbab43f5fa7d.jpg?hash=GYGMu7ZIhM)
![Gaps on Near Side[640x480].JPG](/data/attachments/16/16159-ea4ba22324209f3d30c174f80dfc3a79.jpg?hash=6kuiIyQgnz)
![Side Profile[640x480].JPG](/data/attachments/16/16160-e31fc340e349612127ff4c19b28a52b9.jpg?hash=4x_DQONJYS)
![Front Profile[640x480].JPG](/data/attachments/16/16161-ddebf1c633f670883f82b16d63edceb1.jpg?hash=3evxxjP2cI)
The sills don't seem to flare so much on 1075. (the transition between the siil and arch is not a smooth curve, and it seems that martin has replicated this) But then again we don't know what Martin is replicating (or if he's replicating anything at all...) so i could be talking rubbish. Are you replicating an original Martin? or is it going to be your own design?
Joe
Joe
Attachments

Yes, I think Joe is correct, there is no "right" in any of these cars, they were all individual and different, just an alternative then. Frank
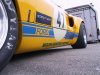
Good weather in the U.K this weekend so i decided to fit my light covers. They are Repsol perspex and don't like being manipulated in cold conditions. Even with my attention to spacing and using a heat gun to make sure they were plyable, I still managed to crack the passenger side headlight cover.. Bugger ! It was a bad fit to start with so I'll try again with a new one soon I hope.
The other covers fitted a treat and I found trimming and drilling them quite easy. It was only the top bend that posed some questions.
The bodywork on the drivers side is coming on nicely. You can just see it in the backround. Gaps look good, just a bit of finishing work.
I've been looking at photos of 1075 and I'm pretty happy with the sill to rear arch lines. I like Franks' car very much, it looks very aggressive, but for now I'm going to stick with what I've got as I see it's a pretty close replication of the original.
Martin
Attachments
![Light Covers [640x480].JPG](/data/attachments/16/16379-e95e8b55d1ade5276d1e70a6a9cfa9ae.jpg?hash=6V6LVdGt5S)
![Side Window [640x480].JPG](/data/attachments/16/16478-f240a27983645ac0f4922961552e4e5c.jpg?hash=8kCieYNkWs)
![Blacked out NACA Ducts[640x480].JPG](/data/attachments/16/16479-312a12b32c731f623f6015bc4b201806.jpg?hash=MSoSsyxzH2)
![Offside Gaps [640x480].JPG](/data/attachments/16/16507-8e6efb8c4ca1fade91951eddf567f200.jpg?hash=jm77jEyh-t)
![Offside Gaps1 [640x480].JPG](/data/attachments/16/16508-fb144e870ff4bb97983e4fdcd5d17216.jpg?hash=-xROhw_0u5)
![Side View Offside1 [640x480].JPG](/data/attachments/16/16509-369a9ab5b0617adeb822ae22d21e9bf5.jpg?hash=NpqatbBhet)
Similar threads
- Replies
- 14
- Views
- 5K
- Replies
- 4
- Views
- 4K