
You are using an out of date browser. It may not display this or other websites correctly.
You should upgrade or use an alternative browser.
You should upgrade or use an alternative browser.
Mitch Krause's RCR GT40 Build
- Thread starter Big-Foot
- Start date
Hello,
I guess a new post (and the first one) for my build log. That must mean I did something right? Well, I finished the inside door latching system, so I will show you how I did that.
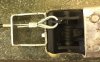
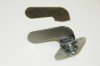
It seems to work very well, lets you easily install and remove the door box and latch. In the first picture below (complete), you have everything assembled and carefully threaded in the proper order and place on the cable. Yep, it is a bicycle brake cable, suitably modified to fit what I needed. In this case a sheath length of 12 inches with the cable length on both ends just long enough to attach allows for installation of the latch into the door (while holding the door box in your lap), then connection of the eye bolt and then installation of the door box.
The second picture is the detail of the connection at the door handle. It shows the back of the door handle. Since the “throw” of the latch is an inch or so, an Aluminum support box was made to support that much movement, the cable connected and then crimped to the latch. Note the sheath of the cable rests on the outside of the “box” so that it has something to pull against.
The third picture is the detail on the latch side of things. A hole was drilled in the edge of the latch, then the brake cable threaded through from that end. Note the eye bolt is the first thing in on the cable, that is the support for this side of the brake cable to give the cable sheath something to pull against.
The fourth picture is with the door latch mounted in the door, and the eye bolt mounted in the supporting brace inside the door. This has a slight downward pull to the cable, which serves to easily release it. At this point, the door box was in my lap, next step was simply to place the door box in place (and there is a few extra inches of cable to allow this easy access), and you are done.
OK, seems I can't upload files, as soon as I click "upload", it says a security token is missing. So, sending the post without files, so I don't miss the text.
Mitch
I guess a new post (and the first one) for my build log. That must mean I did something right? Well, I finished the inside door latching system, so I will show you how I did that.
It seems to work very well, lets you easily install and remove the door box and latch. In the first picture below (complete), you have everything assembled and carefully threaded in the proper order and place on the cable. Yep, it is a bicycle brake cable, suitably modified to fit what I needed. In this case a sheath length of 12 inches with the cable length on both ends just long enough to attach allows for installation of the latch into the door (while holding the door box in your lap), then connection of the eye bolt and then installation of the door box.
The second picture is the detail of the connection at the door handle. It shows the back of the door handle. Since the “throw” of the latch is an inch or so, an Aluminum support box was made to support that much movement, the cable connected and then crimped to the latch. Note the sheath of the cable rests on the outside of the “box” so that it has something to pull against.
The third picture is the detail on the latch side of things. A hole was drilled in the edge of the latch, then the brake cable threaded through from that end. Note the eye bolt is the first thing in on the cable, that is the support for this side of the brake cable to give the cable sheath something to pull against.
The fourth picture is with the door latch mounted in the door, and the eye bolt mounted in the supporting brace inside the door. This has a slight downward pull to the cable, which serves to easily release it. At this point, the door box was in my lap, next step was simply to place the door box in place (and there is a few extra inches of cable to allow this easy access), and you are done.
OK, seems I can't upload files, as soon as I click "upload", it says a security token is missing. So, sending the post without files, so I don't miss the text.
Mitch
Sounds like some great progress Mitch!
If you want to send the pictures to me, I will get them posted for you. Not sure what the security token thing might be though.. maybe dumping cookies and cache would help?
What browser are you using?
If you want to send the pictures to me, I will get them posted for you. Not sure what the security token thing might be though.. maybe dumping cookies and cache would help?
What browser are you using?
OK, might have figured out problem with the pictures. They might be too big. Trying with shrunken ones.
Attachments
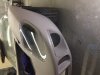
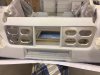
I have light covers.
Lexan Driving Light and Headlight covers
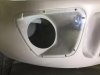
OK, just a few notes about how I did it. I followed the general thoughts from the book by Charles and Ryan. In fitting the various pieces, I did start at one corner and got it to fit there first. Then depending on how much I had left on the other corners, would either cut some off with a scroll saw, or grind it away with a sander. Once I was close, I would use my belt sander for the final adjusts. Basically laying the glass so that it fit in the designated starting corner and then using a black permanent sharpie to mark (by eyeball) the line required to fit. Then grind with the belt sander and keep doing that until I had the fit. Generally took a few tries (since I was scared to grind away too much) until I had it fitting the way I wanted.
With that done, it was time to get the screw holes. I mounted using a number 6 stainless steel sheet metal screw. I would first drill a 3/32 hole in the lexan at the places I determined the holes would go (general pattern from Schulz’s book). I did use the ¼ tape around the edge of the lexan to make sure I had the same distance from the end. Note that for the bottom of the driving lights, there is much less real estate on the edge of the fiberglass, so those holes had to move a little closer to the edge of the lexan that the other holes. I would then drill the 3/32 hole into one place on the fiberglass, use a nail to hold that aligned and proceed with the other holes. When that was all done, I would remove the lexan and drill a 5/32 hole in each location in the lexan (so that #6 screw fit with a little bit of room). Then drill again in the fiberglass with a 9/64 hole (so that the screw would screw and hold in the glass). I have not yet decided if I am going to use nutserts on the door windows. I did not use inserts on the driving light and headlights as I figure the screws in the fiberglass will hold well enough.
Then wrap the lexan in glad wrap and put it away until the vehicle is painted.
Lexan Driving Light and Headlight covers
OK, just a few notes about how I did it. I followed the general thoughts from the book by Charles and Ryan. In fitting the various pieces, I did start at one corner and got it to fit there first. Then depending on how much I had left on the other corners, would either cut some off with a scroll saw, or grind it away with a sander. Once I was close, I would use my belt sander for the final adjusts. Basically laying the glass so that it fit in the designated starting corner and then using a black permanent sharpie to mark (by eyeball) the line required to fit. Then grind with the belt sander and keep doing that until I had the fit. Generally took a few tries (since I was scared to grind away too much) until I had it fitting the way I wanted.
With that done, it was time to get the screw holes. I mounted using a number 6 stainless steel sheet metal screw. I would first drill a 3/32 hole in the lexan at the places I determined the holes would go (general pattern from Schulz’s book). I did use the ¼ tape around the edge of the lexan to make sure I had the same distance from the end. Note that for the bottom of the driving lights, there is much less real estate on the edge of the fiberglass, so those holes had to move a little closer to the edge of the lexan that the other holes. I would then drill the 3/32 hole into one place on the fiberglass, use a nail to hold that aligned and proceed with the other holes. When that was all done, I would remove the lexan and drill a 5/32 hole in each location in the lexan (so that #6 screw fit with a little bit of room). Then drill again in the fiberglass with a 9/64 hole (so that the screw would screw and hold in the glass). I have not yet decided if I am going to use nutserts on the door windows. I did not use inserts on the driving light and headlights as I figure the screws in the fiberglass will hold well enough.
Then wrap the lexan in glad wrap and put it away until the vehicle is painted.
Attachments


Dsuz Fasteners.
OK, a note on fasteners. I didn't see a whole lot of information on finding them on the forums. Not sure if everyone has as much issue with sourcing the right sizes as I did, it might have been something I did. After much learning on the sizing and how to calculate what you needed, I determined that I needed some that were in the range of 45/100 ths of an inch long and others that were much longer (range of 90). A bunch of emails, phone calls and web research seemed to find that there is a very limited number of companies that make the fastener, most other ones source them from that company and they only sell through resellers and not direct to the consumer. The other big issue is that nobody seemed to stock anything longer than a 50 and those were hard to find. More looking and such, and I actually found a company (MilSpec Products | Quick Release Fasteners Camloc Dzus Airloc C-Spec Z-Spec A-Spec - AIRCRAFT FASTENERS | MilSpec Camloc Dzus Airloc Zeus Quick Release Fasteners) that seems to make their own in a few different designs, and had some in stock (although only up to the 50) and would sell in small lots. I bought a few different ones in a few different lenghts in the 40 to 50 range to test fit and found what I needed. A call to support and a chat with someone very helpful named Jeremy about what I was working on and why I needed longer ones (which they would do in runs of 100 instead of 1000's like others I had found, but still very spendy), and Jeremy said "I think I was talking to someone else recently who actually ordered longer ones for a GT40 also". He gave me a name, I did a search here and found him, sent a PM and actually got some fasteners that are longer without having to pay for a whole run myself. Hopefully I helped ease some of his investment also.
OK, a note on fasteners. I didn't see a whole lot of information on finding them on the forums. Not sure if everyone has as much issue with sourcing the right sizes as I did, it might have been something I did. After much learning on the sizing and how to calculate what you needed, I determined that I needed some that were in the range of 45/100 ths of an inch long and others that were much longer (range of 90). A bunch of emails, phone calls and web research seemed to find that there is a very limited number of companies that make the fastener, most other ones source them from that company and they only sell through resellers and not direct to the consumer. The other big issue is that nobody seemed to stock anything longer than a 50 and those were hard to find. More looking and such, and I actually found a company (MilSpec Products | Quick Release Fasteners Camloc Dzus Airloc C-Spec Z-Spec A-Spec - AIRCRAFT FASTENERS | MilSpec Camloc Dzus Airloc Zeus Quick Release Fasteners) that seems to make their own in a few different designs, and had some in stock (although only up to the 50) and would sell in small lots. I bought a few different ones in a few different lenghts in the 40 to 50 range to test fit and found what I needed. A call to support and a chat with someone very helpful named Jeremy about what I was working on and why I needed longer ones (which they would do in runs of 100 instead of 1000's like others I had found, but still very spendy), and Jeremy said "I think I was talking to someone else recently who actually ordered longer ones for a GT40 also". He gave me a name, I did a search here and found him, sent a PM and actually got some fasteners that are longer without having to pay for a whole run myself. Hopefully I helped ease some of his investment also.
Last edited:
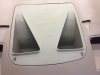
Lexan Driving Light and Headlight covers
OK, just a few notes about how I did it. I followed the general thoughts from the book by Charles and Ryan Schmidt. In fitting the various pieces, I did start at one corner and got it to fit there first. Then depending on how much I had left on the other corners, would either cut some off with a scroll saw, or grind it away with a sander. Once I was close, I would use my belt sander for the final adjusts. Basically laying the glass so that it fit in the designated starting corner and then using a black permanent sharpie to mark (by eyeball) the line required to fit. Then grind with the belt sander and keep doing that until I had the fit. Generally took a few tries (since I was scared to grind away too much) until I had it fitting the way I wanted.
With that done, it was time to get the screw holes.
I mounted using a number 6 stainless steel sheet metal screw. I would first drill a 3/32 hole in the lexan at the places I determined the holes would go (general pattern from Schulz’s book). I did use the ¼ tape around the edge of the lexan to make sure I had the same distance from the end. Note that for the bottom of the driving lights, there is much less real estate on the edge of the fiberglass, so those holes had to move a little closer to the edge of the lexan that the other holes. I would then drill the 3/32 hole into one place on the fiberglass, use a nail to hold that aligned and proceed with the other holes. When that was all done, I would remove the lexan and drill a 5/32 hole in each location in the lexan (so that #6 screw fit with a little bit of room). Then drill again in the fiberglass with a 9/64 hole (so that the screw would screw and hold in the glass). I have not yet decided if I am going to use nutserts on the door windows. I did not use inserts on the driving light and headlights as I figure the screws in the fiberglass will hold well enough.
Then wrap the lexan in glad wrap and put it away until the vehicle is painted.
Attachments
Ian Anderson
Lifetime Supporter
Dzus Fastener | Demon Tweeks
Ask and information is available
Probably not the cheapest source but a good supplier
Ian
Ask and information is available
Probably not the cheapest source but a good supplier
Ian
Lexan Driving Light and Headlight covers
OK, just a few notes about how I did it. I followed the general thoughts from the book by Charles and Ryan Schmidt. In fitting the various pieces, I did start at one corner and got it to fit there first. Then depending on how much I had left on the other corners, would either cut some off with a scroll saw, or grind it away with a sander. Once I was close, I would use my belt sander for the final adjusts. Basically laying the glass so that it fit in the designated starting corner and then using a black permanent sharpie to mark (by eyeball) the line required to fit. Then grind with the belt sander and keep doing that until I had the fit. Generally took a few tries (since I was scared to grind away too much) until I had it fitting the way I wanted.
With that done, it was time to get the screw holes. I mounted using a number 6 stainless steel sheet metal screw. I would first drill a 3/32 hole in the lexan at the places I determined the holes would go (general pattern from Schulz’s book). I did use the ¼ tape around the edge of the lexan to make sure I had the same distance from the end. Note that for the bottom of the driving lights, there is much less real estate on the edge of the fiberglass, so those holes had to move a little closer to the edge of the lexan that the other holes. I would then drill the 3/32 hole into one place on the fiberglass, use a nail to hold that aligned and proceed with the other holes. When that was all done, I would remove the lexan and drill a 5/32 hole in each location in the lexan (so that #6 screw fit with a little bit of room). Then drill again in the fiberglass with a 9/64 hole (so that the screw would screw and hold in the glass). I have not yet decided if I am going to use nutserts on the door windows. I did not use inserts on the driving light and headlights as I figure the screws in the fiberglass will hold well enough.
Then wrap the lexan in glad wrap and put it away until the vehicle is painted.
Hi Mitch,
Really nice job on fitting the light covers. Be sure to tighten the screws just enough to hold the pieces on, which doesn't take much. If they are too snug the screw pressure will dimple and wave the edges over time as with any plastic. I check this by catching a glare of light on the cover and if the light makes a circle around the screw, back it off until the light reflection is flat. Then they will stay looking great.
Mark Clapp
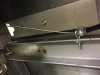
A few things accomplished this weekend. Undercoated the rear wheel well area on the rear clip. Eastwood rubberized undercoating was used. Really easy to use and spray on. I was satisfied with the look and everything once it dried. See picture.
Attachments
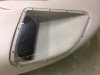
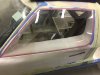
Got the drivers and passenger windows mounted. Use the spacing from Charles and Ryan's book. 6-32 screws button head, stainless steel, pan head, socket style were selected. Holes were tapped into the fiberglass. 1/2 inch screws worked for almost everything (oops). That is a good length for the front side, the back side and the bottom side. Found out they are a wee bit too long for the top edge and now I have a little #36 hole to patch on the inside of the door. Need to get some 3/8 inch screws I guess.
Still waiting on some notes from RCR before I finally mount the window latches as per a previous post. Think I have it figured out, but need confirmation.
Still waiting on some notes from RCR before I finally mount the window latches as per a previous post. Think I have it figured out, but need confirmation.
Attachments
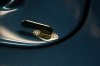
I have DSUZ. This was a very long effort, both in terms of sourcing the right fasteners, and then in figuring out all the mounting intricacies. Fasterner are the self captured DSUZ, 0.95 grip length. Basically a 27/64 inch hole through everything, with a 3/4 inch hole in the fiberglass for the top part. A very slight countersink was added to the 3/4 inch hole using a file to do the countersink to make sure the top fastener lays flat. What you can't see in the picture is below the snorkel is some little pieces of flat aluminum stock 1/4 inch thick approximately a rounded triangle shape (Randy had these made and provided them) to provide some reinforcing to the whole thing and I elected to stay with those. The springs for the fasteners were mounted from the inside of the front clip, with 6/32 screws then tapped into the aluminum to secure the springs. The fiberglass is slightly thicker at the front of the clip, 3/4 inch screws are the perfect length there to not stick out the top of the AL. At the back, 1/2 inch screws are the right length, tapped into the AL again. If I can find 5/8 that will be tried as they are a little low in the AL and could be just a little longer. I didn't secure the top DSUZ to the snorkel yet in the pictures, will probably used some tapped phillips screws to to do that. Got everything installed and aligned it looks good. Then removed everything and re-install after the paint is done. Now just to get the fasteners for the rear of the front clip.
Attachments
Dr. Bob Woods
Supporter
Mitch,
I like what you did with the Dzus fasteners in terms of clocking. I don't know why they couldn't have made the slot align with the rivets, but they are slightly off. you got your slots in line with the car. Well done! I did the same thing.
In addition to aligning the slots, I fabricated some single-wing attachments to go onto the Dzus fastener just like the originals did. Nobody makes that type of wing anymore. I did it mainly so I won't have to have a tool or reach in my pocket to open the Dzus, but it is nice that it looks like the original cars as well.
The stainless steel wings were laser cut from a sheet and then laser welded to the Dzus fastener. Very tidy.
You can also see my discussion about the lengths and installation of Dzus fasteners on my build log, page 8 post 144. http://www.gt40s.com/forum/gt40-build-logs/42186-tornado-gt40-texas-8.html?highlight=gt40+in+texas
-Bob Woods
Attachments
Bob,
Yeah, just have to take great care to keep the screws that hold the springs on the line that you want to have the slot align to. I agree they could have made it easier. I did get them to align with the car.
I think that Randy might have gotten the stainless steel wings from you or something once upon a time. I have eight of them in a package. I consulted my welder and he recommended trying epoxy to get them affixed to the DSUZ fasteners, as he was leery of welding the fastener without having bad things happen. I am proceeding down that path, will be sure to update when I am done. Seems like 3M metal epoxy might be the best way to go, I am going to get some of that and experiment a little bit before I go final. The wings that I have fit perfectly with the four fasteners that I showed for the snorkel, so if all works it will look really good when done.
Mitch