MKII Headers: My 2006 Summer Project

Adam C.

GT40s Sponsor
Hello all, long time, no see.

This one is called our 2006 summer project because it is presented as a follow up to our little brake scoop project of similar title. In truth, this has been more like a one-year project.

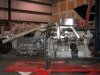
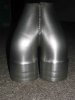
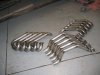
As I proposed in the previous write up, there are a few very special things that make a MKII, namely the transaxle, headers, and brake scoops. With the scoops done, we moved on to the next more elaborate piece.

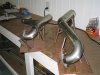
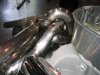
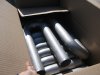
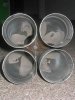
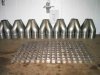
The project began with some jigs on loan from a very dear friend. The prototype set of pipes were made from these jigs using donuts and straight sections of pipe cut to fit.
 

Attachments

  • 122_2218.jpg
    122_2218.jpg
    118.3 KB · Views: 1,488

Adam C.

GT40s Sponsor
I drew up the header flanges and had them water cut... sweet.

Once all 8 prototypes were complete, the moment of truth came when they were mounted to a big block complete with T44 and original collector and megaphone.

Is there anything more beautiful?
 

Attachments

  • 123_2303.jpg
    123_2303.jpg
    131.6 KB · Views: 1,497
  • 123_2308.jpg
    123_2308.jpg
    125.9 KB · Views: 1,488

Adam C.

GT40s Sponsor
So with the jigs verified, it was time to sit down and really figure out how the originals went together. We reversed engineered the prototypes and got them into CAD. With the CAD model a cookbook list of bend sections was developed. This took MONTHS.
 

Attachments

  • headers7.JPG
    headers7.JPG
    34.8 KB · Views: 1,392

Adam C.

GT40s Sponsor
With it all figured out, we ordered an enormous amount of tubing to complete sets for ourselves and friends. U-bends allow us to get 2 sections out of one 180 deg bend. Material is 2.25" dia. 0.035" thick 321 SS bend at almost a 1D centerline radius. There aren't too many shops willing to supply that, trust me. It is thin, hard as nails, and expensive.
 

Attachments

  • IMG_1231.jpg
    IMG_1231.jpg
    97 KB · Views: 1,283

Adam C.

GT40s Sponsor
We then made the collectors. They are the merge variety and the geometry is unlike any available todyay the best we can tell. I won't try explain how we fabbed these. I dare you to weld down in there! Ever played that game operation?
 

Attachments

  • IMG_3292_2.jpg
    IMG_3292_2.jpg
    98.6 KB · Views: 1,307
  • IMG_3293_2.jpg
    IMG_3293_2.jpg
    123.6 KB · Views: 1,331

Adam C.

GT40s Sponsor
We even had to design water cut, and fab the little tabs that hold the collectors and pipes together. I bent and welded like 250 of these little suckers!
 

Attachments

  • IMG_3303_2.jpg
    IMG_3303_2.jpg
    130.5 KB · Views: 1,359

Sandy

Gulf GT40
Lifetime Supporter
I love the 427 style exhaust. The work your doing is awsome, works of art, can't wait to see the final SS versions.

Sandy
 

Adam C.

GT40s Sponsor
All segments are slip fit and welded as original. Cylinders 4 and 8 are two piece to ease assembly (read make it possible to assemble). The transition from round to rectangular is reinforced with an additional layer welded to the flange and pipe. That transition is 50% of the work for each pipe. Believe me, MKI pipes are childs play compared to these suckers.
 

Attachments

  • IMG_1839_2.jpg
    IMG_1839_2.jpg
    126.8 KB · Views: 1,368
Last edited:

Adam C.

GT40s Sponsor
All welds were TIG with the pipes purged with argon. The result is a beautiful weld without nasty oxidation on the inner surface. The welding supply guys also got to know me real well.
 

Attachments

  • IMG_3387_2.jpg
    IMG_3387_2.jpg
    88.8 KB · Views: 1,295

Adam C.

GT40s Sponsor
The final product was then fit to a 427 jig I made. Fit like a glove! Now all we need to do is make the megaphone tailpipes and weld on the tabs. Sorry for the poor pictures. My camera is dying. I'll try to post better pictures when we finish the tailpipes and mount them to the real engine.

Not super technical, and for that I am sorry. Hopefully it will inspire others however.
 

Attachments

  • IMG_3407_2.jpg
    IMG_3407_2.jpg
    101.1 KB · Views: 1,323
  • IMG_3408_2.jpg
    IMG_3408_2.jpg
    106.7 KB · Views: 1,368
Adam,
Having done tig welding, I can tell everybody, that is the best looking welding I have seen, bar none, even the welding that will be done for my headers. Tig welding is not hard for big welds. The fine stuff is truely art in the right hands.
If you decide to do other systems like for the 302 or 351, you will make a bundle as I don't think anyone would want to cover those pipes with anything to hide the raw beauty of the stainless and those welds.
And to think, we all thought you to be a nerd with all those formulas and graphs!!!!!!
Keep up the great work.

Bill
 

Adam C.

GT40s Sponsor
Thanks all. It has been a real journey.

Thanks for the kind words Bill.

I would still call my welds structurally satisfactory, but not as pleasing to they eye as they could be. A funny thing happended while spending hundreds of hours welding these things. I became better at welding thin stuff than I am at thicker material. I was doing some 1/8" stuff on the mustang the other day and just couldn't get in the groove. The 321 has Ti in it (that is what gives 321 its elevated temperature strength), which is nasty in it's molten state. You use 347 filler rod when welding 321 as well. The result is a weld that looks somewhat dirty, with what I think is the Ti floating on top. I hear that inconel is even worse in that regard. 304 actually makes the best looking welds, although not as strong or corrosion resistant at elevated temperatures. I am still a nerd, but would have surely been a fabricator if I had not gone to school. It is like art class for grown ups.

Howard, I think I will have to leave the T44 to others more gifted. Our next project will be seats. They will be just like original with the exception of the seatbacks, which will probably be vacuum-bagged carbon, maybe with a little kevlar thrown in to slow down the water pump as it grinds towards your kidneys in the event of a crash. The originals are just too heavy. Anyone interested in a set should get in touch soon.
 

Chris Kouba

Supporter
Holy crap Adam- those look AWESOME!

I haven't done TIG in a long time but that does look great. Awesome job on the manufacture of multiples of them too.

Sorry about the grade school vocabulary... Again, awesome work!

Chris
 
Adam
Awesome craftsmanship on those pipes, your welding and repeatability on the tubes is definitely on the money. If you are having some trouble with what you called "dirty" on the outside of the tubes I would suggest you try a complete purge during the process...an example would be a box similar to a glass bead cabinet, except for welding. We used this on titanium parts and it gave a good weld. Also you may have a little oxidation on those tubes which will also come to the top on stainless, looks like a floating skin as you weld. I can tell you that you have a superior product there and have taken pains in the details.
I would like to ask what method you use to cut the tubing to size as your join-ups look very good.
cheers
Phil
 

Adam C.

GT40s Sponsor
Thanks Phil,

Thanks for the compliments. Honestly we did not expect this kind of feedback. We just tried to copy the originals as close as possible. With every original part we copy, I am increasingly impressed at the attention to detail in these cars. Everything looks simple and easy until you actually try to make it. Only then are the layers of engineering exposed. Most of the time I am sitting there mumbling "those cheeky bastards!"

We did some Ti parts in a chamber back in college. I had considered it for this project, especially for the collectors. It really limits your visibility and manuverability though. I removed the mill scale from the joints and cleaned with alcohol before welding. The flanges were 304, and when welded to the 321 pipes the weld was beautiful. I think the extra nickle makes the difference. If you rub out the HAZ on the 321 however, the weld looks just as good.

We just cut the tube and bends with a band saw. The hard stainless and interrupted cut makes short work of the blades. Sometimes we even used the abrasive saw. The joints on the primaries are expanded and slip fit. This is how the originals were done and why the joints look so good. If the slip fit is made too loose however, the weld is tougher than a butt weld. You have to tack the thing together, trap the outer tube, and shrink it back down on the inner.

The collectors were marked with a fancy little template that I made, cut with a regular old cut-off wheel, and then ground on a belt grinder to make them flush and square.
 
Hey Adam, it looks like you need a little air in the front right tire of the Mustang. :)

The headers look great, and I'm especially impressed with the collectors. Did you outfit your torch with a small-diameter nozzle to help you get at those tight areas? I hear you about welding being art class for grownups - I'm taking a welding class at a vo-tech school right now and I'm really enjoying myself. Pushing that little puddle around is such a pleasurable endeavor.

I never realized that the Mk-II headers were made from 321; I thought that stuff was mostly used in turbo exhaust systems. I imagine you have to be damn good with a TIG welder to weld 321 - it's too expensive to make mistakes with.
 

Lynn Larsen

Lynn Larsen
Adam,

Nothing but primo! As per normal.

Are you or will you be back in the motor city area? I simply have to take a trip up there and soon.

Continually impressed,
Lynn
 
Back
Top