

You are using an out of date browser. It may not display this or other websites correctly.
You should upgrade or use an alternative browser.
You should upgrade or use an alternative browser.
Nicks Forte Scratch Build - to Stunning Mk1 GTD
- Thread starter Nick Davies
- Start date
")
Thanks bud. I'll take you up on that. Can confirm later in the week but I might be in your area on Friday afternoon.Nick, I have a spare startermotor unused on my "spareshelf" possibly from same manufacturer as adapterplate You can have it or keep as a spare, I have no use for it bud, next time you pop in
Morten
Hi everyone, its been a while since my last serious post after encountering the starter motor issues. Anyway, long story short, I'm now officially semi retired but seem to have more on my plate with this car and both UK and Thailand house plans that I've decided to de-clutter a bit and passed my build to a guy who is gonna spend 8 weeks on her to take her to the next level. In the UK, that means being close to IVA ready. Car was essentially just needing some TLC, so under the circumstances, bit the bullet and have given to a talented engineer to provide the well needed spit and polish. So looking forward to the additions of stuff I simply haven't hot time for, such as fit the loom, install the immobilizer, fit the door lock mechanisms and the like.
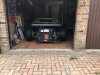
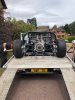
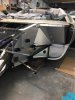
So the Morning was spent putting her running gear on for the first time, getting her into daylight and then up onto the transporter.
Now the blitz the empty garage so its pristine for her return in a couple of months. ;-)
So the Morning was spent putting her running gear on for the first time, getting her into daylight and then up onto the transporter.
Now the blitz the empty garage so its pristine for her return in a couple of months. ;-)
Attachments
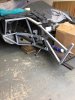
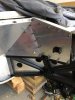
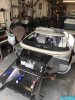
Quick update on the build as it’s 2 weeks into an 8 week stay with a fellow GT Forte builder. first job on the list was to take off the front panelling I had done and then mig the rivet holes, repaint the effected sections and re-do from scratch. Was never happy with my efforts so although my work was good enough, I’d always have a dislike for that part of my build.
Re-panelling well under way now and this is a job that should be completed in full shortly. Much more pleasing on the eye.
Then we can move onto things that need doing that I’ve simply not got time for at the moment.
Re-panelling well under way now and this is a job that should be completed in full shortly. Much more pleasing on the eye.
Then we can move onto things that need doing that I’ve simply not got time for at the moment.
Attachments
Hi, its 1.2mm 1050. If you believe all the blurb it’s qualities etc. are described as moderate strength with excellent corrosion resistance. Attractive feature is its highly reflective surface so ideally suited to exposed uses where a decorative impact is desired. Make of that what you will.What alloy are you using, Nick?
I originally went with something much softer but it scratched like hell and I eventually ended up spraying it all in black stone chip which was practical but in my mind it looked dreadful. It had lost all of the essence and essentially the DNA of being fundamentally a race car If that makes sense.
Glad to be of service Nick, and very pleased with the results so far
Hi Neil. This time around am planning to skip the sealant between the panels and the chassis. unless I'm unlucky to get caught out one day, I've no real intention of taking g=her out in the wet. We are also going Riv Nuts as opposed to rivets so the panels are remove-able.Thanks, Nick. I had never heard of 1050 aluminum alloy so I had to look it up. Adding a sealant such as silicone or polysulfide betreen the tube and the aluminum before riveting will keep moisture out of the faying surface.
Neil
Supporter
Nick, unless you install countersunk Riv-Nuts the panels will not lay tight against the tubing. It will be spaced away by the width of the Riv-Nut head. Countersunk Riv-Nuts are such a pain to install that it might be easier to rivet the panels on and then drill them out when you need to remove the panel.
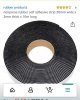
Hi Neil, yep, we considered that. we have installed a layer of neoprene rubber self adhesive strip between the panels running between the Riv-Nut heads. This way the panels sit sight and are weather sealed to address the odd chance I one day get caught out in the wet.Nick, unless you install countersunk Riv-Nuts the panels will not lay tight against the tubing. It will be spaced away by the width of the Riv-Nut head. Countersunk Riv-Nuts are such a pain to install that it might be easier to rivet the panels on and then drill them out when you need to remove the panel.
My original panels used the polyurethane sealant which I won't use again in any area where the panel might one day have to be removed.
Attachments
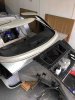
After 3 weeks hard graft, the front is almost done. Much better than my original effort. As of next week as we work rearward on the car, serious jobs to be done for the first time.
Attachments
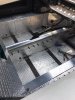
Following last weeks post at the end of week 3, now just about the end of week 4. The original front end panelling which I have loathed for so long is now completely gone and replaced. So much happier to progress the car now that is done and dusted. Next week work moves into the cabin where the centre tunnel finally gets completed (boxed in) along with the Gear shift cable / wiring loom section (boxed in) . Then in go the door lock mechanisms along with the loom proper and the ECU. Then, given a fair wind, that should leave around 2 weeks at the end of this 8 week project to address the "nice to do's if we had time !"
Attachments
Following last weeks post at the end of week 3, now just about the end of week 4. The original front end panelling which I have loathed for so long is now completely gone and replaced. So much happier to progress the car now that is done and dusted. Next week work moves into the cabin where the centre tunnel finally gets completed (boxed in) along with the Gear shift cable / wiring loom section (boxed in) . Then in go the door lock mechanisms along with the loom proper and the ECU. Then, given a fair wind, that should leave around 2 weeks at the end of this 8 week project to address the "nice to do's if we had time !"
Absolute pleasure to be working with you on your car Nick
Gale, As a group of UK Forte builders, we got together and made a group purchase. They are nothing flashy but we have the drawings for both the front and rears. Drop me a PM if you’d like the info.While reading thru your build I saw a mention of parrot beak hing fittings for the rear body. I didn’t see whether you fabricated them or bought them?
Gale
Nick.
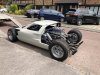
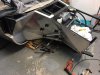
My car actually got a few mins in the daylight Today following a months work centred around re-doing the front end. With all new panels in place, ARB with new Caterham supplied mounts also fitted for the first time, was time to roll her out to check all the work and roughly set the camber etc.
With that great milestone nailed courtesy on my mate Tony, The two cabin jobs are now underway.
As a side note, while she has been away I’ve managed to re-vamp My garage so when she is back I won’t be breaking my angles on tools and crap lying all over the place. ;-)


With that great milestone nailed courtesy on my mate Tony, The two cabin jobs are now underway.
As a side note, while she has been away I’ve managed to re-vamp My garage so when she is back I won’t be breaking my angles on tools and crap lying all over the place. ;-)
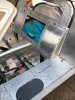
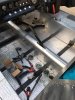
Looks like the cabin panelling is almost done. Shifter section now suitably boxed in with some Great panel work and the centre section getting topped off with some custom rolled ally.
As of close Tomorrow, that will put us 5 weeks into the 8 week re-vamp and make ready for the dreaded UK vehicle IVA lottery.
Come Monday, there will be 3 weeks left in the budget to target at the most pressing remains jobs !
As of close Tomorrow, that will put us 5 weeks into the 8 week re-vamp and make ready for the dreaded UK vehicle IVA lottery.
Come Monday, there will be 3 weeks left in the budget to target at the most pressing remains jobs !
Attachments
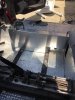
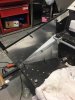
As with most projects, it’s only when it’s really apart can you take the opportunity to right the wrongs you made earlier. Having tried recently to make some front of engine mods, I realised just how constrained I was with just the centre section of the firewall being removable. Hence, two additional access panels added behind the seats to correct that previous oversight. Cabin all but wrapped up now so onto the door locks next.
Attachments
Similar threads
- Replies
- 17
- Views
- 3K
- Replies
- 22
- Views
- 4K