I spent some time today on the door handles. There was not enough meat on the fiberglass to drill a hole and install a pin to hold the door handle. I cut and drilled a couple of pieces of angle iron and made a small pin to hold in place. Worked out good..just need to fiberglass the angle iron in place.


You are using an out of date browser. It may not display this or other websites correctly.
You should upgrade or use an alternative browser.
You should upgrade or use an alternative browser.
Phil's RCR GT40
- Thread starter philg
- Start date
Got my chassis back from powder coating. I had them use a Satin Black powder and I am very satisfied with the way it came out. I will add an undercoating on the bottom. I started the process of re-assembling the front and rear suspension and some panels. I am taking my time polishing some of the aluminum and powder coating some of the smaller uncoated pieces.
Today I spent some time finishing up installing threaded inserts for the light covers. After trying a couple of different fasteners I decided on these 6/32 #9024A008 from McMaster Carr. I drilled and tapped then added a spot of glue before installing. Theres not much room and meat to work with in some areas but worked out fine.


Today I spent some time finishing up installing threaded inserts for the light covers. After trying a couple of different fasteners I decided on these 6/32 #9024A008 from McMaster Carr. I drilled and tapped then added a spot of glue before installing. Theres not much room and meat to work with in some areas but worked out fine.
Neil
Supporter
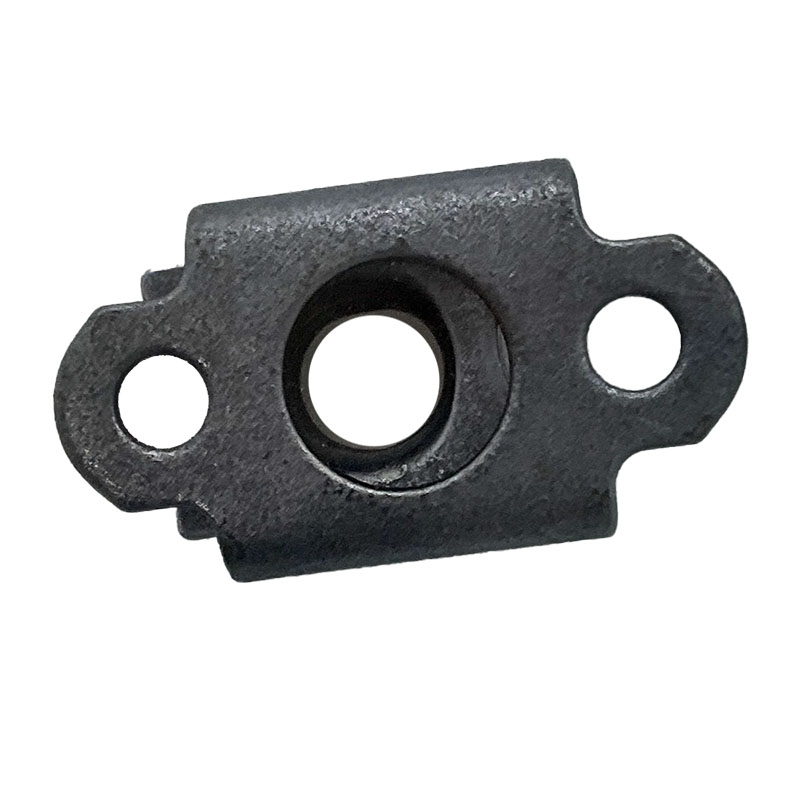
These will not twist out and they provide a self-locking feature for the threaded screw. The "floating" insert allows a little misalignment of the hole pattern in the window.

 www.aircraftspruce.com

Two Lug Anchor Nuts M-5000 Miniature | Aircraft Spruce ®
Two Lug Anchor Nuts M-5000 Miniature Anchor nuts are designed for blind mounted applications where it is impractical to use hex nuts or where it is desirable to have an attached nut for ease of maintenance.
Rod Dittmar
Supporter
Phil, I like the look/function of these and just went to the McMaster-Carr site. Were they really $9.45 EACH?I think these inserts work fine on the Light covers however I am not sure about using them on the side windows.
What are most guys using for side windows. ? any suggestions?
Thanks
Neil
I am not sure how I would attach those. Wouldn't I need access from the back which is not possible?
Thanks
Rod
The Stainless inserts come in a pack of 5 for $10.38. They are the thick wall ones 90247A008.
You can also get them in Black Phoshate @ $6.75 for a pack of 10. No reason they shouldn't work just as well. #90248A017
Hole needs to be drilled and tapped then just screw in while adding some type of glue preferably something like super glue. The driver bit they sell works great.
Neil
Supporter
Rod,
Yes, if the backside is not accessible then they are not appropriate. Riv-nuts are pretty good but Nutserts are not very good in fiberglass. The two types are frequently confused and referred to incorrectly. Riv-Nuts are similar to Pop rivets, they are secured by flaring out their shank behind the panel. They were developed early in '30s by BF Goodrich for attaching de-icing boots to the leading edges of airplane wings. A Nutsert expands radially into the by wedging its read half into its front half. These are not good for thin or soft materials. They are exasperating when they fall apart and the rear half falls into an inaccessible place.
Yes, if the backside is not accessible then they are not appropriate. Riv-nuts are pretty good but Nutserts are not very good in fiberglass. The two types are frequently confused and referred to incorrectly. Riv-Nuts are similar to Pop rivets, they are secured by flaring out their shank behind the panel. They were developed early in '30s by BF Goodrich for attaching de-icing boots to the leading edges of airplane wings. A Nutsert expands radially into the by wedging its read half into its front half. These are not good for thin or soft materials. They are exasperating when they fall apart and the rear half falls into an inaccessible place.
I am considering using these collapsable ones...they are not very big and seeing the fiberglass is not very thick in some spots it does not take a lot of pressure to collapse them. I just need to find a 6/32 collet for my Riv-Nut tool. It came with 1/4-20 the smallest.
Thanks for the input.
Thanks for the input.
Neil
Supporter
Here is some dimensional & engineering data on various types of Riv-Nuts from Boellhoff:
 www.boellhoff.com
RIVNUT® blind rivet nuts and RIVSTUD® blind rivet studs | Böllhoff
RIVNUT® blind rivet nuts and RIVSTUD® blind rivet studs are a versatile solution for attaching a resilient thread to thin-walled components.
For those of you that have considered setting up to do your own powder coating I say go for it. I did not realize how easy it is to setup and powder coat. All you need is a small blaster, an electric stove ,and Powder Coat Gun setup which is about $100 and of course Air but most of you have that.
I set it up in my basement and takes up about a 8'X8' area. Theres hardly any mess and takes about 20 minutes start to finish to get a piece done.
Unlike paint there are no fumes and it is totally dry in minutes. One of the best decisions I have made.


I set it up in my basement and takes up about a 8'X8' area. Theres hardly any mess and takes about 20 minutes start to finish to get a piece done.
Unlike paint there are no fumes and it is totally dry in minutes. One of the best decisions I have made.
Bill Kearley
Supporter
Very nice, I to have built an oven ( 50x32x30 ) inches. Cost me a bit but well worth it. For the small stuff I stole the toaster oven from our kitchen.
It has all ready payed for itself.
It has all ready payed for itself.
Since my body and chassis are at the bodyshop I started work on my dash. Started by making the aluminum switch plates which where kind of a pita. I made a template then ordered the aluminum pieces (0.63) online which I had cut to size. I used a cheap 18" bench top brake to make the bends then powder coated them in krinkle black.
I painted the dash with ALSA Soft Paint. This paint as the name implies is soft to touch and looks a little like leather when applied over krinkle paint. I used Black Krinkle for the base coat then applied the Soft Touch which is clear for the top coat. I thought it came out nice and I am happy with how it looks. I am not sure how durable the Soft Paint is so I guess only time will tell.


I painted the dash with ALSA Soft Paint. This paint as the name implies is soft to touch and looks a little like leather when applied over krinkle paint. I used Black Krinkle for the base coat then applied the Soft Touch which is clear for the top coat. I thought it came out nice and I am happy with how it looks. I am not sure how durable the Soft Paint is so I guess only time will tell.
I took advantage of 3 days of rain over the Holiday Weekend last week and made some progress. I got the Engine and Transaxle installed for the last time hopefully. Brakes and emergency brake mounted. Radiator and front cowl section shaping up. AC lines hooked up to compressor. Engine coolant lines done. Also Mike Everson has been working on the wiring for me. Ron at Metal Morphous is getting close to paint.


Hey Phil! Beautiful build! I just finished reading through your thread.
I have some questions if you don't mind...
I am neck deep in transaxles. The Quaife box is interesting and similarly priced to the other box I am considering (Mendeola). I'd love to hear your story on how things went with this box. How was the buying experience? Are you happy with it?
It looks like you had some trouble hooking up a clutch release earlier this year as well as a cable shifter conversion. I don't believe you posted your solutions yet. Would you please share more?
Also what did you do for axles?
I was also looking at your fuel tank mounting solution. Did you cut the recession on the top for the aero motive pump? Or did it come recessed like that from RCR? Also wondering if you know if there is any baffling welded into the fuel tanks.
Sorry last question... would you share more about the exhaust set up? Particularly I am interested in the red mufflers.
Thanks in advance for your time!
