
You are using an out of date browser. It may not display this or other websites correctly.
You should upgrade or use an alternative browser.
You should upgrade or use an alternative browser.
RCRP4 Marc's Sports Prototype
- Thread starter marc.madmax
- Start date
marc
Lifetime Supporter
Okay so I haven't been posting, sue me.
I got the car pulled apart, tranny on the floor over here, Motor over there. The big glass panels wrapped in strechy plastic in the other garage. Wheels and tires off, suspension yanked. The poor thing looks like a frog disected on the mat in a biology classroom.
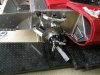
I mounted the fuse panel upside down under the passenger side. I was hoping to make it more accessable for troubleshooting but too bad. The wire loom is spaghetti right now as I have the dashboard cut for the gauges but not the switches. I need to figure how many I need and the location. I figure a long paddle type for the turn signal on the far left on the left of the steering wheel. I know I need for the Ignition, fuel pumps, fans, wipers, brake fans, A/C enable, Lights and what else? I did score some carbon fiber to cover the dash when I finish the layout and cut all the holes.
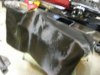
The fuel tanks are out and I installed some AN fittings -10 for supply and -6 for return. Fuel foam going in now. Haven't worked out the sending unit for the fuel tanks yet. they are too long and don't fit. need to search the fix. Got to order some adhesive foam to fit the tanks back in to stay in place.
Speaking of holes i have to work on cutting up the tank box to feed the fuel to the motor. I have decided on blue fabric covered in place of the braided. I should do black but wtf.
I should shoot some pictures but its all so naked, ya know.
I got the car pulled apart, tranny on the floor over here, Motor over there. The big glass panels wrapped in strechy plastic in the other garage. Wheels and tires off, suspension yanked. The poor thing looks like a frog disected on the mat in a biology classroom.
I mounted the fuse panel upside down under the passenger side. I was hoping to make it more accessable for troubleshooting but too bad. The wire loom is spaghetti right now as I have the dashboard cut for the gauges but not the switches. I need to figure how many I need and the location. I figure a long paddle type for the turn signal on the far left on the left of the steering wheel. I know I need for the Ignition, fuel pumps, fans, wipers, brake fans, A/C enable, Lights and what else? I did score some carbon fiber to cover the dash when I finish the layout and cut all the holes.
The fuel tanks are out and I installed some AN fittings -10 for supply and -6 for return. Fuel foam going in now. Haven't worked out the sending unit for the fuel tanks yet. they are too long and don't fit. need to search the fix. Got to order some adhesive foam to fit the tanks back in to stay in place.
Speaking of holes i have to work on cutting up the tank box to feed the fuel to the motor. I have decided on blue fabric covered in place of the braided. I should do black but wtf.
I should shoot some pictures but its all so naked, ya know.
OK, not bad for a rough old back yard project
marc
Lifetime Supporter
I bought the Katech parts to reverse the intake. When the car was shipped Fran installed the motor and tranny. Motor needs to move forward about an inch and a half to get the half shafts close. as it was, Fran had to pull the throttle body off to ship. I will also have to relocate the water pump line as it won't make the turn without entering the cockpit. was considering an electric pump for water (not connected to the motor). Ideas would be helpful on that.
Hi Marc,
Some have used the Davies Craig electric water pumps:
Davies, Craig EWP High Performance and Racing Electric Water Pump Kits
There are some pretty good write-ups and photos in some of the GT40 builds although I can't remember which ones.
Some have used the Davies Craig electric water pumps:
Davies, Craig EWP High Performance and Racing Electric Water Pump Kits
There are some pretty good write-ups and photos in some of the GT40 builds although I can't remember which ones.
I will also have to relocate the water pump line as it won't make the turn without entering the cockpit. was considering an electric pump for water (not connected to the motor). Ideas would be helpful on that.
Might want to check these posts out..
http://www.gt40s.com/forum/gt40-tech-fueling-electrics-engine-cooling/30707-electric-water-pump.html
http://www.gt40s.com/forum/gt40-tec...ng/27834-electric-water-pumps-discussion.html
http://www.gt40s.com/forum/gt40-tec...e-cooling/27719-davies-craig-controllers.html
((I'm sure there are more that you can find using the search function))
Also - I have an electric water pump setup that I'm documenting on my build site;
http://www.GT-Forty.com
marc
Lifetime Supporter
Thanks guys for the help on the electrical pumps, they all look promising, I will have to see how to plumb the motor to make the remote pump work as there is very little room up front due the roll cage. But speaking of pumps... I posted this info on the fueling section but wanted to document it here.
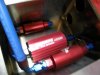
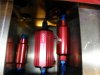
So I finalized the fuel configuration for the RCRP4. This is a dual tank (one in each "sponson", and will be feeding a hungry LS7 with fuel injection. I have -10 AN fittings for the supply side at the bottom back of tanks, -6 AN fittings 5" above the supply for the return lines. I am connecting a 100 micron fuel filter (SS Mesh) before a Aeromotive A1000 pump then a 10 micron filter after the pump with a checkvalve. This will connect from each bank and meet between the rails at a regulator that will feed back to either tank via manual selector. Pumps will be run individually and electrically from the cockpit. I will see if I can setup a cable operated tank selector rather than run the fuel into the cockpit. I confirmed this setup with Aeromotive, and I just need to get the check valves as I bought the rest of this stuff (and it is $$$) already.
So I finalized the fuel configuration for the RCRP4. This is a dual tank (one in each "sponson", and will be feeding a hungry LS7 with fuel injection. I have -10 AN fittings for the supply side at the bottom back of tanks, -6 AN fittings 5" above the supply for the return lines. I am connecting a 100 micron fuel filter (SS Mesh) before a Aeromotive A1000 pump then a 10 micron filter after the pump with a checkvalve. This will connect from each bank and meet between the rails at a regulator that will feed back to either tank via manual selector. Pumps will be run individually and electrically from the cockpit. I will see if I can setup a cable operated tank selector rather than run the fuel into the cockpit. I confirmed this setup with Aeromotive, and I just need to get the check valves as I bought the rest of this stuff (and it is $$$) already.
Do you really need -10 fuel supply line? I would thing that -8 would suffice.........
marc
Lifetime Supporter
Ken, Tonight I will take pictures and post.
Dave, I considered that but the price did not make much change so I went that way. Besides bigger is better??
Cam, yes, it is the EZ harness. Hey, we should meet up! fellow Dallas-ite. I haven't ran many wires yet but have it mounted. Still deciding on how to route some of it. I am considering on top of the tunnel.

marc
Lifetime Supporter
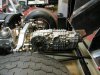
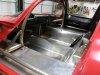
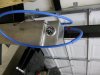
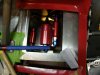
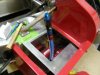
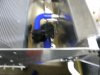
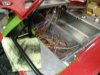
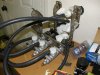
Here is the fuel system config. this will be duplicated on the other side pod and connect to an aero motive fuel rail on each side. A regulator will drive the fuel back to the tanks via cable operated fuel switch (L or R). The tanks each use SS hose. I m not a fan of the steel braid. and blue does look good.
I drilled out the vent hole and installed a rollover valve. and the tanks are stuffed with foam. the rubber will make for a firm fit in the chassis. and I will fab a panel on the front to seal them in. Could use some thoughts on the vent to where? outside or fill cap?
I drilled out the vent hole and installed a rollover valve. and the tanks are stuffed with foam. the rubber will make for a firm fit in the chassis. and I will fab a panel on the front to seal them in. Could use some thoughts on the vent to where? outside or fill cap?
Attachments
marc
Lifetime Supporter
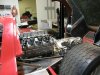
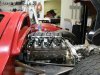
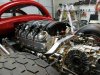
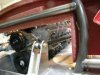
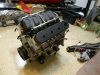
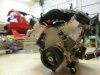
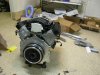
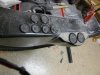
Ah the motor. changes: note no more water pump! 4 an-12 connecting to the front and to a Y pipe and off to the front. Upfront, 55gpm pump. Not mounted but to be installed, expansion tanks front and rear. One will tie to steam connections on block and draw side line near motor. two will be tied to the draw side up front and the bleed lines on the radiator. No plans for restrictions, but considering a pump controller (VFD in minature)
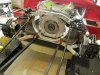
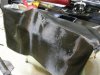
Almost for got about that sweet racing clutch from Gbox. Erik you did good. I can tell you this is a very aggressive clutch, so not going to be good for the street. But I will be laying some serious black strips coming out some corners if I get lazy. No freak fading clutch. Brake pads also. This is going to hurt really good!
So far so good!
Attachments


marc
Lifetime Supporter
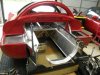
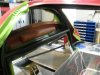
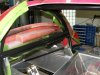
Interior work. Not pretty yet...
Pedals built. don't like the throttle linkage yet need to work on it. I have a push pull cable for it.
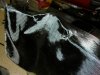
This body needs some serious gaps filled. not a prob but I really don't want to throw alot of weight to it to seal it up.
Seats are on the way.. sort of. when your a fat a$$ you got to pay for it. buy hey promised the wife I'd lose the weight so I can fit in this mother. (yes I can get in it now, shut up) LOL!
Pedals built. don't like the throttle linkage yet need to work on it. I have a push pull cable for it.
This body needs some serious gaps filled. not a prob but I really don't want to throw alot of weight to it to seal it up.
Seats are on the way.. sort of. when your a fat a$$ you got to pay for it. buy hey promised the wife I'd lose the weight so I can fit in this mother. (yes I can get in it now, shut up) LOL!
Attachments
Similar threads
- Replies
- 4
- Views
- 2K
- Replies
- 7
- Views
- 1K