Thank you AlanHeater hoses are usually a #10AN fitting with a 5/8 barb for the hose. The AC will be a #10 O-Ring AN and a #6 O-Ring AN.

You are using an out of date browser. It may not display this or other websites correctly.
You should upgrade or use an alternative browser.
You should upgrade or use an alternative browser.
Restarting my SLC project in West Texas
- Thread starter felizguy
- Start date
Ken Roberts
Supporter
Here are the part numbers for the following fittings in the attached picture. Some builders choose to run the #8 a/c hose on the outside of the foot box all the way to the front. I bring mine inside the footbox then out the front bulkhead for a cleaner look. The down side is the fact there are two additional connection points.
#8 ac fittings 90 degree
35882-VUG
35832-VUG
#10 ac fittings 90 degree
35883-VUG
35833-VUG
5/8" heater hose 90 degree fittings
34236-VUG
121018

#8 ac fittings 90 degree
35882-VUG
35832-VUG
#10 ac fittings 90 degree
35883-VUG
35833-VUG
5/8" heater hose 90 degree fittings
34236-VUG
121018
Last edited:
Thanks for the part numbers, then you use the standard 5/8 heater hose inside the footbox with the 10 AN fitting? Got it. Yes I am planning to go the footbox route for #8 hose. I ended up flipping the core , I just could not get it to fit even bending the heater tubes and I messed them all up , but I thing they will still work. What a PIA. I dodged a bullet though, the unit barely fits behind the footbox cage tubes. ( I have the extra cage that fits inside footbox) I will post pictures later. Thank you all for answering silly questions.
Joel K
Supporter
Thanks for the part numbers, then you use the standard 5/8 heater hose inside the footbox with the 10 AN fitting? Got it. Yes I am planning to go the footbox route for #8 hose. I ended up flipping the core , I just could not get it to fit even bending the heater tubes and I messed them all up , but I thing they will still work. What a PIA. I dodged a bullet though, the unit barely fits behind the footbox cage tubes. ( I have the extra cage that fits inside footbox) I will post pictures later. Thank you all for answering silly questions.
Hector,
You would use barbed fittings for the heater hose.
The parts Ken listed are:
34236-VUG
121018
34236 is the barbed bulkhead and 121018 is a barbed o-ring fitting which connects to the back of the bulkhead. Then just connect heater tubing from the bulkhead to the evaporator.
You can search each part number on vintageair.com to see each picture.
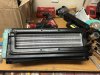
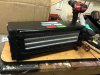
Having the extra cage inside the footbox, some rotate the unit 90 degrees like this...
Last edited:
Thanks Joel, I did think about doing it that way, and thanks for the shoe goo tip, I got the clear instead of black, so it looks funny but works.Hector,
You would use barbed fittings for the heater hose.
The parts Ken listed are:
34236-VUG
121018
34236 is the barbed bulkhead and 121018 is a barbed o-ring fitting which connects to the back of the bulkhead. Then just connect heater tubing from the bulkhead to the evaporator.
You can search each part number on vintageair.com to see each picture.
Having the extra cage inside the footbox, some rotate the unit 90 degrees like this...
View attachment 107200
I will try both ways and see which makes more sense .
Joel K
Supporter
Hector,
Shoe goo is good stuff. The black is nice since it hides the fiberglass sheet rock tape and is virtually the same color as the ABS. But at the end of the day, no one will see it.
The other option are single or multiple bulkhead fittings which accept O-rings on both sides. That adds one extra o-ring connection per line. Some builders like the bulkheads vs. the bulkhead fittings Ken used. I think one difference to me is the bulkhead fitting side runs the hoses a little closer to the chassis. Right now I’ll go with the ones Ken listed and will reverse them if I want more clearance where the door strut will go.
Joel K
Supporter
Patience, patience, patience. What I am learning by doing this project is everything takes much longer when you are doing something for the first time. Lot’s of think time and going slow in small steps helps me.
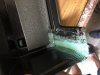
I think you are close, a couple ideas.
1)The #6 fitting needs to be rotated a bit upward which you already know.
2)Looks like you squeezed the tops of the copper heater tubes when you straightened them. Stephan, cut the tops off and re-flared the stub, this may work for you and cleans things up, but you will need the right tool to flare the copper tube.
Last edited:
Yes I know, I will try to straighten them up the best I can , and re flare as a last resort. I just need a fresh start tomorrow. ThanksPatience, patience, patience. What I am learning by doing this project is everything takes much longer when you are doing something for the first time. Lot’s of think time and going slow in small steps helps me.
I think you are close, a couple ideas.
1)The #6 fitting needs to be rotated a bit upward which you already know.
2)Looks like you squeezed the tops of the copper heater tubes when you straightened them. Stephan, cut the tops off and re-flared the stub, this may work for you and cleans things up, but you will need the right tool to flare the copper tube.
I have been looking for a flare tool or pre flared pre bent 5/16 copper tubing (I could replace and re solder the tips ) and don't see to find anything, is that info on Stephen's thread? Thanks for your help .Patience, patience, patience. What I am learning by doing this project is everything takes much longer when you are doing something for the first time. Lot’s of think time and going slow in small steps helps me.
I think you are close, a couple ideas.
1)The #6 fitting needs to be rotated a bit upward which you already know.
2)Looks like you squeezed the tops of the copper heater tubes when you straightened them. Stephan, cut the tops off and re-flared the stub, this may work for you and cleans things up, but you will need the right tool to flare the copper tube.
Joel K
Supporter
Hi Hector,
You have a point and I did not think of that, however I don’t know how much better it is leaving it in the original orientation. I still like the swapped approach.
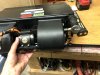
Here is a pic from Cam’s Blog with all the hoses on...

Here is a pic from Stephan’s Build thread with the heater core swapped. Not much difference to me.....

You have a point and I did not think of that, however I don’t know how much better it is leaving it in the original orientation. I still like the swapped approach.
Here is a pic from Cam’s Blog with all the hoses on...
Here is a pic from Stephan’s Build thread with the heater core swapped. Not much difference to me.....
I think that is a problem, you are not getting any air into that side. I don't know if I can make it better but I am going to try , it will depend on where I can route the tubes inside the footbox. Will see. I guess there is never a free lunch, always a compromise . Getting used to it.
If if bend the lower tube 90 degrees straight down and the upper one 90 degrees towards the driver side it is tight but it will fit and will free up the air inlet. Easier said than done, I will see what I can do . I may need to learn to solder copper tubing. I should have gotten the copper tube bending spring to begin with. May be too late now, I messed up those tubes really good, this will be the third of fourth bend I attempt.
I wouldn’t sweat that blockage, it’s very rare that I move my blower past the low setting. It’s getting plenty of airflow and isn’t stalling out the fan. Texas heat may be a little different but this was true even when ambient temps were in the 90s. Seal your cabin really well and get as much heat blocker in there as you can and I think you’ll be good.
I think on mine, I over spec'ed the condensers and my evaporator FREEZES up! My clue is that the air flow decreases the longer the unit is on. Then after sitting a bit, the air velocity returns to normal. I suppose the fix would be to use a larger evaporator unit, except of course...it won't fit.
Not to hijack but we had a refrigerator in our garage that would freeze up. As it turns out, the service guy added a small heating element to the coils and it works fabulously now. I wonder if something like that could be added to yours?I think on mine, I over spec'ed the condensers and my evaporator FREEZES up! My clue is that the air flow decreases the longer the unit is on. Then after sitting a bit, the air velocity returns to normal. I suppose the fix would be to use a larger evaporator unit, except of course...it won't fit.
Similar threads
- Replies
- 18
- Views
- 2K