Richard's MDA Build

Hi all
I thought I would start a build log just for interest and as a incentive for me to finish the job in good time (unlike the last one)
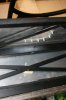
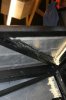
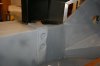
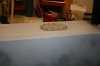
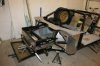
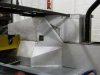
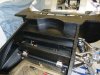
I recently purchased a MDA rolling chassis with most of the ally panelling work completed, unfortunately the ally was bonded onto the chassis and some of the panels were in the wrong place so I thought lets just start from scratch with the project and that way I can stand up and say “all my own work”
The route I am going down is one of budget and value for money, do they go together with a 40 build? probably not but we all have good intentions. ( I have just sold my old 40 to fund this one)
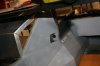
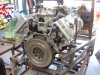
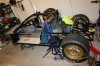
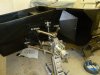
Apart from all the essential stuff the main issues will be transmission and engine so having spent ages looking for decent box I have decided to go to Chris Cole and opt for a UN1 with the up-rated Quailf internals and LSD but with a twist, literally, we are going to run the box upside down thus enabling the engine to drop to a lower position, hopefully the same as a ZF, well that’s the plan, a special interface plate will be made so that we will then have a generic 8 stud bell housing arrangement, I am not doing this bit but working with Mark from what was MDA we are sorting out how all this will go together, early days yet but I have a few sheets of ally and a guillotine to keep me busy for now, a few pictures to follow when Ben my boy returns my camera,
Rich
 
Hi Rich,

Good luck with the build!

The 'old one' is due for a major (Mainly cosmetic) overhaul over the winter, starting on Thursday evening.

I'll be watching your log with interest for ideas.

Cheers,

Geoff.
 
Hi Richard,

Good luck with the build. Just shout if you need some help. There are a few MDA owners out there at a more advanced stage.

Martin
 
Thanks Martin

Any chance of the AP's back :eek:), Also i am quite lucky in that Mark S is less than a hour down the road

Rich
 
Work has restarted on the car following a head injury whilst on holiday, bugger springs to mind as I am now unable to drive for a year, the upside of course is that this will allow me more garage time.
The previous owner of the MDA wanted to replicate a Mk2, modifications were made to the front of the car allowing a dry sump oil tank to be fitted for his big block FE, The panelling of the car was constructed to make the chassis look more like a monocoque so a bonding technique was used, I decided to revert back to the tried and tested method of using rivets, unfortunately some of the panel work was unsalvageable, so I am making new ones.
The panels which form the internal cills are a nice one piece section with rolled ribs so I have managed to save them.
Fabrication of the front end has started, all pieces are now cut but we (my mate Chris who can weld) ran out of Argon for the Tig so that will be another day. Now how do i get pictures posted?
 

Howard Jones

Supporter
The easy way to post pictures is to buy or use a pretty cheap camera that can produce pictures files of about 180-200K or so. About 1 megapixel will usually do, and then check that the file sizes are coming out small enough. If you have a better camera or need to reduce file size then you will need to set it on the low resolution setting.

Then all you will need to do is down load them from the camera to your computer. I put them into a file named GT40. My camera has a USB port on it so I just plug it into the USB port on the computer and drag and drop the picture files into my GT40 file inside windows explorer.

Then you just use the forum "manage attachments" thingy and there they are attached to your post in thumbnail form.
If you need to re-size pictures then let us know. There is a lot of free software out there that you can download that can do picture resizing.

I bet there are more tech savvy people here who can help also.
 
Hi
Well you can see that all that glitters isn’t gold, some great metalwork has been altered to fit, unfortunately as previous stated I will now have to make new ones, god can’t believe how boring making templates can be
Also you can see that the cill is nicely made with a rolled edge and pressed ribs, I have managed to save this one but again the only reason it looked good on the car is that the floor to cill section was filler.
I have cut and replaced the flat easy bend panel work at the rear of the car but the front and cabin are a little more tricky.
 

Attachments

  • 023.jpg
    023.jpg
    24.5 KB · Views: 352
  • 024.jpg
    024.jpg
    24 KB · Views: 338
  • 025.jpg
    025.jpg
    28.1 KB · Views: 351
  • 026.jpg
    026.jpg
    22.4 KB · Views: 364
  • 027.jpg
    027.jpg
    21.5 KB · Views: 344
Hi again

Well my build log is all messed up date wise at the moment but after this post we can only go forward in date order.

Pictures show some of the new ally panels temporally fitted to the rear of the car, these were put on before I decided to go and strip the whole thing and start from scratch.

Nice tyres but they didn’t come with the car when I purchased it…the rims may be for sale as I would like to go to 17 inch ones…any takers?
 

Attachments

  • 021.jpg
    021.jpg
    58.3 KB · Views: 502
  • 020.wdp.jpg
    020.wdp.jpg
    51.2 KB · Views: 408
Richard,
About posting pics. The way that Howard gave is a good one to do. If you want to preserve your photos and not lose them in a computer crash, I would suggest a web hosting site such as Photobucket or the like. They all pretty much operate the same with some minor differences. I like Photobucket personally.
The web site(GT40s.com) was updated some time ago and you don't have to worry about picture size or number of pixels. It is taken into consideration and is automatically resized with a disclaimer above the pic that if the viewer wants to see the pic in its original size to click on it. there is a limit on how big the pic can be, but if you don't take gigantic pics, you don't have to worry. If the site says the pic is too big, upload it with your editing software and tell it to "Save special" and save it as a "web ready pic". It will be saved on the same page as the original, but will jave "Web" in its title instead of the pic # or title. It then will be accepted by the site.
With Photobucket, your pics can be arranged by albums and arranged in them any way you wish. You don't have to worry about crashes that will lose most if not all your pics. They are always there unless they go bust.Then they will alert you so you can download all your pics.
You can take any size camera/pic you want. Transfer it to your computer and edit the pic any way you want with either the cameras software or a free one like Microsoft Picture It. Then upload them to the web site. Most of the web hosting sites will have a bulk uploader that will allow you to upload any number of pics you desire at one time. You can then label them any way you wish.
When it comes time to add them to your post, this is how you would do it with Photobucket.
Start posting and when you reach the part where you want the pic to be displayed, minimize the GT 40s page with the (-) box in the upper right hand corner. Open a new browser window and go to Potobucket. Find the pic you want and put your cursor over the pic. A box with 3-4 choices will open. They are the choices you will have to make a post. You will select Direct Link. Put the cursor over the direct link and right click it. Chose copy. Enlarge the GT40s page and put the cursor where you want the pic and left click. Go to the box at the top of the posting window, and chose the "mountain scene"(left click). Right click in the window and choose paste. Don't worry about the http thing. Then chose O K and it will post the full size pic right in the middle of your post(hopefully where you wanted it). It will be automatically resized for you when you "Submit Reply" . Then people won't have to click on it to see what you are talking about. Works great, especially in a long post.
When using other sites just read their infomation on how to post. It really isn't that difficult. Just follow the directions. Do a trial and see how it works. If you make a mistake it can always be deleted.
With pics done this way, if someone wants to download the pic for reference or because it's hot, it will be much clearer.
If this is not clear let me know.

Bill
 
The work like so many builds has gone a little slower than anticipated. The fabrication for the front end is now complete and finished in satin black. All the ally panels have been made at home with a pile of redundant ally mistakes now sat in the corner of my garage.

All the major components have now been procured and taking up valuable space in the garage, the engine is very sweet and supplied by Mike Huddart, approx. 420 brake on the dyno, gearbox by Chris Cole and built to spec, inverted, ATB diff and solid main shaft, the body was built and delivered by Lee Dawson.
A few pics of the work so far.

Hopefully it can been seen that the fuel delivery pipes have been totally enclose for IVA compliance.

The spider has been temporary located, I have discovered that due to it being doubled skinned it now sits on the roll cage, there is only one option and that is remove cage and make it lower,
 

Attachments

  • MEMO0026.jpg
    MEMO0026.jpg
    35.2 KB · Views: 343
  • P1000127.jpg
    P1000127.jpg
    48.5 KB · Views: 323
  • P1000128 (2).jpg
    P1000128 (2).jpg
    58.6 KB · Views: 358
Back
Top