Roaring Forties 66

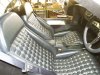
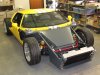
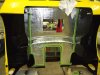
Bulkhead access panel fitted for the last time.
Centre console and seats fitted.
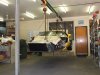
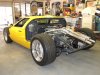
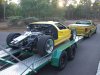
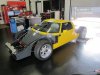
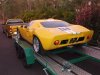
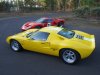
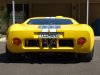
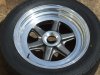
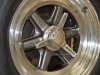
And the ceremonial lowering of the chassis for the first time on its wheels.
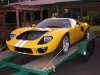
That was a fantastic day :thumbsup:
After viewing the car at such a height for a long time, it looked squashed on the ground....

Clayton
 

Attachments

  • DSCF1125.jpg
    DSCF1125.jpg
    159.7 KB · Views: 400
  • DSCF1127.jpg
    DSCF1127.jpg
    195.9 KB · Views: 430
  • DSCF1176.jpg
    DSCF1176.jpg
    174.6 KB · Views: 387
  • DSCF1177.jpg
    DSCF1177.jpg
    143.6 KB · Views: 390
  • DSCF1187.jpg
    DSCF1187.jpg
    192.7 KB · Views: 435
  • DSCF1189.jpg
    DSCF1189.jpg
    171.3 KB · Views: 435
On the home straight now....
After programming a basic tune to get it started, it was off to the dyno to finish the mapping.
At the end of the day we had it tuned, but still needs some fine tuning on the road.
The std lump made 212 RWHP. Which doesn't seem much, but it gets along quite well for now.

Clayton
 

Attachments

  • DSCF1200.jpg
    DSCF1200.jpg
    229.6 KB · Views: 355
  • IMG_3952.jpg
    IMG_3952.jpg
    150 KB · Views: 335
Now it was time to get it ready for the brake testing.
Heat shield added inside the rear clip and the final bit of wiring done to the clip.
Fitted the side windows and took in to have the aircon gassed.
Didn't want the certifying engineer sweating away while trying to pass the brake tests :sweatdrop:

Clayton
 

Attachments

  • DSCF1205.jpg
    DSCF1205.jpg
    167 KB · Views: 390
  • DSCF1225.jpg
    DSCF1225.jpg
    163.3 KB · Views: 348
  • DSCF1223.jpg
    DSCF1223.jpg
    173.2 KB · Views: 337
Managed to get the use of the drag strip, which was great.
Only problem was, I couldn't use the full length (1/4 mile only) as maintenance was being done on the end of the braking area.
The car had good brakes, felt stable, but seemed to lock up easy (adjusted the bias bar for the fronts to lock just before rears) this went on for a while until the track manager came over to see how things were going.
He said he has seen street tyre loose grip on the prepared surface, so gave us the braking zone as well.
Boy, did this make a difference. Decel G's went up and distance came down.
Max decel was 1.18 G's and a stopping distance of 45.5m from 100km/h :D

Spent half the day burning my brake pads out....
Something like 30 runs, brake fade, full laden, cold and hot tests, etc
It passed with flying colours.

Clayton
 

Attachments

  • DSCF1249.jpg
    DSCF1249.jpg
    244 KB · Views: 392
  • DSCF1251.jpg
    DSCF1251.jpg
    193.2 KB · Views: 347
  • DSCF1236.jpg
    DSCF1236.jpg
    172.2 KB · Views: 285
  • DSCF1235.jpg
    DSCF1235.jpg
    181.8 KB · Views: 294
  • DSCF1243.jpg
    DSCF1243.jpg
    181.3 KB · Views: 351
Well done Clayton....on top of everything else the car has a very nice stance. Beautiful!
Thanks Jimmy
The stance was one of my goals, hence the rear arch work
Its set at 100mm ground clearance, but I did put it down to 80mm and man, did it look good. Not good for the road though, so back up to 100mm.

Clayton

Excellent, Clayton

A great looking car and a testament to your skills and patience - well done!
Thanks Bill
 
It was a bit unfortunate, but my mate Udo sold his RF40 before I had mine registered. So before it left town we took the opportunity to take a few photos of them together. A friend of a friend came around and took some awesome shots at night. But before that, here are the shots I took in the afternoon. (I never get sick of looking at 40's :D )

Clayton
 

Attachments

  • DSCF1317.jpg
    DSCF1317.jpg
    169.9 KB · Views: 361
  • DSCF1330.jpg
    DSCF1330.jpg
    229.2 KB · Views: 358
  • DSCF1303.jpg
    DSCF1303.jpg
    200.8 KB · Views: 313
  • DSCF1375.jpg
    DSCF1375.jpg
    139.7 KB · Views: 350
  • DSCF1297.jpg
    DSCF1297.jpg
    193.5 KB · Views: 319
Michael has a web site at Cars - 1302 Photography
He does all sorts of photography, and there are more shots on his site.

We weren't quite sure what he was doing, but the light was fading and when it got pitch black. He said, its time for the proper shots !!!
He basically painted the cars with a light box...... you had to be there :stunned:

They turned out fantastic, now that the car has sill strips and numbers. We are planning another photo shoot.

Clayton
 

Attachments

  • group-shot.jpg
    group-shot.jpg
    117.5 KB · Views: 349
  • IMG_3008.jpg
    IMG_3008.jpg
    96.9 KB · Views: 316
  • IMG_3011.jpg
    IMG_3011.jpg
    47.9 KB · Views: 305
  • IMG_3020.jpg
    IMG_3020.jpg
    105.1 KB · Views: 295
  • IMG_3012.jpg
    IMG_3012.jpg
    86.7 KB · Views: 319
The day had arrived for its first trip into town for registration.
As the better half only works around the corner, we both took it on its madden voyage.
Was one of the most white knuckle drives I've been on......(in our peak hour traffic)
Only one minor issue which was talked around and the number plates were bolted on.
I'm now legal :D

Clayton
 

Attachments

  • IMG_3966.jpg
    IMG_3966.jpg
    151.8 KB · Views: 346
  • DSCF1406.jpg
    DSCF1406.jpg
    142.2 KB · Views: 323
  • DSCF1404.jpg
    DSCF1404.jpg
    119 KB · Views: 300
Which now brings it a full circle back to the first post.
Sill stripes, roundels and numbers added.

Since then, I've painted the rim centres graphite grey and it has finished off the exterior nicely.

Have been putting many K's on the clock and loving it.

Clayton
 

Attachments

  • DSCF1442.jpg
    DSCF1442.jpg
    143.1 KB · Views: 277
  • DSCF1447.jpg
    DSCF1447.jpg
    178.5 KB · Views: 285
  • DSCF1465.jpg
    DSCF1465.jpg
    152 KB · Views: 284
  • DSCF1467.jpg
    DSCF1467.jpg
    126.1 KB · Views: 316
  • DSCF1463.jpg
    DSCF1463.jpg
    229.6 KB · Views: 307
Clayton,

What a wonderful job you have done. I admire you for the extra steps you have taken to make the car right. Thank you for sharing all of your ideas and details. You have been an inspiration to my build, but you just about wore me out trying to keep up with you. I guess it was the 12 years compressed into two months...

-Bob Woods
 
Well done Clayton, one of my fav build threads at moment.
Thanks Dave

Clayton,

What a wonderful job you have done. I admire you for the extra steps you have taken to make the car right. Thank you for sharing all of your ideas and details. You have been an inspiration to my build, but you just about wore me out trying to keep up with you. I guess it was the 12 years compressed into two months...

-Bob Woods
Thanks Bob
Sorry for wearing you out :laugh:
Rest assured, I felt every one of those 12 years and it nearly wore me out.
That's history now, time to move on to the next project, while enjoying driving the 40.

Clayton

Clayton,
Did I miss something, in that I don't see any safety wires on the spinners??

Bill
Hi Bill
Those photos were taken the day I refitted them.
If you look closely at the rims, you can see the two holes in the web (East - West in the first photo) and three holes in the spinner.
I wanted to bed them in before lock wiring. Over about a two week period I would check the spinners before each drive. The second drive was the only time they tightened up. Since then, they have not moved and are wired.

Another thing which I think helps stop the spinners coming loose (on the back anyway), is the drive pin clearance. The old RF1 rims had 0.040" clearance between the drive pin and holes in the rims.
With accelerating and braking the rim could rock back and forth.
I had them remade with 0.010" clearance and a hex on the end so they could be torqued using a socket.
Like they say, it's all in the detail.

Clayton
 

Attachments

  • DSCF1522.jpg
    DSCF1522.jpg
    173.6 KB · Views: 317
Back
Top