Fuel Fillers & Caps - I pulled my dash out to complete "all" of the work under and around the dash before a "final" fitment of the dash. We all know nothing is "final" and "all" of the work is never finished. Most days I take 3 steps forward and two back. If I have not redone so much I would have this car pretty much finished. Oh well, we enjoy this stuff I guess.
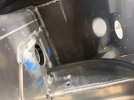
I figured I better get my fuel fillers installed next. I have started the car by running off of a gas can. Putting actual gas in the gas tanks is critical to getting the car on the road. This was pretty straight forward. I mounted the front clip and the spider, getting both positioned where I want them. I then set in the fillers, positioned in the center of the front clip holes, made sure everything opened without contact & screwed them down. For filler tubes I used 2 45 deg rubber filler tubes and a steel straight section on both sides. I had to trim the legs of the 45 deg tubes to get everything to fit correctly. Good news - I did not cut any of the too short, so that is a win. A few pics.
.JPG")
.JPG")
.JPG")
.JPG")
.JPG")
.JPG")
.JPG")
.JPG")
I figured I better get my fuel fillers installed next. I have started the car by running off of a gas can. Putting actual gas in the gas tanks is critical to getting the car on the road. This was pretty straight forward. I mounted the front clip and the spider, getting both positioned where I want them. I then set in the fillers, positioned in the center of the front clip holes, made sure everything opened without contact & screwed them down. For filler tubes I used 2 45 deg rubber filler tubes and a steel straight section on both sides. I had to trim the legs of the 45 deg tubes to get everything to fit correctly. Good news - I did not cut any of the too short, so that is a win. A few pics.