SLC 24 Howard Jones

Howard Jones

Supporter
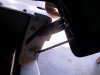
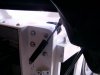
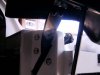
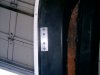
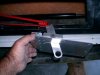
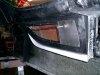
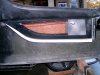
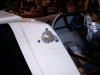
I agree with you both, I have them already made. I will post pictures as I assemble/mount the doors onto the car. By the way, I'm putting plates on BOTH the inside and outside of the door mounting location also.

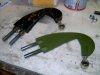
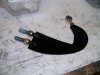
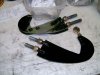
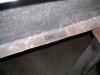
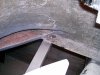
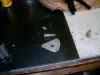
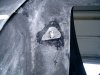
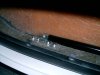
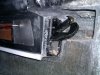
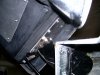
Alex, The henge can still be removed. Only the flat alum plate is bonded in place. I have already pre assembled the doors onto the spider and I am pretty sure I will be very close when I put them on the last time. The Two small countersunk screws at the bottom were located after I was pretty sure I liked the location of the reinforcement plate.
 
Last edited:

Howard Jones

Supporter
More non sexy stuff. Where the body bolts to the chassis bottom plate, inside the side pods it becomes inconvenient to get to the nuts on the inside. So I made some nut plates and riveted them in place. Now when the center section of the body is bolted to the chassis, all the hardware is accessible from the outside. The lower ones can be simply remove from the bottom of the car.

The last one is how I jigged up the body so that I can install the doors off the car. The center section is indexed by the lower mounting holes. The two alum angle pieces running transversely across the front and back have been indexed to the bottom of the chassis, using the same holes that the body mounts to. When they are attached to the center section they force it to conform closely to the same dimensions as the chassis.

Now I can fit the doors onto the center section easily because I can access the henge's from inside the body. I think this will get me very close with a minimum of hair pulling fitting the doors. So far based on the original trial fit markings, I think this will work.
 

Attachments

  • HPIM1560.jpg
    HPIM1560.jpg
    117.7 KB · Views: 360
  • HPIM1564.jpg
    HPIM1564.jpg
    169.6 KB · Views: 365
  • HPIM1566.jpg
    HPIM1566.jpg
    180.7 KB · Views: 352
  • HPIM1563.jpg
    HPIM1563.jpg
    171.1 KB · Views: 398

Howard Jones

Supporter
Now on to the doors. A while back I completed the doors themselves. Now it's time to mount them. The door itself fits the opening nearly perfectly as formed. All that is needed is to mount the door on the henge's and adjust the system to swing it in the correct arc and adjust he gaps.

Adjustments were made by putting washers between the henge and the door jam thus changing the angle of the arc the door swings through, changing the length of the rod end to alter the length of the swing, and moving the door in the opening front to back with the two big bolts and their nuts along with the top henge adjustment.

You can also see the way I indexed the strike post in relation to the catch assembly. I drilled a hole through the door end straight in line with the catch. I did this last. Once I had the door in place and happy with how it swung, I marked the spot for the strike post hole in the rear door jam with the centering punch through the catch assembly with the door closed. It went in place perfectly the first time. No slotted holes for me. I don't like slots. They make thing loose.

You can also see the reinforcement plates behind the strike post, the shock mounts on the bottom of the door and door mount bolts. All this results in a pretty strong door mounting system.

Lastly you can see I didn't mount the gas shocks in the standard manner. This way they can be removed from the door through the door access cover very easily. This is one of Robs ideas. All the parts came from Mcmaster Car.

Having the center section up off the chassis made this very easy and I would recommend it. Just make sure you trial fit things first, mark them for placement and then index the body on your stands as it sits on the chassis.

One on one to go.
 

Attachments

  • HPIM1568.jpg
    HPIM1568.jpg
    160 KB · Views: 399
  • HPIM1567.jpg
    HPIM1567.jpg
    131.6 KB · Views: 368
  • HPIM1570.jpg
    HPIM1570.jpg
    165.9 KB · Views: 391
  • HPIM1571.jpg
    HPIM1571.jpg
    134.8 KB · Views: 395
  • HPIM1573.jpg
    HPIM1573.jpg
    158.9 KB · Views: 388
  • HPIM1574.jpg
    HPIM1574.jpg
    129.2 KB · Views: 381
  • HPIM1576.jpg
    HPIM1576.jpg
    162.6 KB · Views: 371
  • HPIM1577.jpg
    HPIM1577.jpg
    148.3 KB · Views: 376
  • HPIM1579.jpg
    HPIM1579.jpg
    198.4 KB · Views: 362
  • HPIM1578.jpg
    HPIM1578.jpg
    184.3 KB · Views: 382
  • HPIM1580.jpg
    HPIM1580.jpg
    182 KB · Views: 363
  • HPIM1575.jpg
    HPIM1575.jpg
    121.9 KB · Views: 459
  • HPIM1569.jpg
    HPIM1569.jpg
    105.4 KB · Views: 367
Last edited:
Having the center section up off the chassis made this very easy and I would recommend it.

Have you test fit it back on the chassis? Maybe my body is just funny, but i had initially done the door install off the chassis. Got it perfect; indexed everything; back on the chassis and it didn't begin to fit nicely (I was shooting for even gaps and flushness). Back to square 1. Fit the doors wit the body on the chassis, got everything perfect, then for giggles took it off the chassis and it didn't begin to fit nicely. put the body back on the chassis and the doors fit like a glove again.

Also, did you test the hinging action w/ the front clip on? I noticed you didn't clearance the upper corners of the door at all (to prevent binding against the front clip)
 
Well, you just blew me in the door completion department :( 
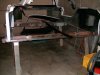
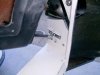
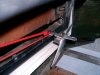
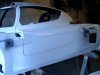
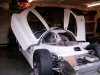
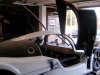
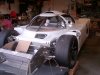
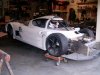
Neat engineering throughout. Howard's spider is fairly stout with the engine compartment seals he made bonded in. I hope this will prevent alignment issues once back together.
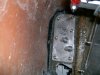
 

Howard Jones

Supporter
Even if some adjustment is required, it should be minor and I have gone through the process so far fairly easily so that I will know what has to be done. Other wise I would have had the body on/off a dozen times by now.

There is a lot of ways to do this kind of thing. A given builder will find their own way. I offer mine so as to document my build process.

I didn't find this to be nearly as difficult at my GTD. I didn't add any material to get it to fit, just to strengthen the mounting points, and the available adjustments seam to be adequate to get good results.
 

Howard Jones

Supporter
Alex, I want to wait until I get the center section/door assembly back onto the car before I trim the doors one final time to fit the front nose bodywork. I like to fit things in place as much as possible. This gets a good fit and avoids adding back material after the fact due to removing too much.

This tends to be a slower process but I'm a Virgo and we're like that.
 

Howard Jones

Supporter
Cam,

McMaster # 9416K392

50 pounds

28" long

12.80" stroke

Here's a couple of other pictures I forgot yesterday. Inside and outside door stiffing plates. These REALLY stiffen up the doors. If you don't do the other things I did with my doors, at least do this.
 

Attachments

  • Picture 002.jpg
    Picture 002.jpg
    143.9 KB · Views: 391
  • Picture 001.jpg
    Picture 001.jpg
    156.1 KB · Views: 408
Last edited:

Howard Jones

Supporter
So as I put the center section back on I expected to get a real good fit with the doors. It was pretty good but not really good enough to call it done. The curved moving door henge was rubbing in the stationery slot of the door mount. I would need to remove the center section and re-shim the stationary mount again and then re mount the center section all over again. This could have taken several times before I got it the way I wanted it. So................

The curved piece with the door mounted on one end and the rod end on the other is normally about 5/8" thick and it must slide through the slot in the stationary mount nearly perfectly so that it doesn't rub. Why not make it much thinner. How about 3/16.......... Now it can be simply put together with the stationary piece of the henge and the rod end will allow enough lateral movement so that the door travels on it's arc while being restricted by the top mount so that it puts it right on the spot when both open and closed.

The material is 4140 .190 CM so it is very stiff along with some CM tubing with the proper ID so that it can be tapped to 3/8-24 for the rod end. The big bolts are just that with the heads cut off and a little more threads added with a die. I like to use CM because it welds so nicely. It took me about a day to cut these both out with a sawzall and weld then up but a guy with a water jet could make them in about 10 Min's I would guess. They are dimensionally the same piece just much thinner.

So now the doors are on and nearly complete except a little final gap and slam catch adjustment.
 

Attachments

  • HPIM1585.JPG
    HPIM1585.JPG
    149.5 KB · Views: 328
  • HPIM1586.JPG
    HPIM1586.JPG
    137.6 KB · Views: 287
  • HPIM1587.JPG
    HPIM1587.JPG
    149.3 KB · Views: 309
  • HPIM1591.JPG
    HPIM1591.JPG
    105.9 KB · Views: 334
  • HPIM1589.JPG
    HPIM1589.JPG
    111.5 KB · Views: 303
  • HPIM1590.JPG
    HPIM1590.JPG
    118.6 KB · Views: 303
Last edited:

Dave Lindemann

Lifetime Supporter
Howard - Did you check with Fran on the hinge? He has a billet aluminum replacement for the piece you modified that "may" have solved your issue.

Dave L
 

Howard Jones

Supporter
Dave, I was aware of some kind of updated part but this was really too easy. I'll save the help I need from Fran for the stuff I can't do myself.
 

Howard Jones

Supporter
Doors on! I hereby declare car is half done! Really the doors are not all that difficult. They require presistance and a bit of thinking but they must be done so they shall be done.
 

Attachments

  • HPIM1592.JPG
    HPIM1592.JPG
    166.4 KB · Views: 368
  • HPIM1593.JPG
    HPIM1593.JPG
    155.9 KB · Views: 383
  • HPIM1594.JPG
    HPIM1594.JPG
    173.5 KB · Views: 434
  • HPIM1595.JPG
    HPIM1595.JPG
    174 KB · Views: 427
Back
Top