SLC 24 Howard Jones

Scott

Lifetime Supporter
Howard,

My supercharger intake and throttle body are where most people route the fuel filler hose. I need to route it outboard of 2"x2" just like you did in the picture below. You indicated that you used this flexible fuel filler hose: Wire Reinforced Clear Filler Hose - 2.25" I.D. - CFH225W | Fuel Safe .

Did you need to modify the Sparco or anything else to make it work?

Do you need to be careful when pumping gas?
 

Attachments

  • howard+gas+fill.jpg
    howard+gas+fill.jpg
    212.9 KB · Views: 550

Howard Jones

Supporter
I did cut off the neck of the Sparco filler and weld on a more straight down outlet tube. It fills fine from a 5 gallon fuel can but I haven't filled it from a gas pump yet. I don't see why it wouldn't be fine however.

The hose I used is very stiff and if I did it again I think I would use a more flexible hose. A 2 inch hose work just as well so you have more lower priced hose available also.

I made all my pieces so here's some pictures for your information.
 

Attachments

  • HPIM0900.jpg
    HPIM0900.jpg
    135.6 KB · Views: 394
  • HPIM1442.jpg
    HPIM1442.jpg
    207.6 KB · Views: 453
  • HPIM0937.jpg
    HPIM0937.jpg
    167.1 KB · Views: 420
  • HPIM1444.jpg
    HPIM1444.jpg
    152.5 KB · Views: 439
Last edited:

Howard Jones

Supporter
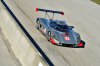
I ran the car at MSR Houston last Saturday and Sunday. The open track group was Chin Motorsports and all I can say about that is a VERY BIG THANK YOU!!!!! They went out of their way to find a way to run me and my car given that they mostly have road going high performance street sport car owners as customers. Lots of very high end Porsches, Corvettes, Mustangs, BMW's etc.

Their policy is to have first time customers start out with a instructor ride along. But all of their instructors were rather tall and were unable to fit in the car with a helmet on. So in the end we did a lead follow arrangement that helped me with learning a track that I had never been on and at the same time fulfill their obligation to their policy. Very cool, and again thank you.

MSR Houston is a fun, well maintained, and safe track with lots of run off. It is about 2.4 miles long and has a combination of slow speed corners linked together and longer straights with faster sweepers at either end of them. Great for test and tuning. The track is plenty smooth enough for my SLC and generally a lot of fun.

It was cold. In the mid 30s overnight and in the 50s until 11am or so with afternoon air temps up to low 60s. Track temps were very cold to low warm. Little wind but sunny. Pretty nice days really.

Saturday morning was mostly taken up with Chins beginner system but once we had that sorted out and I was turned loose I began to pick up the pace and by the afternoon I think I was running fast enough to collect good data.

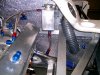
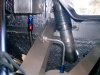
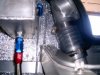
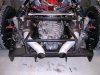
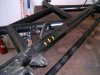
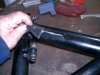
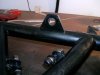
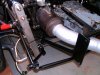
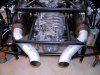
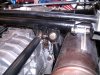
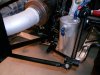
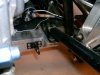
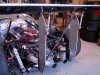
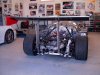
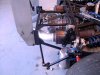
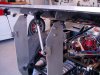
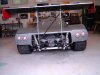
Cooling system: From what I can tell it works perfect now. The Davies Craig controller runs slow until the system begins to warm up and then holds the target temp SOLID. My temp setting was 191F and I never saw the water temp above that.....not once all weekend. I think mostly that was the new radiator but also the final layout of the system is now correct from a engineering perspective. Everything is in the right place now and works as it should. The only thing to do now is run the car on a high 90F day and confirm these results. But I think its good now.

Tire pressures: I tried to run the car on Saturday morning at 30psi all because it was so cold and I didn't believe that the tires would pump up given the slow speeds we were doing with the lead follow deal. 30psi is still too high. In the afternoon on Sat. I went down to 28psi all and was able to pump up to 30. Still too high. Sunday morning I went back to 26F 27R and ran harder to finish session #1 at 28F 29R. Remember it was still cold with air temps at low 40s @ 8am. By the second session, 10:30am, it warmed up to low 60s, I reset warm tires to 26F 27R and they came up to 28 all and felt pretty good.

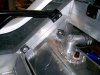
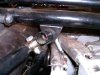
Brakes: Played with bias every session. Added to front with 1 or 2 turns each session from centered. As I added front bias the car began to allow more trailing braking and generally felt better each time. Stops good, would stop tires if pushed on hard, and stopped straight every time. I think the brake components are close enough for now with maybe just a higher coefficient of friction pad. The pads on the car now are about .45 and I could see trying something above .6. This will require some thinking before the next outing.

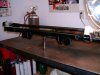
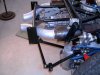
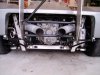
Setup: Started with 0 angle of attract on rear wing, shocks setting unchanged from last time out, about center of range both compression and rebound, springs 750F 850R, antiroll bars, rear 3 of 6 holes from min rate. Camber -1.5F -1.0R.

I did add +4 degrees to rear wing. That was felt above about 85mph in high speed sweepers. Everything else I didn't change much. Next time I would like to stiffen up shocks about 2 clicks both R&C and loose up rear antiroll bar a hole or so. I also think the car would like more camber. At least another -.5 all.

I began to feel some over steer in one of the 4th gear sweepers at constant power. Some of this was helped with more rear wing but the wing effect goes away below about 70ish and the over steer comes back with adding power. Car will power over steer at 50mph if a lot of power is added in 3 gear. I did loop the car at about 45MPH by putting too much power on early out of a slow corner. 2nd gear is all wheel spin........useless really. I think that I would use 3rd in any corner under 60 down to about 20mph. Plenty of power.

The last session I tried to add revs to the back straight. I held the motor to between 5500-5700 until then. Let it go to just short of 7K. Lots more power up there.

Fuel: car used 5 gals ever 30 mins.

Temps: water 190-191f all the time. Oil 210F solid, gearbox ran as high as 210-220F. What do you guys think about gearbox temps. 220F too high? This car has no gearbox cooling.

Well that's it! next stop maybe COTA in January.
 

Attachments

  • C52_0034.jpg
    C52_0034.jpg
    495.9 KB · Views: 466
Last edited:
Nice summary Howard. I’m surprised to hear you only felt the rear wing after +4 degs AOA and at 85+ mph. Are you running the standard or race wing?
 

Howard Jones

Supporter
Standard. What I am saying is I had a about 5 of 10 oversteer condition at moderately high speeds that improved by changing rear wing AOA from 0 to +4. I don't consider the imbalance fixed, just better than it was. There is still a lot of work to be done with mechanical grip balance before I call it fixed. What I would like to do is finish tire pressures, spring rates, shock settings, and antiroll bar rates to get the best balance I can and then start working on downforce. I cranked up the rear downforce knowing I was masking a chassis balance issue just to keep going in a safe manner.

Right now I just don't know where I am with the mechanical balance. At least not enough to start aero tuning. The idea was to confirm my cooling system fix and improve brake balance as well as some idea of best tire pressures last weekend. I was happy to be able to do that.

In addition to those things I really wanted to get to know the Chin motorsports group so I can run with them in the future.

The punch list looks like this now.

1. check wheels bearing slop
2. look over bottom of car and wheel wells for tire and or ground/curb contact.
3. have a think about brake pads
4. have a think about ign timing advance curve.
5. check float levels
6. re balance tires (some vibration at +90mph)
7. Re check all suspension bolts
8. check CV joint torque
9. have a think and call California Motorsports about gearbox oil temps.
10. add gurney to rear wing.
 

Howard Jones

Supporter
I found this online at: Pelican Parts. They are a well known Porsche parts and racing supplier. The response was found on their forum and the question was generally how hot can a G50 get with the same oil I use. So my 220F seams for the time being OK. I will watch this carefully as the summer progresses. If I begin to see GRBX temps above 250F I will consider using a cooler and pump.


Thanks Jeremy.

David at Redline provided this response overnight:

John,

Thank you for contacting Red Line Oil, in your G50 transaxle the 75W90NS would be recommended. A temperature of 240° is not excessive, ideally you would like the fluid temperature to remain below about 295 to 300°. As the temperature approaches 300° the seals will start to loose integrity, then as temperatures reach 325 to 350° surface hardening on components can start to soften. For good component longevity the ideal maximum temperature should remain below 300°F. The gear oil provides extremely good thermal stability, will tolerate substantially higher temperatures than components.

Regards, Dave
Red Line Oil
 

Howard Jones

Supporter
Ran with Chin again last weekend at COTA. Again really a great group of people. I met some new friends and had a great time.

It rained on Saturday morning and the track was full wet/minimum flooding all morning. I did do a session at 11am with the track beginning to dry but still wet all the way around. Now THAT was a experience considering I left the Hoosiers (R6) on the car. All I can say was I managed to not spin the car and didn't hit anything for 30 mins. It did help me to begin to get acquainted with the track layout.

After that I got a ride with a instructor in his Corvette and he gave me a very clear look at the correct line. Thanks Dave!

The track dried over lunch and by 1pm it was pretty much dry. At temp was mid 60sF with a good breeze.

I went through the list above over the last few weeks and added a 1/2 inch gurney to the rear wing and 3/4 inch fences on the sides of the front canards.

made setup changes:

1. Camber from -1f -.5r to -1.5f -1r,
2. Raised rear ride height 1/4 inch to 4.75 from 4.5 inches. Left front at 3.75
3. Put two more clicks (higher number, stiffer) on shocks both compression and rebound, all 4
4. The slop in the front wheel bearings had not gotten worse from MSR Houston so I will check again this week and report.
5. Rebalanced tires, all vibration gone now
6. Ran tire pressures, cold f26 r26 they went up to 27 all in wet/slow conditions. After track dried tires stabilized at 28 all and I think that is the magic number in mild air/track temps
7. two header bolts fell out last session Saturday and I replaced them Sunday morning.

Now the engine timing thing....... First, Thank you Comp Cams and MSD for the tech line help. What was going on was two things. First the advance bits in the MSD distributor were restricting the advance curve to about 15 degrees and the timing seemed to be jumping around and erratic at constant 1100 RPMS.

Pulled distributor and found two things. The little nut that holds the advance bushing was too tight and contacting the body of the advance plate. This caused the advance arms to get stuck and restrict total advance to something like 15-20 degrees.

But the erratic nature of the whole thing was a damaged distributor gear. Yes I did look at the cam gear and it looked ok. Comp cams told me the cam gear is much harder than the did gear and it usually is ok as long as things have not progressed too far. I drained and replaced engine oil/filter. I could not see find metal bits in oil. Fingers crossed.

Distributor gears might be the most discussed subject on hot rod engine forums. My advice is to do what your cam manufacture says and don't listen to anyone else. Comp says my hyd roller cam MUST USE a melodized gear. MSD says their gear is melodized coated. Comp says there is no such thing as "coated" melodized distributor gears. The process is throughout the metal of the gear itself and not a coating. Comp said they believe MSD does coat their gear for "fast break-in" with something but he didn't know what it was for sure. Bottom line install Comp Cam gear. Done, all good.

Times fine now 21 degrees advance all in at 2700RPMs + 14 initial for a total @ 2700 of 35 degrees. Perfect.

Carb tuning.....or lack of...... The problem is the engine stumbles below 2500 revs and generally runs rough at low revs. So I added 1 pound of pressure from 5 to 6 psi from the regulator. I also retuned the four corners idle mix screws and reset float levels a bit higher. All this helped somewhat and now the engine is OK from 2k to 2.5k ...... I think I need to replace the single plane intake with a dual plane if I am going to fix this. That is slowly moving to the top of the to do list.

Saturday: ran 3 sessions, one wet. Second was mostly learning the track and working out brake points. Pushed a bit last session of the day. Car felt good.

Now the drama.

Sunday. 1st session continued to run 28 psi and track was low to medium warm and dry. As I began to pick up pace I also began to get some heat in tires and more importantly really started to get nice and warm brake pads. Once they got hot the car really began to stop well. The back straight is LOOOOOOOG!!!!! and even the front straight is well over a 100mph if driven easy.

I started lifting at 250 feet at the end of the back straight @ about 130-135mph in 4th and worked that down to about 150ft from 145-150mph 5th gear. This is the only place I ever kept the car wide open in 5th for more than a few seconds. You can sing a song on that back straight. I even began to use 5th on the front straight in the second Sunday session and running well up the hill in 5th before breaking into turn 1. Had to be about 125-130mph. That big hill is like throwing out a parachute.

THE BRAKES ARE GOOD. I think they just need heat. A lot of heat.

I was to the point that running in the slowest of three run groups was nearing an end. Some of the street cars/beginner/instructor combo closing speeds on the fast parts of the track was in the neighborhood of 40-50mph.

THEN DRAMA. 3rd session. There is a small tab welded at the rear on the chassis X brace over the engine that I used for a pickup point for the rear wing mount frame work. That 2 inch weld cracked and then failed. I felt it on the brakes at about a buck and a half and it was all my underwear could do to get the car slowed in a straight line. If anybody thinks that big wing is for looks then you are wrong. It adds a huge amount to down force. FUCK ME that was a moment baby. I though a tire had gone down or something like that but as I ran back to the paddock the car felt fine at low speeds <70-80 mph.

As I was getting out of the car to have a look a guy pulls up and gets out of his car DURING a session and tells me that "the left side of your wing is about 3 inches lower as the car get really going fast, you should have a look at that" I thanked him and he got in his car and went back out. Like I said really cool people!!!!

So I took the rear wing off for the last session and ran a couple of laps. Completely undriveable!!!!! Really, REALLY HUGE front aero push at high speeds >100. So bad I had a hard time keeping the car in a straight line. So if you ask me if the big honking canards do anything......Yes they do .... I was really surprised to find out just how much front downforce this car makes. With out the rear wing I just put the car away and called it a day.

That car went from really close to a really good neutral balance (perfect slow speed grip with on demand power over steer, slight mid speed push that is easy to control with the throttle, and stable high speed braking) to completely totally fucking terrible without the rear wing.

Lots to think about and lots of fun. Really a great track!
 
Last edited:
Hey buddy, sounds like a good time :stunned: but, I think you meant to say aero oversteer without the rear wing (?)
 

Howard Jones

Supporter
Ya your right Robert. But that would be "loose" in this part of the world. It was really more of a feeling that the front of the car was really planted at high speed and the rear was sort of following along for the ride with a little wag from side to side. It was really a unnerving feeling and very sensitive to steering inputs. With the wing on it is rock solid.
 

Howard Jones

Supporter
Here's a couple of pictures of the Gurneys I ran at COTA. The last two are the broken tab. I ordered all the material to redo the wing mount chassis frame. I will put both mount points in double shear and use separate mount points for the chassis link and the wing frame next time.
 

Attachments

  • HPIM2342.JPG
    HPIM2342.JPG
    41.6 KB · Views: 446
  • HPIM2343.JPG
    HPIM2343.JPG
    42.7 KB · Views: 459
  • HPIM2344.JPG
    HPIM2344.JPG
    46.2 KB · Views: 466
  • HPIM2345.JPG
    HPIM2345.JPG
    76.7 KB · Views: 498
Last edited:

Howard Jones

Supporter
So I fixed the mounting tab problem. On my car the oem tab was welded on only one side cracked and broke off. To be fair it was being asked to take an additional load fore and aft instead of just in tension as originally but if yours is only welded on one side I would recommend you weld the other side.

Here is the double shear repair and the additional mounting points for the wing system next to them.
 

Attachments

  • HPIM2347.JPG
    HPIM2347.JPG
    27.7 KB · Views: 356
  • HPIM2348.JPG
    HPIM2348.JPG
    36.5 KB · Views: 362
  • HPIM2349.JPG
    HPIM2349.JPG
    32 KB · Views: 405
  • HPIM2350.JPG
    HPIM2350.JPG
    27.2 KB · Views: 365
  • HPIM2351.JPG
    HPIM2351.JPG
    31.6 KB · Views: 349

Howard Jones

Supporter
I finished the remake and update of the wing mount sub chassis, the mount points on the big X brace, and the removal of the diffuser and redesign of the body support mounts.

All the material came from Aircraft Spruce and its 4140 CM. The big tubes are 1X.058 and the smaller ones are 5/8 X .058, and the steel flat stock is 1/8 thick.

Next I want to redo the wing uprights slightly mainly to allow for better and easier wing AOA adjustment.

Making these tubing structures is very interesting from a learning process but fitting the "fish mouth" notches can be very time consuming. I used a free online tubing notching program to do the basic tube notch cut out line on the tube but getting the angle correct isn't as easy as it looks. In the end the fit of the joint is the important thing because it make the welding so much easier and stronger.

I think most of my snails pace is due to experience but I marvel at people who can just look at two pieces of tubing, cut them up and weld them in a few minutes.

Anyway here are the pictures.
 

Attachments

  • HPIM2352.JPG
    HPIM2352.JPG
    47.3 KB · Views: 359
  • HPIM2353.JPG
    HPIM2353.JPG
    53 KB · Views: 395
  • HPIM2354.JPG
    HPIM2354.JPG
    59.5 KB · Views: 338
  • HPIM2355.JPG
    HPIM2355.JPG
    40.7 KB · Views: 323
  • HPIM2356.JPG
    HPIM2356.JPG
    49 KB · Views: 370
  • HPIM2357.JPG
    HPIM2357.JPG
    39.5 KB · Views: 369

Howard Jones

Supporter
Here's the completed modification to the wing mounts. As is I can adjust AOA from 0 to +6 degrees. Changing the aluminum hex tubes to ones that are 1 inch longer will allow for AOA changes +5-12 degrees.
 

Attachments

  • HPIM2358.JPG
    HPIM2358.JPG
    155.7 KB · Views: 435
  • HPIM2359.JPG
    HPIM2359.JPG
    144.6 KB · Views: 452
  • HPIM2360.JPG
    HPIM2360.JPG
    132.4 KB · Views: 347
  • HPIM2361.JPG
    HPIM2361.JPG
    135.6 KB · Views: 403
Nice Howard.

Now you are ready to change the hex tubes and install actuators that work off a 3rd brake master. When you mash the brakes the wing angle changes...
 

Howard Jones

Supporter
Or maybe even seal the bottom of the car off and get me a snowmobile motor to drive a big ass fan................kind of a Texas thing.
 

Howard Jones

Supporter
Here's how the car came out complete with the removal of the diffuser/ body mount replacement sub-chassis.
 

Attachments

  • HPIM2362.JPG
    HPIM2362.JPG
    115.4 KB · Views: 409
  • HPIM2363.JPG
    HPIM2363.JPG
    117.4 KB · Views: 439
Back
Top