SLC 36 Cam's Build

Cam,
I'm not sure how it happened, but somehow I ran across your build thread and that's how I found out about the SLC.

So, it's your fault I now have one under construction. :thumbsup:

Ha, welcome to the club! Your build is looking great. :thumbsup:
 
Some good information in these updates Cam, thanks.

Like the bigger brakes. Sweet.

I'm in Roseville at least once a month, I'll have to stop in and have a chat with that shop. Curious, why didn't they revalve the shocks to provide more performance without setting the clicks "too high"? It's pretty standard to have racebike shock valve stacks custom matched to the bike and rider for optimum performance even in Penske or Ohlins shocks. I'd guess QAs are built to a price point and have understandably lower quality stacks in them (potentially causing less than optimal adjustment curve).
 
Last edited:
NIce work Cam. I have looked at those shock ends and wondered how long they would hold up? Now I know. BTW, Maybe you have already told me but what track(s) so you frequent? Cresson?
 
Flywheel- I got one of the earlier flywheels for the Ricardo back in 2009 that was machined about 3mm too narrow. There are probably only a handful of people on the blog that this relates to. When the twin disc clutch wore down after about 7000 miles the pressure plate started hitting on the flywheel. This slowly caused a metal on metal situation like a stage 3 clutch. It gradually got to the point where I had to slip the clutch to move. So I pulled the rear clip and tranny, leaving the engine in place by grinding down the Ricardo tranny mounts 1/8” or so. This was the First time I had the clip or tranny off since the engine has been in place since 2010. I Popped the flywheel and had 3mm ground off of the outer lip, $70 at a local machine shop. Fran offered to do it free of charge but hey, it took 1 day in DFW. Hmm, if that was my old 911 Turbo, that’d be $10k?
 

Attachments

  • off.jpg
    off.jpg
    397.3 KB · Views: 533
Pilot – While I had it cracked open I figured I’d go from a Brass/bronze pilot bearing to roller like the FGT. Ironically they use a Mustang roller, $12.87. Again this switch at the Porsche shop, thousands $. I took some measurements on the depth of the bearing and I had forced the bronze bearing to flush. I had the flywheel widened plus set the depth for the new roller pilot to around 3mm deeper than flush. From the measurements, I think the Ricardo would be happier with the pilot bearing inset 3mm at least on the early flywheels.
[ame]http://www.amazon.com/Ford-Racing-M7600A-Roller-Bearing/dp/B002TZ896Q?ie=UTF8&psc=1&redirect=true&ref_=oh_aui_search_detailpage[/ame]
Ford Racing M7600A Roller Pilot Bearing
 

Attachments

  • IMG_0516.jpg
    IMG_0516.jpg
    97.2 KB · Views: 473
Boots - While I had the axles off, I switched to Frans new Turbo boot solution. Much thicker which is great for the Ricardo. I have about 12 degrees of drop from tranny to hubs that caused the old style turbo boots to rub on each other. The only thing I noticed with the new boot doesn’t like the hubs to be spun while jacked up. The droop goes from 12 to 20+ degrees when jacked, so with these boots careful not to spin the wheels when jacked up.
Whoops, I meant to post the pilot pic...
 

Attachments

  • new and old boots compared.jpg
    new and old boots compared.jpg
    367.2 KB · Views: 474
  • IMG_0042.JPG
    IMG_0042.JPG
    114.8 KB · Views: 482
Tranny – While I had the tranny out I changed the fluid. I pulled the magnetic drain plug and it had “fuzz” on it. When you break down the fuzz, I couldn’t find a particle bigger then .5mm. I think its aging pretty well with only 500 micron particles at 16k miles.
 

Attachments

  • IMG_0051.jpg
    IMG_0051.jpg
    93.3 KB · Views: 434
Axles – I was down for a while so I sent my axles out to the driveshaft shop. They said they would look at them and refurb for $240/axle. This is the most I’ve spent on any part in 7 years, not bad…They had a little wear but this might be due to the Ricardo having a 12 degree drop. When I got them back they were new. The steel looked to be grade 8/ yellow compared to my old axles that were straight silver. A shout out to the DriveShaft Shop and Frank! Very helpful… Also, I added a jpg for my favorite way to reassemble the CV's, surgically clean or the grease defeats the blue locktite. Again, this repair at a Porsche shop, $$$.
 

Attachments

  • new and old boots compared.jpg
    new and old boots compared.jpg
    367.2 KB · Views: 477
  • solvent soaked rags screwed into CV threads.jpg
    solvent soaked rags screwed into CV threads.jpg
    432.2 KB · Views: 534
Does anyone know the correct part number for the current stock Brembos on the SL-C? I think they are from a camaro SS 2010 to 2014. I worked with Summit to find these pads:
Hawk Performance HT 10 Racing Brake Pads HB194S.570

They were way small. I swapped the front uprights and deleted my old Wilwoods up front adding the SS brembos. My tiny rear wilwoods with hawk ht10s are now out braking my fronts that have stock Chevy pads. Does anyone have a pn for a perfomance pad for these front calipers?
 

Ken Roberts

Supporter
The part number for the front Brembo pads is GM#22907156 or AC Delco #1711112

Rock Auto seems to have the lowest price at about $150 for a complete set.
 
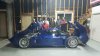
Since you have a sort of hybrid system, with Wilwoods in the back and Brembos in the rear, it seems to me that to optimize braking you'd need to do a little research to get the right braking balance.

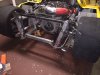
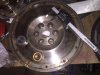
The Brembo brakes are unusual in that they have a larger diameter rear rotor compared to the front, and that rear rotor is significantly larger than the Wilwood rear rotor. That no doubt has an effect on brake balance and torque.

Once you know the swept area and piston area, MC size, rotor size, etc., you can probably get close to what braking torque you could get at each axle. I'm sure you could do some fine tuning with pad compounds.

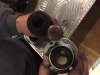
Since you have Wilwoods in the rear, and they are accessible, why not call them and explain what you have. They could probably get you into the ballpark as far as numbers and any suggested parts changes, as well as recommend some pad compounds for your use case and specific circumstances.
 
Ken, Thanks!! Fran chimed in and said the pad profile is an h1000. he recommended carbotech and it looks like the F: CT1001 Ive got an emial in to them and i may try the xp10.

Will good point. Ive now got a hybrid system wilwood/brembo. I may need to adjust the threaded piston actuator rod in the front master to account for the larger amount of fluid in the big Brembos. I had to do that with my original wilwood setup. i could never keep my rears from locking up with the balance bar. I had set the threaded rods in the 2 masters even, but i needed to take the front master rod out several turns to allow the fronts to hit 1st. Then i could even out things with the balance bar.
 
Back
Top