SLC Hubs/ race worthy

Roger Reid

Supporter
For the front and at first I ordered the Strano adaptors and c6 X Tracker (30 spline with passive sensor). I wanted the passive sensor because I may incorporate traction control in the future. I have since switched to the Dulaney adaptor because it is a steel unit rather than aluminum. I was told I got the last one but I hear Dulaney might be making another batch if the quantities were right.
 

Ken Roberts

Supporter
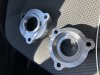
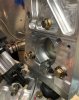
In switching over to the C7 X Tracker hubs I followed Ken and Howard's footsteps. I machined the rear uprights to accept a machined Bushing/spacer. In measuring the C4 hub vs the C7 X Tracker, I required a .250" spacer. Ken had measured his C and C7 bearings requiring a .190” spacer. The difference may be that the C4 bearing when I measured was not compressed with a stub shaft bolted in. The C4 bearing might require the stub shaft to be bolted to tighten the bearings. Without the stub shaft being bolted in place the bearing is sloppy. Not so with the C7 hub. I can thin up my spacer if needed when I drill and tap the mounting holes for the brake calipers. The pics show that I measured the flange to flange distance on the C4 bearing then zero'ed my caliper. Then I measured the C7 bearing and you see the -.250" result.
View attachment 101153View attachment 101155
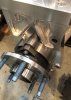
The next pic shows the mounted C4 bearing next to the mounted C7 bearing with a straight edge across both of them.
View attachment 101156

Yes my C4 hub was assembled to the upright with the stubshaft installed and nut torqued when I took the reading. The measurements are posted in post #193. I then installed the C7 hub to the upright (with the stubshaft installed and torqued) when finished the modification. This validated the whole procedure. The final difference in my case was .007" between C4 and C7 install. The perfect sized spacer would have been .197" (in my case). I used a .190" thick aluminum sheet to fabricate the spacer instead of using a thicker sheet and machinining it down to .197". The .007 difference was no big deal.

link to post #193
 
Last edited:
Question for you guys that have done the front hub conversion. I have the Strano adapters. The 4 holes that clamp the adapter to the upright are drilled for 5/16" bolts. The C4 hubs that came off the upright were held on with 3/8" bolts. Therefore the new bolts have quite a bit of clearance in the holes going through the upright. I realize that they are really just providing a clamping force and the adapter is registered into the upright itself. There should be no real lateral loads on the bolts causing issues, but...

Did you leave the 5/16" bolts for the adapters or did you redrill/tap the adapter for 3/8" bolts.


Thank in advance


101196
 

Roger Reid

Supporter
Chris. See post 242 of this thread. I drilled and tapped my Stranos for 7/16 coarse. Yes I switched to the Dulaney so I have a set of Strano's if anyone needs a set.
 
Last edited:

Howard Jones

Supporter
I installed mine as delivered. I have about 70 laps at COTA on them and no ill effects. Oh and I think I remember that those bolts are metric so you might want to check on that. Use blue lock tight on them when installed.
 
Chris. See post 242 of this thread. I drilled and tapped my Stranos for 7/16 coarse. Yes I switched to the Dulaney so I have a set of Strano's if anyone needs a set.

I noticed in your previous post you mentioned that the adapters were aluminum. Mine are steel. I wonder what other changes were made
 

Roger Reid

Supporter
Stranos adaptors are aluminum whereas the Dulaney's are steel.

Edit: Both Stranos and Dulaney are steel. See below for apology.
 
Last edited:

Ken Roberts

Supporter
If I recall correctly the early ones from Strano were a lot more expensive. Then his price dropped dramatically. This could be the reason why.
 

Scott

Lifetime Supporter
I just posted some pictures, measurements and observations that compare the older right rear upright that uses a C4 hub (part# SLC-RR-UR-01R) to the new upright that uses a C5/C6 hub (part# SL-RR-UR-02RL) on my build thread here.
 

Howard Jones

Supporter
After action report. To date, I have run the car approx 1000 - 1200 track miles since finishing this complete upgrade to my car. All of it at full pace (or as much pace as I can produce with my limited amateur skills). I have had NO issues related to any of the upgraded parts illustrated above. I have run Hoosier R6/7 slicks throughout and the GRBX has a Quaife TBD in it. Power is a 450HP SBC.

Additional advice. Re-torque big nuts on stub shafts after the first 1 hour of run time. I have used blue Loctite on all hardware associated with the mounting of all of these parts.
 
I’ve called and emailed, with no response over the past month. Thought that maybe some others may have had better luck.
 
I reached out directly to Fran instead of using the [email protected] email address and have my parts on order!

Updated uprights for the Superlite SLC are $395 per corner. The new stub axles are $795/pair when ordering from RCR. Now I need to order the C6 hubs and new axles.
 

Howard Jones

Supporter
I came across some pictures of the RCR improved stub shafts. Two-piece. I would think this allows either the shaft or the flange to used in multiple applications with different combinations of vehicle track and gearbox selection.
 

Attachments

  • Resized952020090195203012.jpeg
    Resized952020090195203012.jpeg
    176.2 KB · Views: 292
  • Resized952020090195203016.jpeg
    Resized952020090195203016.jpeg
    158.8 KB · Views: 289
I modified my front uprights and designed / built adapters for the C7 style X tracker hubs.
I completed the installation of the left side this weekend and included 1/2” longer wheel studs. This design allows the use of three bolts instead of six to secure the adapter and the C7 hub to the existing upright. I also used 10.9 grade - M12 flange head bolts.
 

Attachments

  • 63CFBC01-3F17-4373-94E2-9BAD2B69B6EB.jpeg
    63CFBC01-3F17-4373-94E2-9BAD2B69B6EB.jpeg
    525.8 KB · Views: 232
  • CFC70781-00B7-44ED-8CD2-D421726C88B7.jpeg
    CFC70781-00B7-44ED-8CD2-D421726C88B7.jpeg
    180.5 KB · Views: 228
  • 4C72A6F9-55A0-4FF8-A392-53D5FBD35C4A.jpeg
    4C72A6F9-55A0-4FF8-A392-53D5FBD35C4A.jpeg
    202.6 KB · Views: 215
Back
Top