Waiting for the parts to arrive actually....

You are using an out of date browser. It may not display this or other websites correctly.
You should upgrade or use an alternative browser.
You should upgrade or use an alternative browser.
slc Ls 376 and grazziano
- Thread starter silverback
- Start date
Its actually an OEM part that is used on the Golf, Jetta, VW ...it is the same part used on R8 and the Gallardo...but common to all of the other cars listed too.
I have a bulk order of 60 pcs coming
I have a bulk order of 60 pcs coming
Fran please keep me posted as to there expected eta. I am trying to decide the best choice for mufflers out the back, borla looks ok.I am hoping to fit the ls-7 cats in front of them as we are going for making it street legal. I have all of the ls-7 ex. I would love to go out the side but I dont think that will work:stunned:.....................any suggestions?
I would not use the Chevy ones...as good as they are the packaging is not the best.
I would put some inline in the location that is better suited to you choice...
The VW cable dodads should be here pretty quickly
I would put some inline in the location that is better suited to you choice...
The VW cable dodads should be here pretty quickly
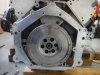
I removed the unneeded pilot bearing that came with the LS7 crate engine. As it turned out, this did require removing the flywheel. In addition, the old bearing was held in place with loctite. I used one of these to get it out: 3-Jaw Pilot Bearing Puller and it worked, but not very well, as only one of the jaws could fit through the center hole of the bearing at any time. This meant using the feet of the puller as a kind of off-center lever and working around the bearing a little at a time, until it pulled free.
Question: Can the ARP flywheel bolts be re-used, or are they junk if they have been previously torqued to the final 85 ft-lbs?
Dave
Question: Can the ARP flywheel bolts be re-used, or are they junk if they have been previously torqued to the final 85 ft-lbs?
Dave
I removed the unneeded pilot bearing that came with the LS7 crate engine. As it turned out, this did require removing the flywheel. In addition, the old bearing was held in place with loctite. I used one of these to get it out: 3-Jaw Pilot Bearing Puller and it worked, but not very well, as only one of the jaws could fit through the center hole of the bearing at any time. This meant using the feet of the puller as a kind of off-center lever and working around the bearing a little at a time, until it pulled free.
Question: Can the ARP flywheel bolts be re-used, or are they junk if they have been previously torqued to the final 85 ft-lbs?
Dave
The easiest way to remove a pilot bearing is to find a nice bolt that fills the ID of the bearing completely with no gap. Then fill the bearing and the space behind it with grease, wax or even this paste like stuff they used to sell at auto parts stores for this specific purpose. Once filled put your bolt in the bearing and whack with a hammer. It may take a few times to get the bearing out but I have never had this fail. Obviously after each whack you need to apply more grease. Based on my experience this is pretty much the universally accepted way of removing pilot bearings, not some super secret trick. If you can locate the waxy paste stuff at the auto parts store it works the best. Comes in a little tear open packet. Can't for the life of me remember the name of it.
It isn't a super secret trick if you already know about it. I am jet saying… I don't know what I don't know and I don't know a lot.
The easiest way to remove a pilot bearing is to find a nice bolt that fills the ID of the bearing completely with no gap. Then fill the bearing and the space behind it with grease, wax or even this paste like stuff they used to sell at auto parts stores for this specific purpose. Once filled put your bolt in the bearing and whack with a hammer. It may take a few times to get the bearing out but I have never had this fail. Obviously after each whack you need to apply more grease. Based on my experience this is pretty much the universally accepted way of removing pilot bearings, not some super secret trick. If you can locate the waxy paste stuff at the auto parts store it works the best. Comes in a little tear open packet. Can't for the life of me remember the name of it.
While that works fine for the older bronze pilot bearings this later stuff with sealed bearing races, ball or roller tend to pop the seal on the first hit resulting in an unwanted greasy mess! and a bearing still in place.
Would plasticine or candle wax work?
Would plasticine or candle wax work?
I think I have heard of people using silly putty. It's all the same really. Grease is popular but too thin for my liking. Wax or putty seem to be better options.
I will post on my build log too, but I was wondering about the mounting position of the engine. I had a rear bulkhead made, and I have also added an almost 90 degree water pump connection. I have spacers that are about 1 3/4" on the rear engine mounts. I need to extend those to 2 1/8" to give me appropriate space between the engine and bulkhead. That will of course move the engine back a little more than 1/2".

Is that a problem for the half shafts? I assume the u joints will compensate???
Also, the starter does not engage the ring gear. I assume it has a bendex that engages the ring gear when juice is supplied?
Is that a problem for the half shafts? I assume the u joints will compensate???
Also, the starter does not engage the ring gear. I assume it has a bendex that engages the ring gear when juice is supplied?
I will. I had it made so it can be removed with the engine in place. I have a lot of goodies to attach to the bulkhead. So, I wanted to get that "stuff" positioned/drilled first. I intend on covering the upper bullhead too.
The replacement pilot bearing arrived (thanks, RCR!) and has now been installed in the flywheel using red, high temperature loctite.
The bearing was a pressure fit and was installed by tapping lightly around the edges with a hammer, followed by a large socket that fit onto the outer race.
The loctite might not be needed, but may help to ensure that the outer bearing race cannot rotate in the flywheel.
The arp flywheel mounting bolts were reused. According to ARP, this is one of the benefits of using their high strength bolts.
Attachments
Dave Lindemann
Lifetime Supporter
Dave -
I hope for your sake that you never have to replace that bearing. Red loctite is considered nearly permanent but can be broken down with a LOT of heat. Another way to install that bearing is to heat up the flywheel in an oven so it expands ever so slightly. Put the bearing in the freezer so it shrinks ever so slightly. The bearing will then drop right into the flywheel. Once the components reach ambient temperature the bearing will be one with the flywheel.
I'm not saying the way you did it is wrong or won't work. It will just make bearing replacement more of a challenge.
Regards,
Dave L
The replacement pilot bearing arrived (thanks, RCR!) and has now been installed in the flywheel using red, high temperature loctite.
The bearing was a pressure fit and was installed by tapping lightly around the edges with a hammer, followed by a large socket that fit onto the outer race.
The loctite might not be needed, but may help to ensure that the outer bearing race cannot rotate in the flywheel.
The arp flywheel mounting bolts were reused. According to ARP, this is one of the benefits of using their high strength bolts.
Dave -
I hope for your sake that you never have to replace that bearing. Red loctite is considered nearly permanent but can be broken down with a LOT of heat. Another way to install that bearing is to heat up the flywheel in an oven so it expands ever so slightly. Put the bearing in the freezer so it shrinks ever so slightly. The bearing will then drop right into the flywheel. Once the components reach ambient temperature the bearing will be one with the flywheel.
I'm not saying the way you did it is wrong or won't work. It will just make bearing replacement more of a challenge.
Regards,
Dave L
Or you could just bring it to a machine shop and have them press it in for $30. I'd rather spend a few bucks and know I followed drivetrain directions to the T - pressed in about 80thou - rather than looks good enough with my smacking hammer.
Or you could just bring it to a machine shop and have them press it in for $30. I'd rather spend a few bucks and know I followed drivetrain directions to the T - pressed in about 80thou - rather than looks good enough with my smacking hammer.
I have a press and I still hammer in pilot bearings. It's not a big deal.
Similar threads
- Replies
- 27
- Views
- 15K
- Replies
- 0
- Views
- 23K