
- Forums
- GT40 Replica Manufacturers' Corner
- RCR Forum - RCR40/SLC/917/Superlite Aero
- The SLC Clubhouse
You are using an out of date browser. It may not display this or other websites correctly.
You should upgrade or use an alternative browser.
You should upgrade or use an alternative browser.
Stephan's SLC Build Log
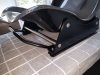
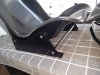
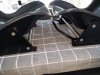
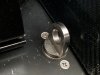
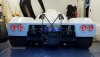
Here is Rev.1 of the seat brackets. I made them completely new from 1/4" T6061 angle. The old ones were made from 3/16" and I did not trust them to take the additional load from the harness since a cross member was added to mount 5 & 6 crotch belts. The crossmember will travel with the driver seat, a Tillet slider was added as well. The passenger seat is rigid. The driver bracket is lower but equals with the passenger seat with the slider installed. All 10.9 hardware on the brackets, high strenght steel on the crossmember. Harness anchors in place as well.
Attachments
![20211008_181805[1].jpg](/data/attachments/115/115196-312a076b67a53e9ec288c06a5f996685.jpg?hash=MSoHa2elPp)
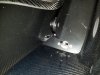
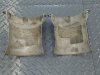
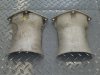
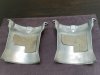
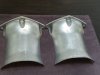
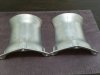
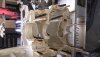
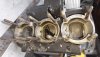
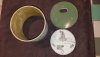
I found a set of Audi drive shaft heat shields for the Graziano on Ebay. I ran them through my self built Vapor Hone cabinet which I am using on all used Aluminum parts as well as on other precious metals, removing oxidation or discoloring, for deburring after machining and transmission gears etc. It is a non abresive process where a water/round glass bead slurry ( I am using between 175 - 135 Microns) are injected into a high velocity air jet. The water acts as a lubricant and the glass removes the imperfections on impact and closing surface porosity. Here is the before and after and a few pictures of one of my restored motorcycle engines I did. Casting fresh parts every time.
Attachments
-
 20230619_122715.jpg472 KB · Views: 320
 -
 20230619_122655.jpg395.8 KB · Views: 320
 -
 20230619_135046.jpg636.2 KB · Views: 312
 -
 20230619_135111.jpg530.8 KB · Views: 298
 -
 20230619_135133.jpg612.5 KB · Views: 298
 -
 DSC_0415.JPG322.6 KB · Views: 307
 -
 DSC_0422.JPG400.4 KB · Views: 310
 -
![HPIM8110[1].JPG](/data/attachments/115/115656-81720513fc1836a1acb3e3e07173f4f9.jpg?hash=gXIFE_wYNq) HPIM8110[1].JPG446.7 KB · Views: 319
HPIM8110[1].JPG446.7 KB · Views: 319 -
![HPIM8111[1].JPG](/data/attachments/115/115657-ca22ff6d696befb6e1524318f2076a41.jpg?hash=yiL_bWlr77) HPIM8111[1].JPG391.9 KB · Views: 320
HPIM8111[1].JPG391.9 KB · Views: 320 -
![HPIM8113[1].JPG](/data/attachments/115/115658-dc640adeab25fc6e85e9b9281e2d75e5.jpg?hash=3GQK3qsl_G) HPIM8113[1].JPG341.8 KB · Views: 353
HPIM8113[1].JPG341.8 KB · Views: 353
Last edited:
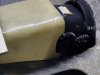
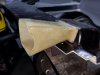
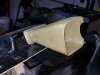
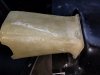
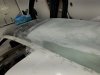
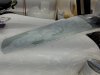
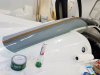
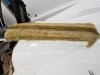
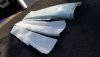
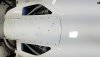
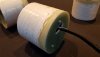
I put some time in to get started on making the plug for the extension of the roofscoop. This will take a few more postings until the first part will come out of the mold since there are many steps to be taken. I found it beneficial to put the extra work in to make a reproducible component instead of just molding one. If I ever want to make a change or screw up a part it can be easily remade. So far I have determined shape and contour and I am more than happy with all proportions. Backbone made with expansion foam and added Bondo as a solid and workable surface. Roughing is almost complete...
Attachments
-
 20230326_130717.jpg314.9 KB · Views: 303
 -
 20230514_151253.jpg171.5 KB · Views: 297
 -
 20230619_123100.jpg302.4 KB · Views: 270
 -
 20230619_123112.jpg249.2 KB · Views: 267
 -
 20230625_142620.jpg253.7 KB · Views: 276
 -
 20230625_142707.jpg240.6 KB · Views: 263
 -
 20230712_182702.jpg241 KB · Views: 277
 -
 20230712_182709.jpg248.4 KB · Views: 264
 -
 20230712_192337.jpg269 KB · Views: 276
 -
 20230712_192925.jpg308.3 KB · Views: 307
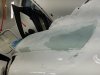
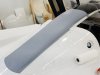
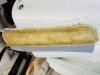
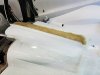
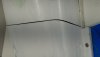
Here are some additional steps towards the mold making. The plug was sprayed in high build primer and sanded with 400 wet. A flange was added for easier removal of the molded part. Before the white gelcoat was applied to the first half of the plug the surface was waxed with release wax eight times and coated with PVA. The first half is now ready and fiberglassed. Working on the second half.
Attachments
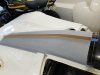

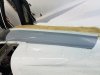
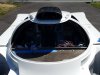
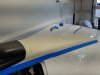
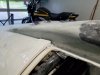
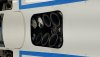
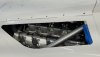
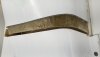
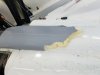
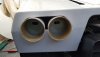
The first part came out of the mold succesfully with only very minor imperfections in the Gelcoat. Fits like a charme. Plug removed from car. Cutout made for velocity stacks. Mold was trimmed in, then cut to allow the rear clam to open. I chose a bolt on version over glued connection on the rear clam. A lip was added to the frontal portion as a sealed transition to the rear duct. Window cutouts done as well.
Attachments
-
 20230805_065618_001.jpg332.3 KB · Views: 254
 -
 20230820_085629.jpg318 KB · Views: 251
 -
 20230826_180242.jpg194.3 KB · Views: 255
 -
 20230827_171233.jpg182 KB · Views: 243
 -
 20230827_171152.jpg221.6 KB · Views: 267
 -
 20230826_172815.jpg167.7 KB · Views: 256
 -
 20230827_171324.jpg198.1 KB · Views: 254
 -
 20230805_123145.jpg225.9 KB · Views: 283
Last edited:
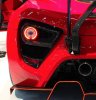
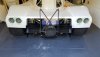
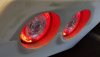
I like roundies and they make the SLC look very wide, so I started looking for some decent LED taillights. I remembed the Zenvo TSR-GT Supercar out of Denmark. I always liked the way the those taillights looked with the notch on the bottom giving it like a reptile eye appearance, thinking that If I get my hands on those I don'thave to make anything. They have dedicated halo’s for running lights, brake lights, yellow turning lights and a white backup lights, creating something like a 3D effect. They are IP67 rated, submersible and come prewired with a real nice AMP connector. It also has a plugin for a resistor if used on a standard flasher relay. Long story short, I called Zenvo and those folks are really friendly over there. They gave me the contact of the German manufacturer. The manufacturers website gave me the reseller info. Zenvo is actually using a common design shared with other manufacturers which made it easy to get my hands of a set of four at a reasonable price. The reseller emailed me the data sheet while the shipment was inbound from Germany and I got started on making the round housings. I used 125mm OD fiberglass tubing which I had laying around with a 3mm wall. The back plates are 4.5mm fiberglass and bonded to the tube. This will be a recessed setup on all four lights when done. OD of the taillights is 112mm so there is about 3mm clearance between taillight and tube wall. Everything pre fitted.
 www.noldengmbh.de
NOLDEN – NCC® Helix full LED rearlight with 3D effect
<table align="left" cellpadding="0" cellspacing="0" hspace="0" vspace="0"> <tbody> <tr> <td align="left" valign="top"> <p>Zenvo relies on the NCC® Helix rear lights for its TSR-S ...</p> </td> </tr> </tbody> </table>
www.noldengmbh.de
Attachments


Last edited:
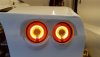
LED tail lights are completed and tested.
Attachments


Last edited:
Similar threads
- Replies
- 19
- Views
- 4K
- Replies
- 8
- Views
- 4K