Stu, let us know the cost and how to do it and maybe. I do like your lights on your car.

- Forums
- GT40 Replica Manufacturers' Corner
- RCR Forum - RCR40/SLC/917/Superlite Aero
- The SLC Clubhouse
You are using an out of date browser. It may not display this or other websites correctly.
You should upgrade or use an alternative browser.
You should upgrade or use an alternative browser.
The SLC headlight and/or tail light swap potential thread
- Thread starter Kyle D
- Start date
Spoke to the lighting company today. The prices range from AUD$30.00 to $50.00 per fitting. Problem is the UK company Perei does not allow them to sell to North America. Nothing to stop me from buying them though and on sending.
The contact I spoke to is going to ask who you can deal with directly in order to purchase their products. I will revert when i hear back.
The contact I spoke to is going to ask who you can deal with directly in order to purchase their products. I will revert when i hear back.
You can buy the same ring style LED tail lights as Stu has in the US. Hella makes them. Called the Hella 9362 Series. Not inexpensive though.
Hella 9362 Series LED Ring Tail/Brake Light Module | Rally Lights
Hella 9362 Series LED Ring Tail/Brake Light Module | Rally Lights
Okay, so here is an idea: mount the rear lights around the edges of the rear, like McLaren styled the rear lights of the P1 (below).Right across the engine bay vents....not bad looking but will have some serious side effects. . . the how "swappable" the . . . 2012 Dodge Charger . . . tail lights would/could be onto the SLC.

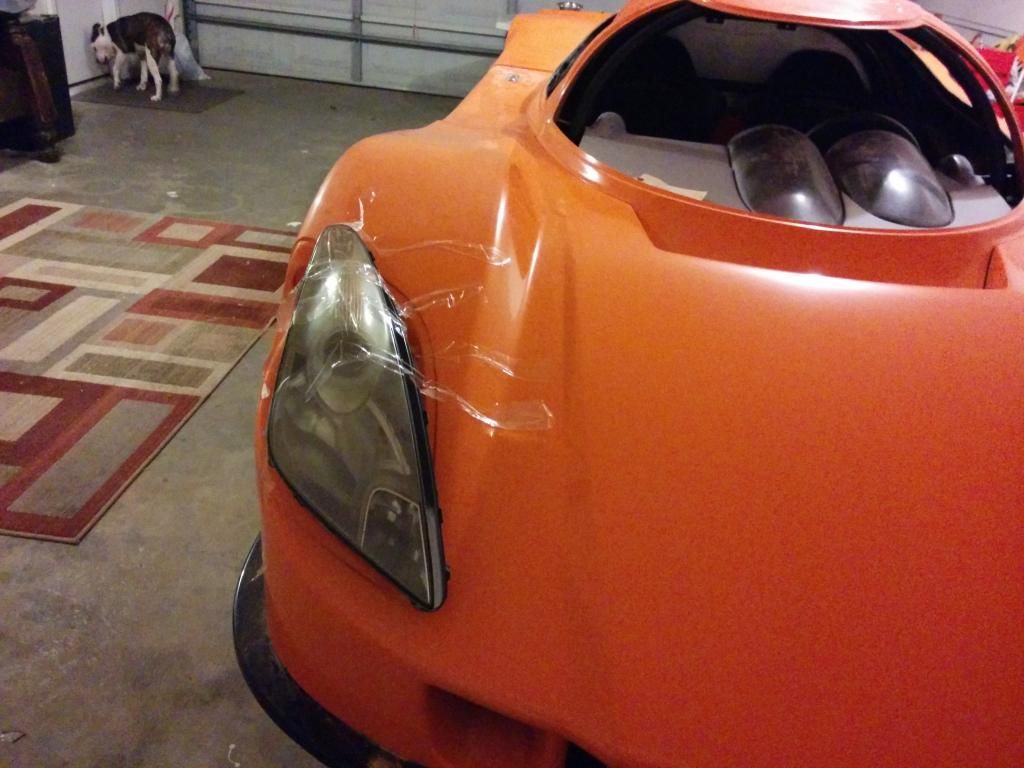
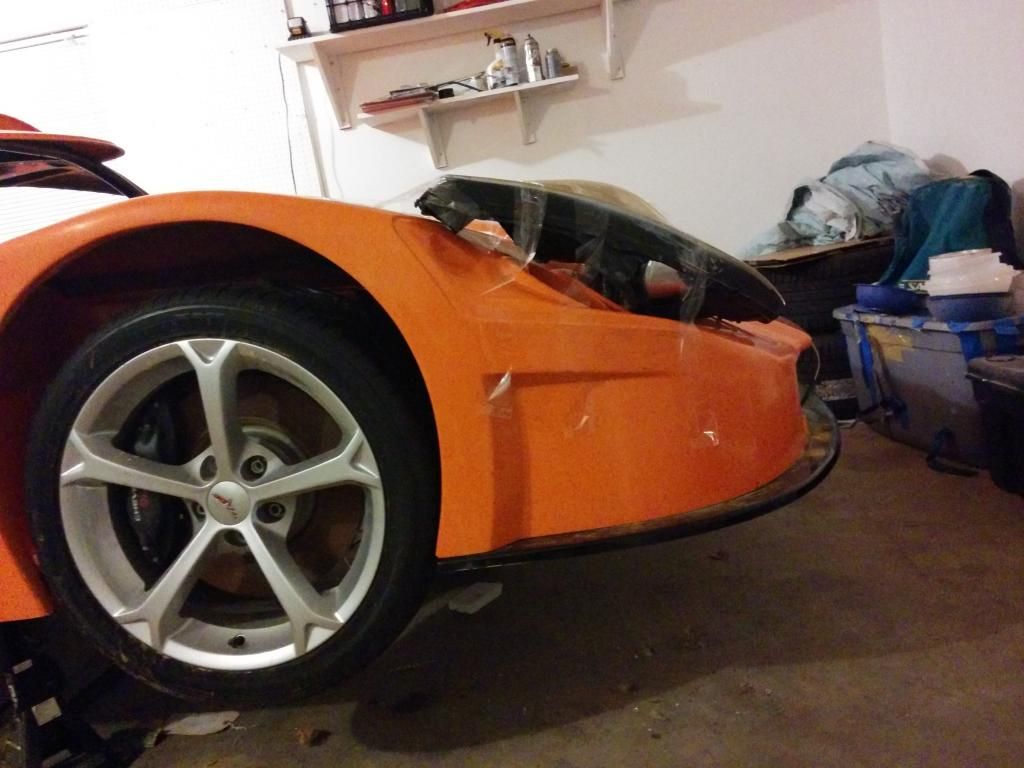
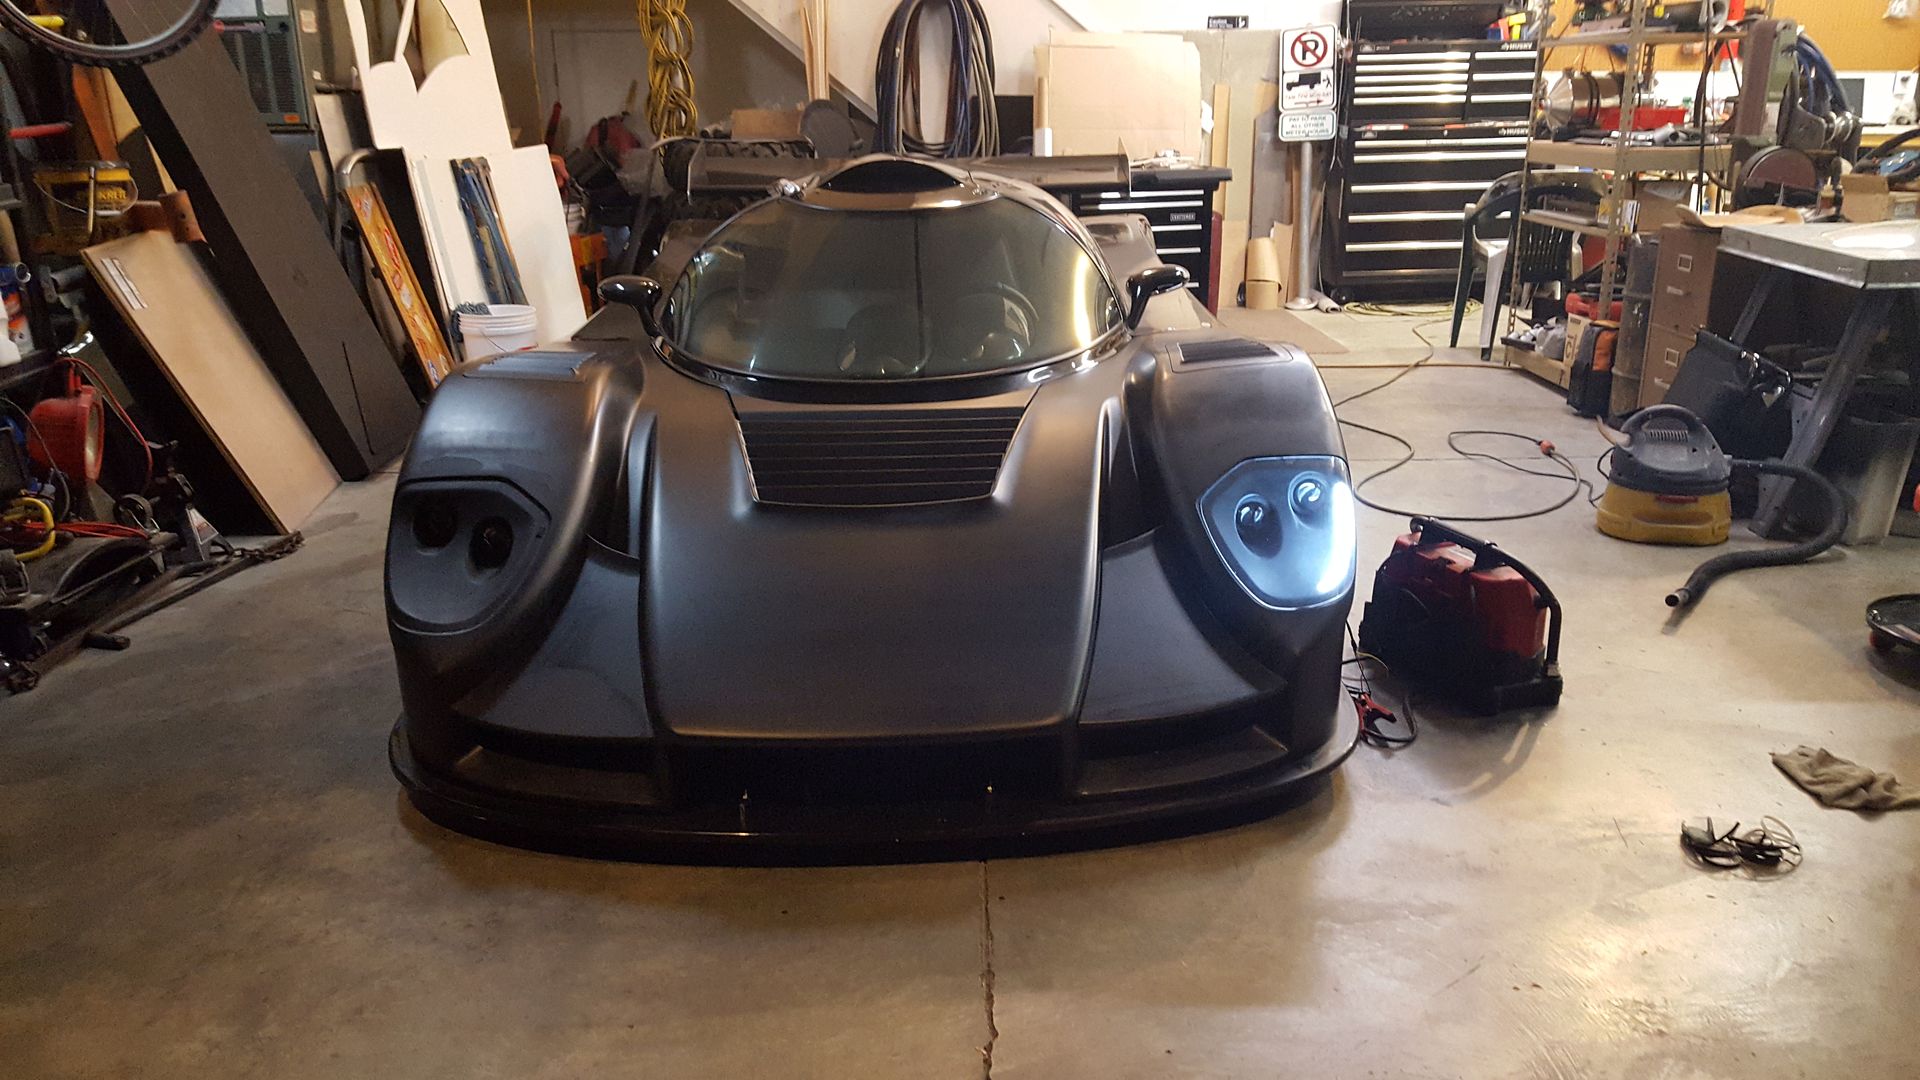
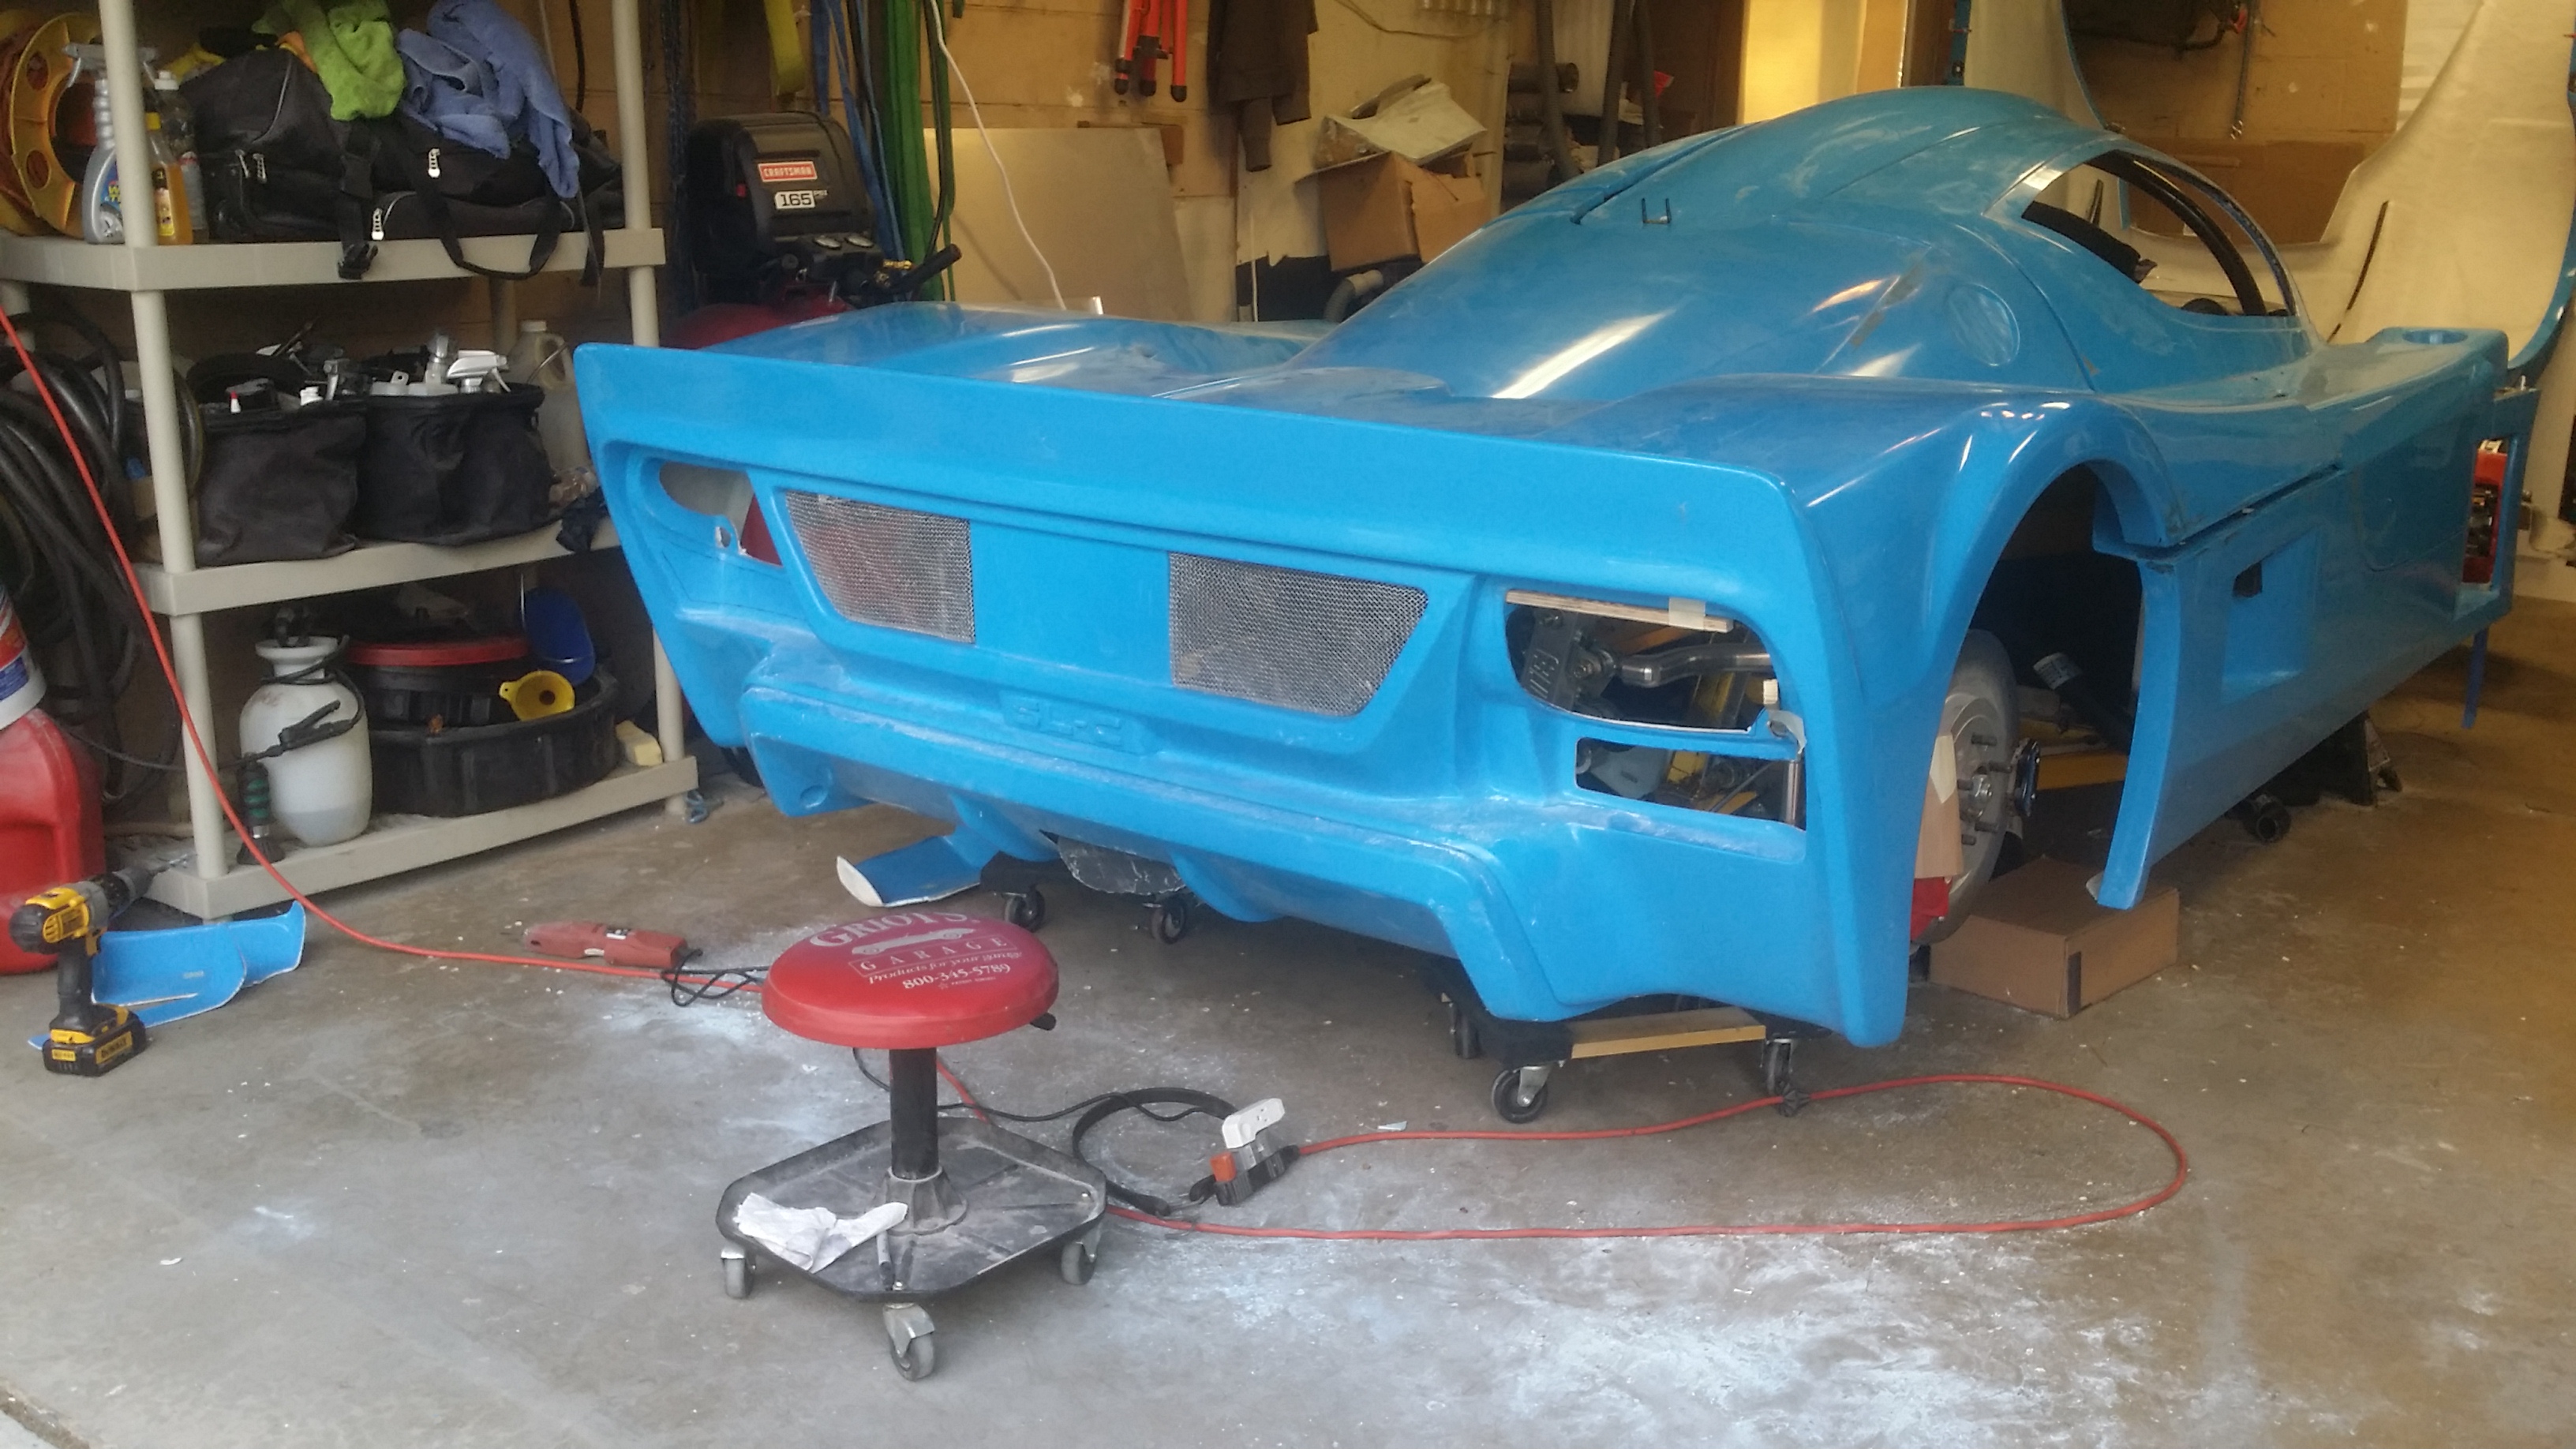
I just got some Celica headlights. I taped one of them on top to see how it looks as I was just going to see how it looks without having to screw with photoshop. It seems to work, and on the side view it seems to follow the contour. I admit I'm a bit intimidated to just cut holes in the front bonnet (I watch too much Top Gear). I may hire a body person to do it.


Last edited:
Ken Roberts
Supporter
That looks good! What do those lights go for?
That looks good! What do those lights go for?
I got these for free because some of the brackets are broken, but that doesn't matter as they are mostly for mock up purposes. My goal is to have an OEM headlight assembly. Something that bolts in nice, and I can remove the whole piece if I have to. I know there have been at least one or two out there that have put off doing the headlights because they don't like the way they are mounted.
I've seen them on Flea Bay for between $170 - $250 or so. I'm actually thinking about going with the halo dual projector ones (I'll post pictures in a bit)


Last edited:
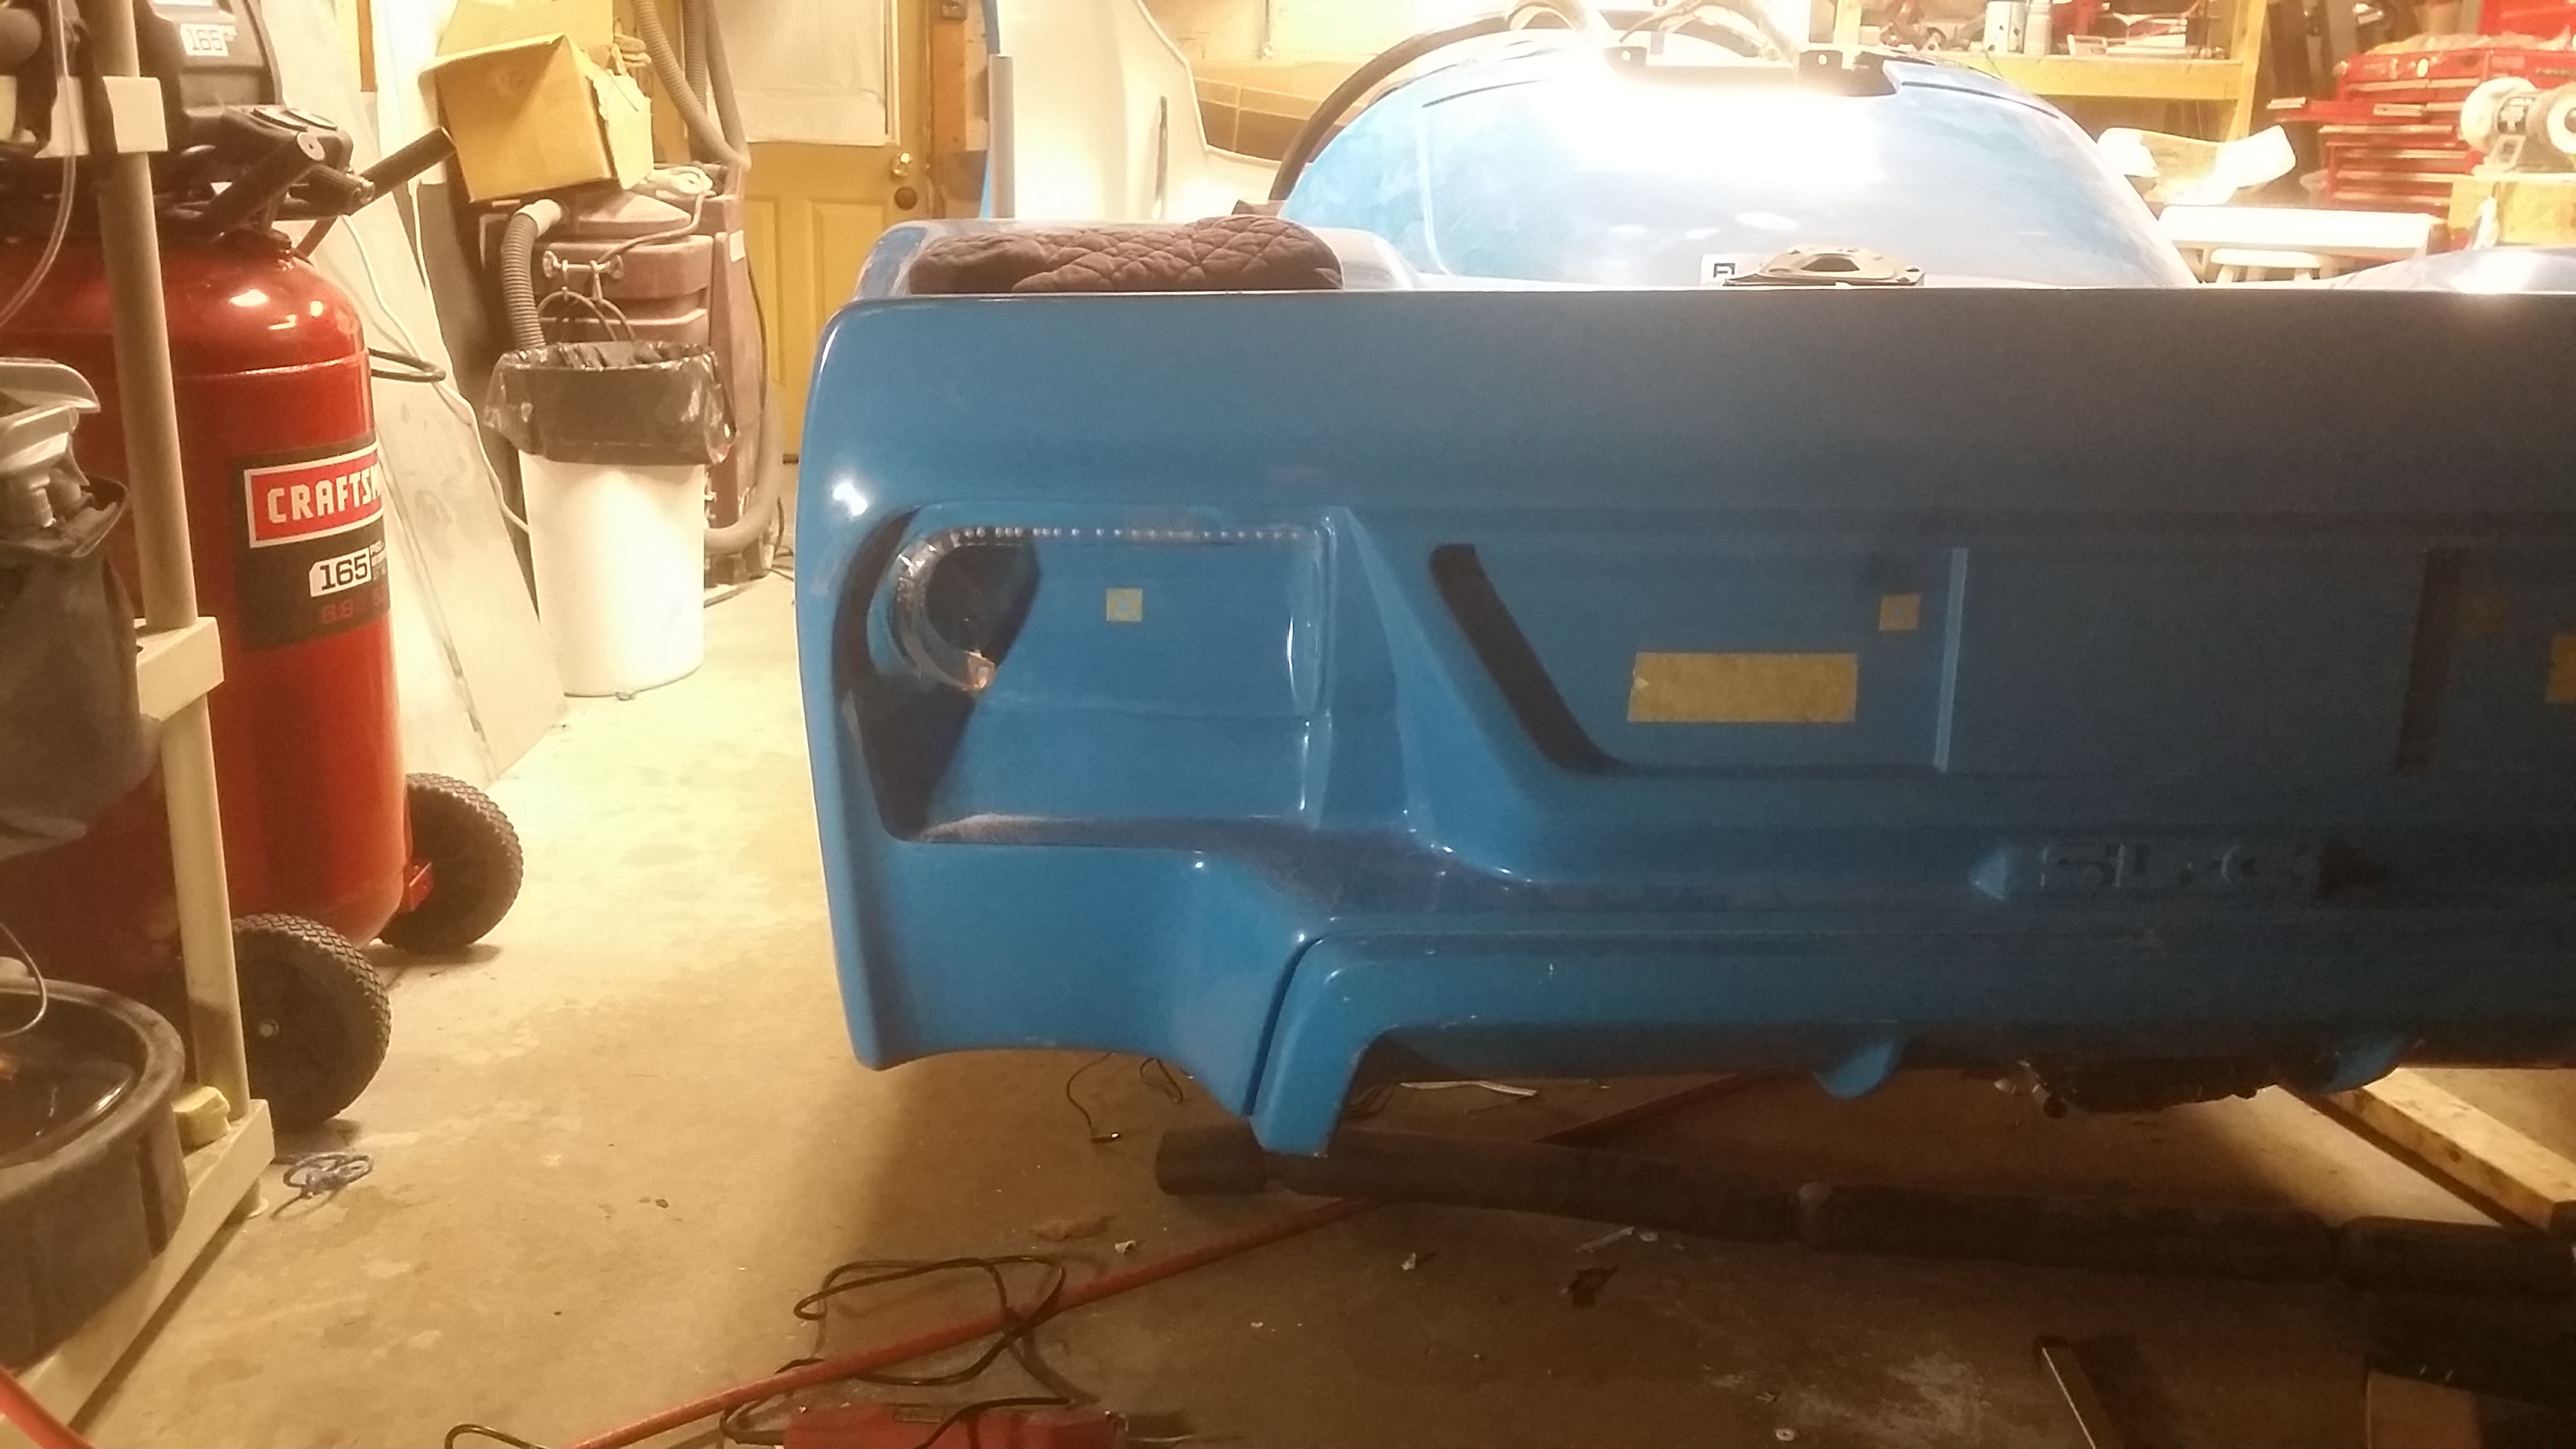
I got my single corvette taillight today. I put it up to the car and it will work. I am going to need to do a bunch of molding and shaping to make it look good and flow with the body, but hat is the fun part for me. I am excited to having this cool looking tail light on my car. I also got the altima headlights fling did so I will have those also.
I got my single corvette taillight today. I put it up to the car and it will work. I am going to need to do a bunch of molding and shaping to make it look good and flow with the body, but hat is the fun part for me. I am excited to having this cool looking tail light on my car. I also got the altima headlights fling did so I will have those also.
Any update on this?
These days if you're not sporting LED lights you're not rolling in style. I like the look of the latest Audi tube DRLs as opposed to the individual arrays of the prior generation.
https://www.ebay.com/ulk/itm/161436961972
Here's a cheap strip that looks like it could be a contender. Cut to size. Securing it behind the lexan cover has me scratching my head a little. The conventional method uses little tabs to keep the strip in place. I'm not a fan of this method since the clips are visible. Some kind of epoxy could work maybe with the strip peeking out just a bit from behind the black border paint if you're running that.
Alternatively you could use an acrylic tube and shape it with a little heat. Place a light at one end hidden behind the bumper shining through the end. I think this style would only work if the tube were not perfectly clear (need to have flaws/something for the light to bounce off of) but I'm not sure this would generate enough light to be usable/noticeable during the day.
I'm thinking a strip running along the interior and across the top would complement the headlights nicely. Anyone do something like this?
In one headlight design I did, I used a .5" alum channel to put them in. Current config has them recessed into the bucket itself, top flush with surface of bucket.
Tried carving a channel to create a window into a piece of tubing and housing the led strip inside, but way to hard to do by hand consistently, and even harder if you are trying to do a compound curve with it.
Current design. No close ups since it is still in mock up.
Tried carving a channel to create a window into a piece of tubing and housing the led strip inside, but way to hard to do by hand consistently, and even harder if you are trying to do a compound curve with it.


Current design. No close ups since it is still in mock up.

I was following all the mods you did in your thread Scott, lots of work going on there! I liked the idea of running it inside the channel but I know I don't have the chops to do that myself. The fleabay linked lights I posted appear to be very easy to shape but doing so cleanly without having to cut up the bucket area is important to me. The headlights of a car give it a distinguishing look and it's an area that i spend a lot of time looking at. I'm sure any fiberglass modification I do would be inconsistent enough that my OCD would make me do it 500x before I thought it was right. I'm jelly of your skills!
Thanks Cam. The alum channel is looks really professional and trick if you go that route. I really liked the suspended look. It is just super hard to bend. I had to put a piece of 1/2" alum rod inside of channel to keep the sides from buckling, with even the slightest bend.
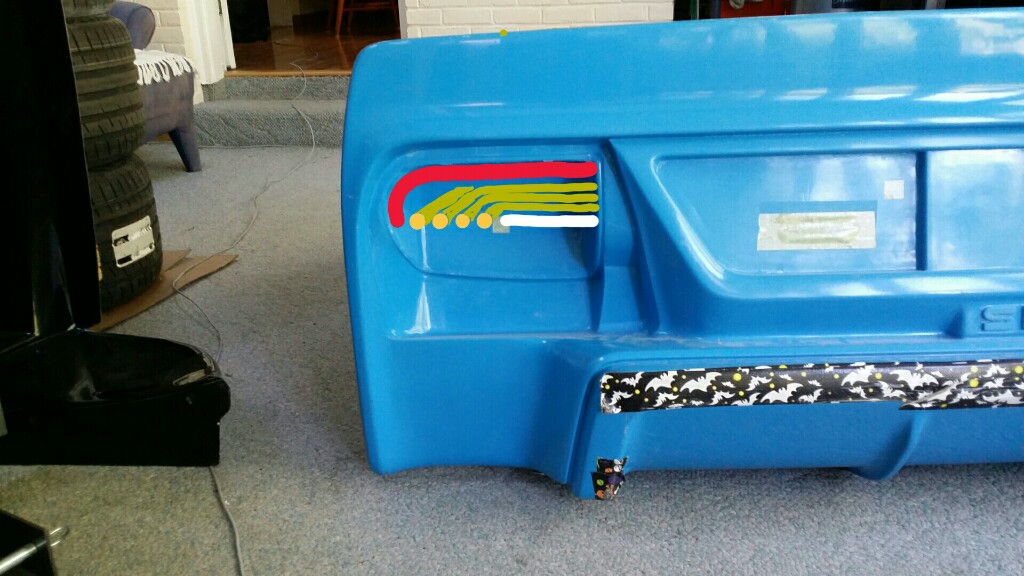
Okay, so here is an idea: mount the rear lights around the edges of the rear, like McLaren styled the rear lights of the P1 (below).
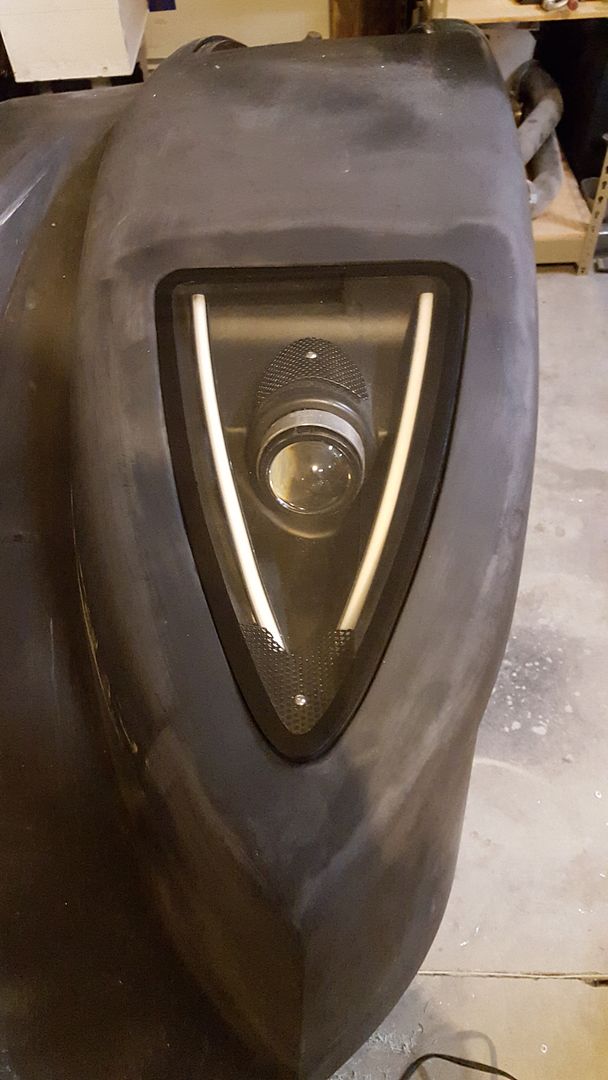
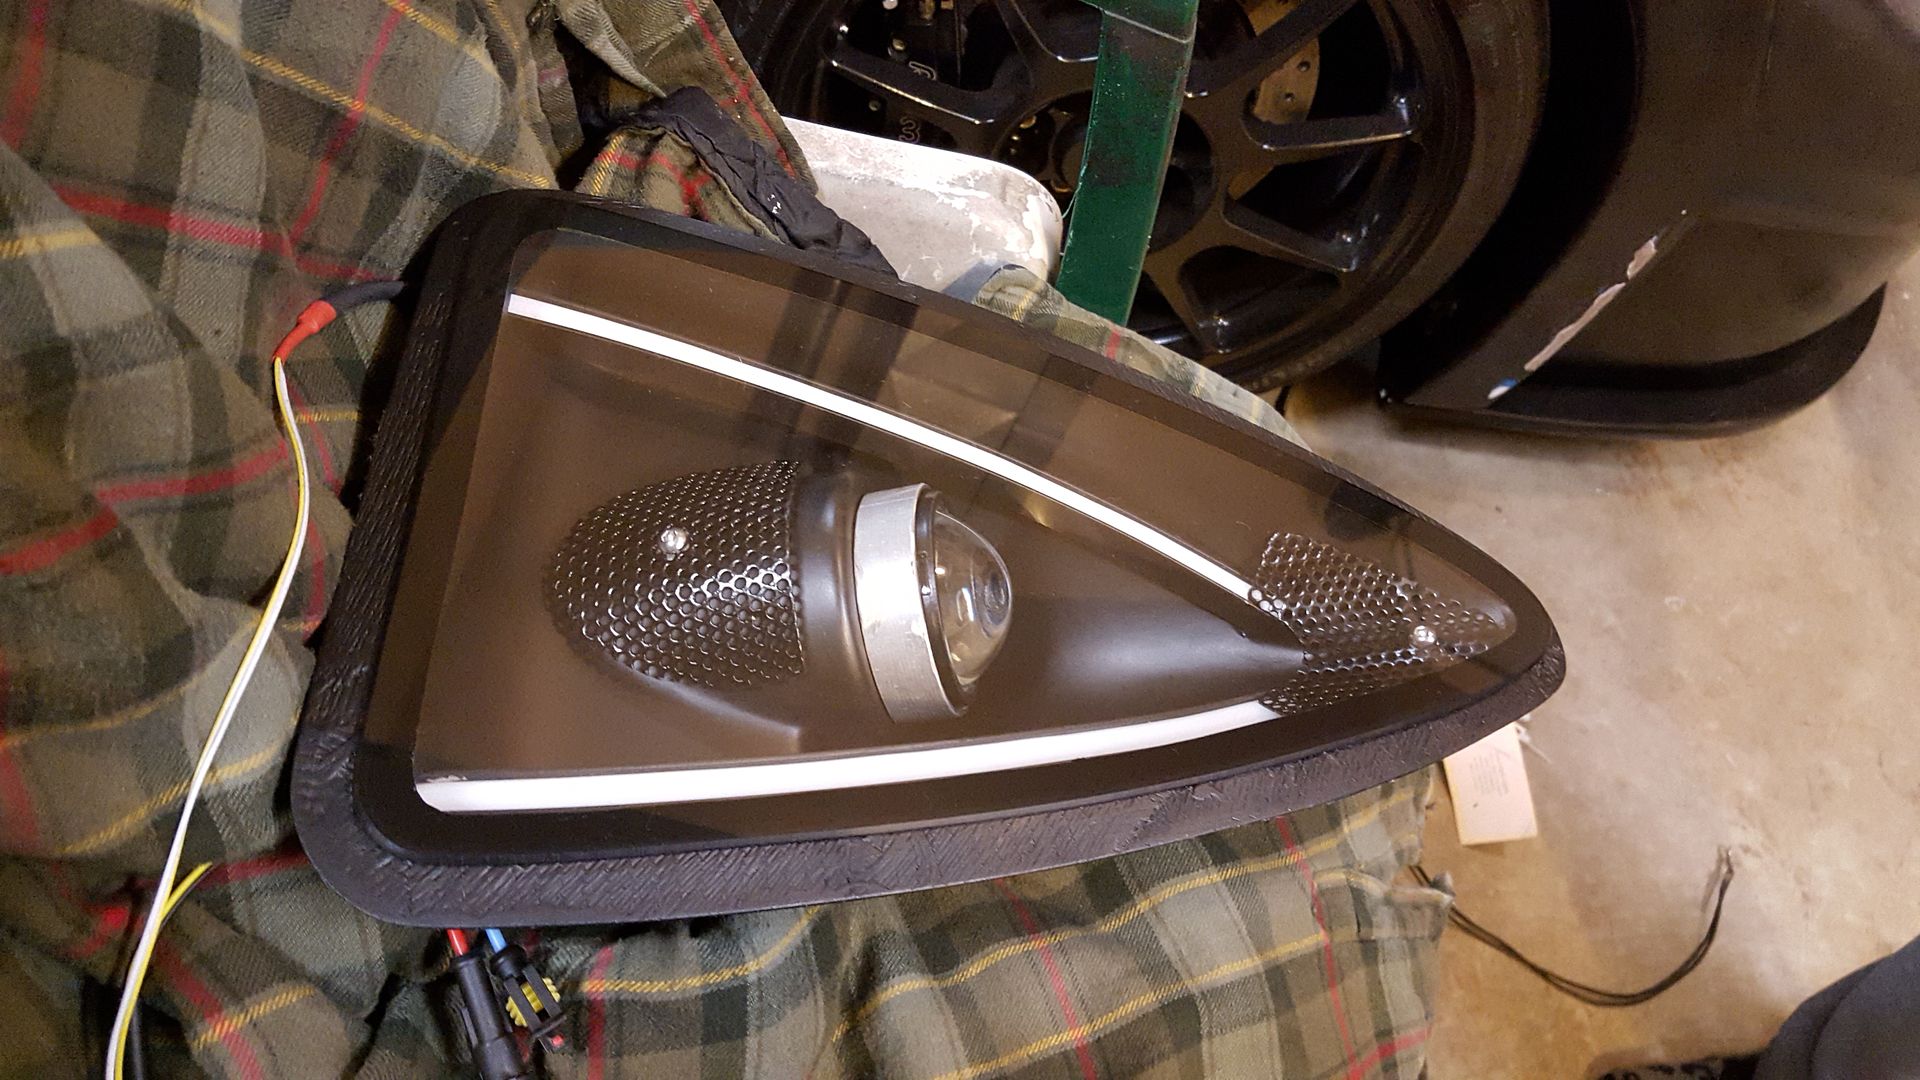
This is exactly the inspiration on the tail lights I have been working on. I'm following the outline of the tail light opening, trying to open up more cooling vents. I'm using acrylic rod which has been heated up and formed to shape. Cam, if you were interested in illuminating acrylic rod as a DRL, you would need to score the back side of the rod with a Dremel or something to give it something to reflect off of. But I don't think it will give the desired effect during the day. For my tail lights, I have 5 (red) LEDS on each end to illuminate as driving lights, ten total. They don't light up as brightly as Scott's strip lights appear to. And I bought 65,000 mcd LEDs from Digikey. The brightest I could find at RadioShack is 3000 mcd, which incidentally were MUCH more expensive.
This has been a work in progress with many lessons learned on how to do it better. In many aspects.
This was the original design intent:
After drilling the holes for the red LEDs, I realized I could integrate everything into one rod around the perimeter and not have to separate the turn signals and reverse light as pictured above. This picture below is just the red LEDs. There's room for amber and clear. Yay!
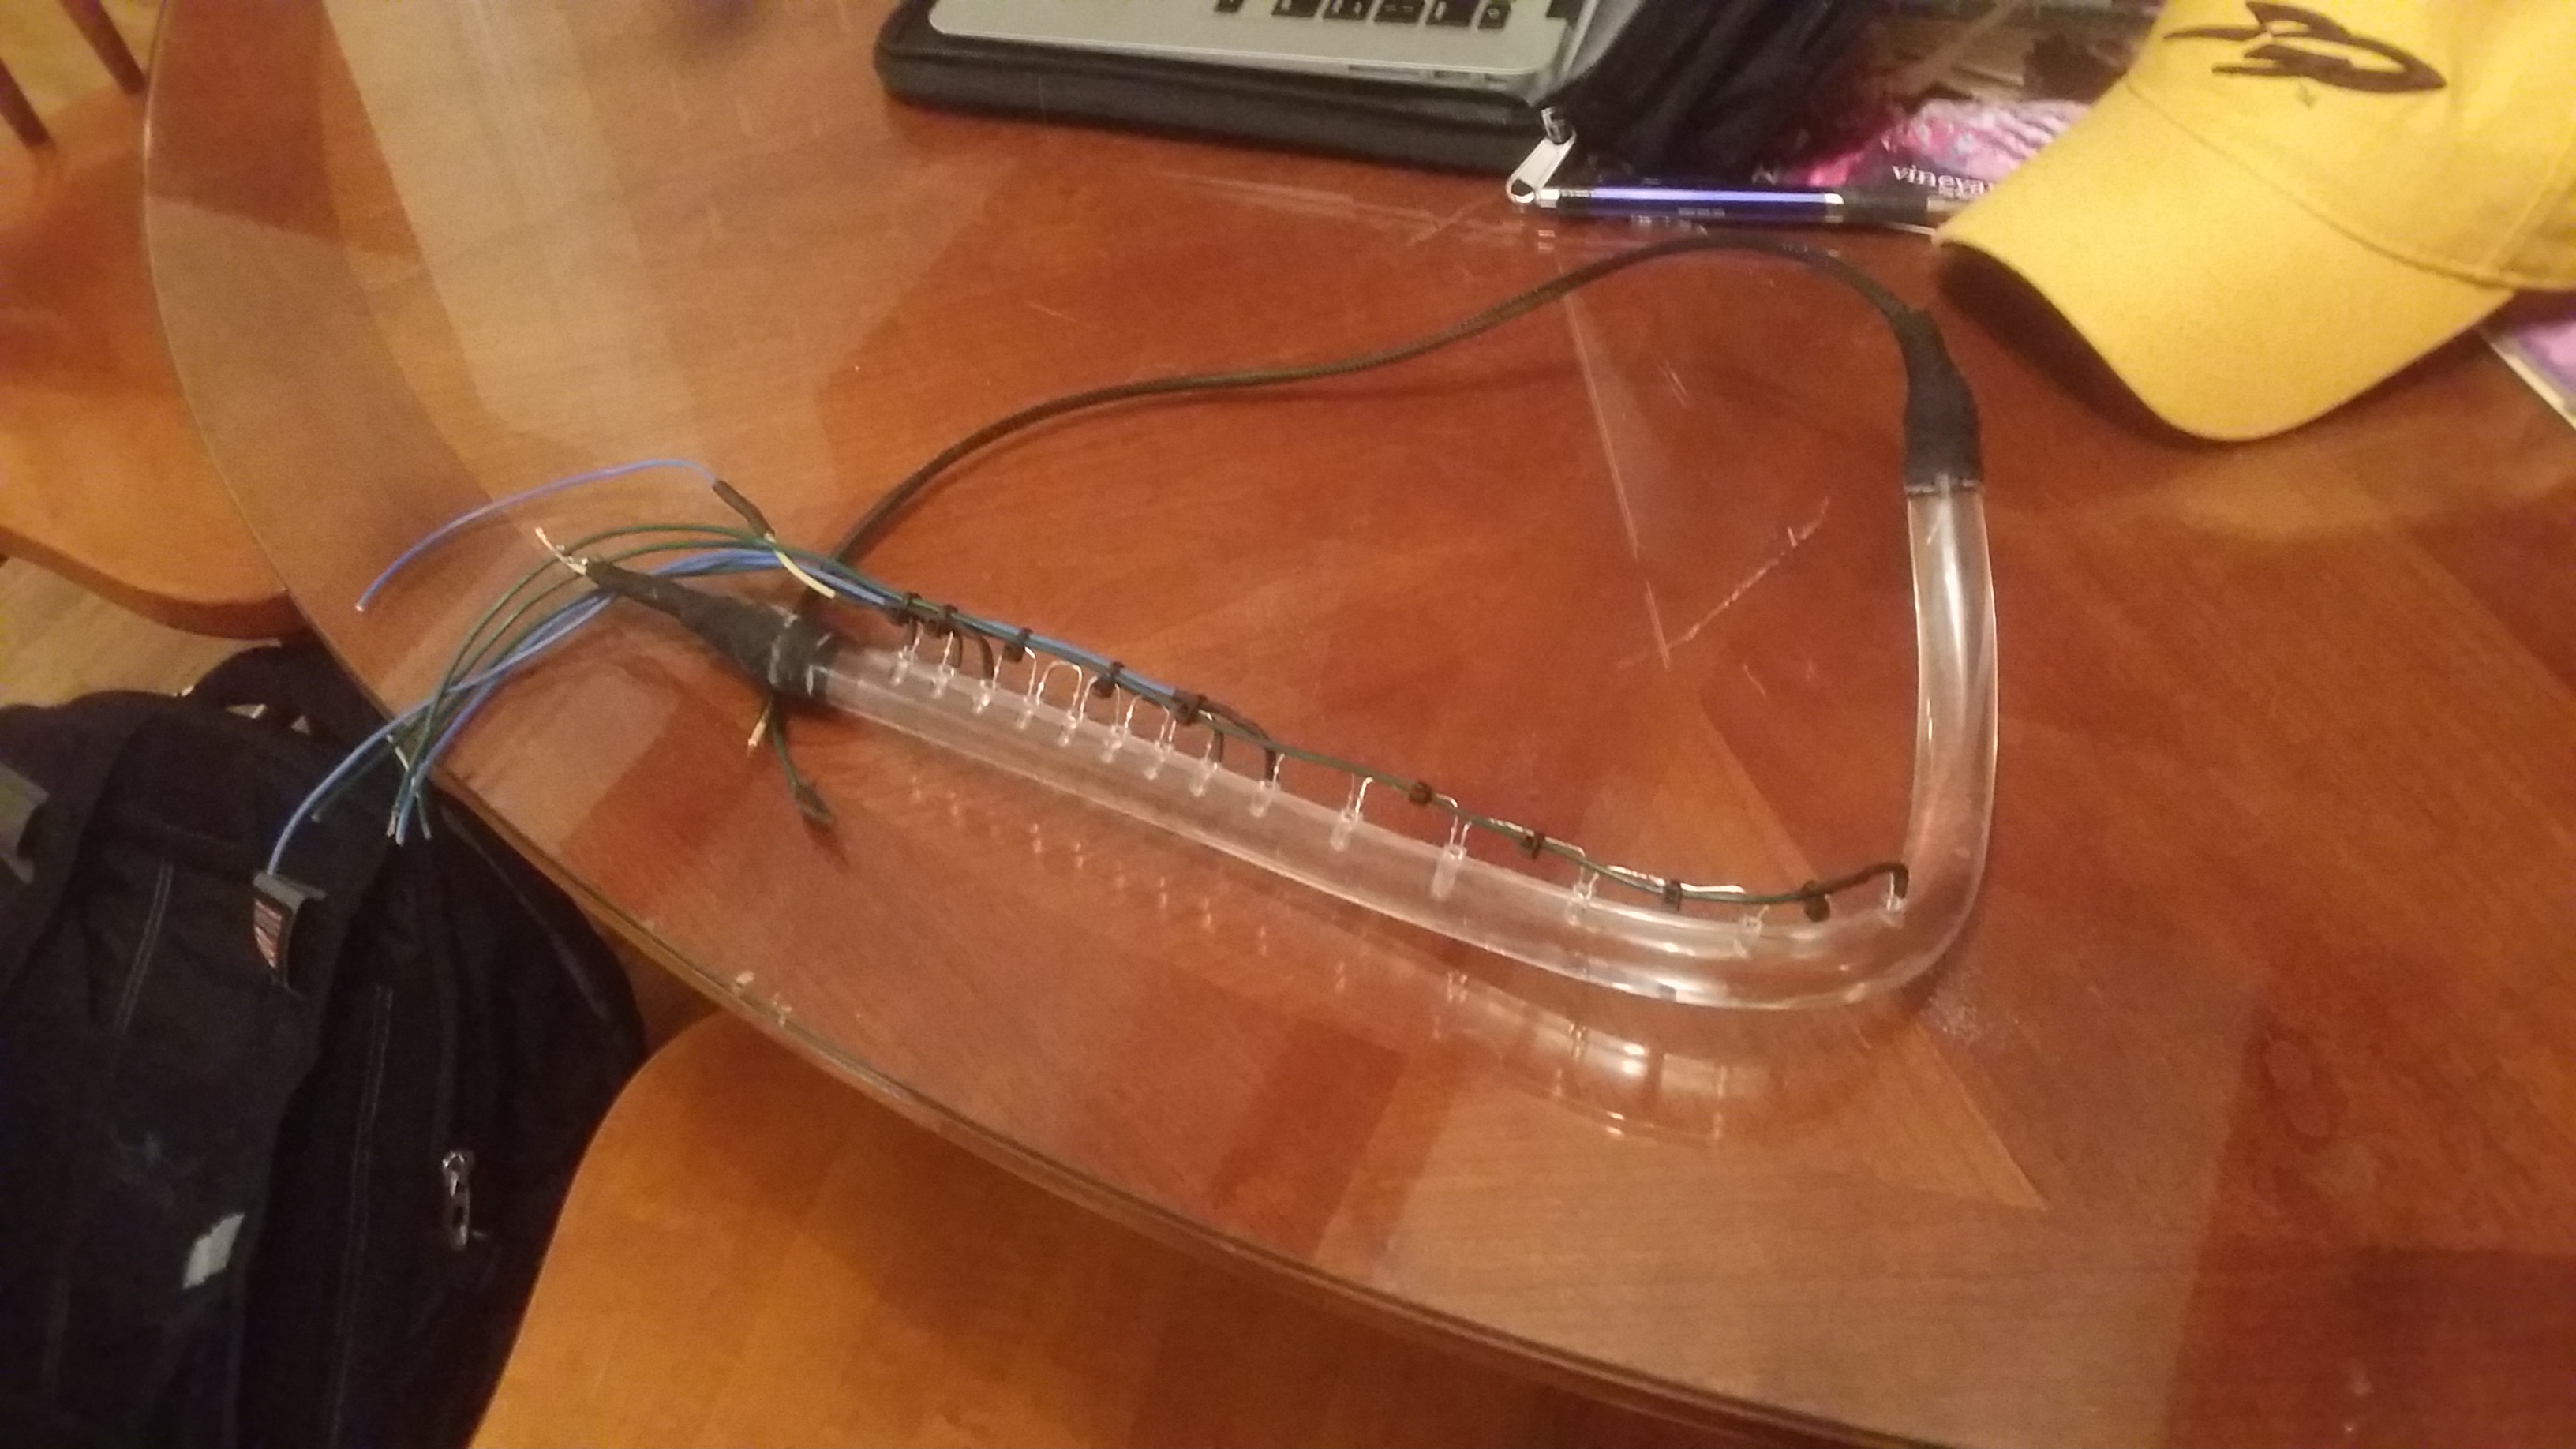
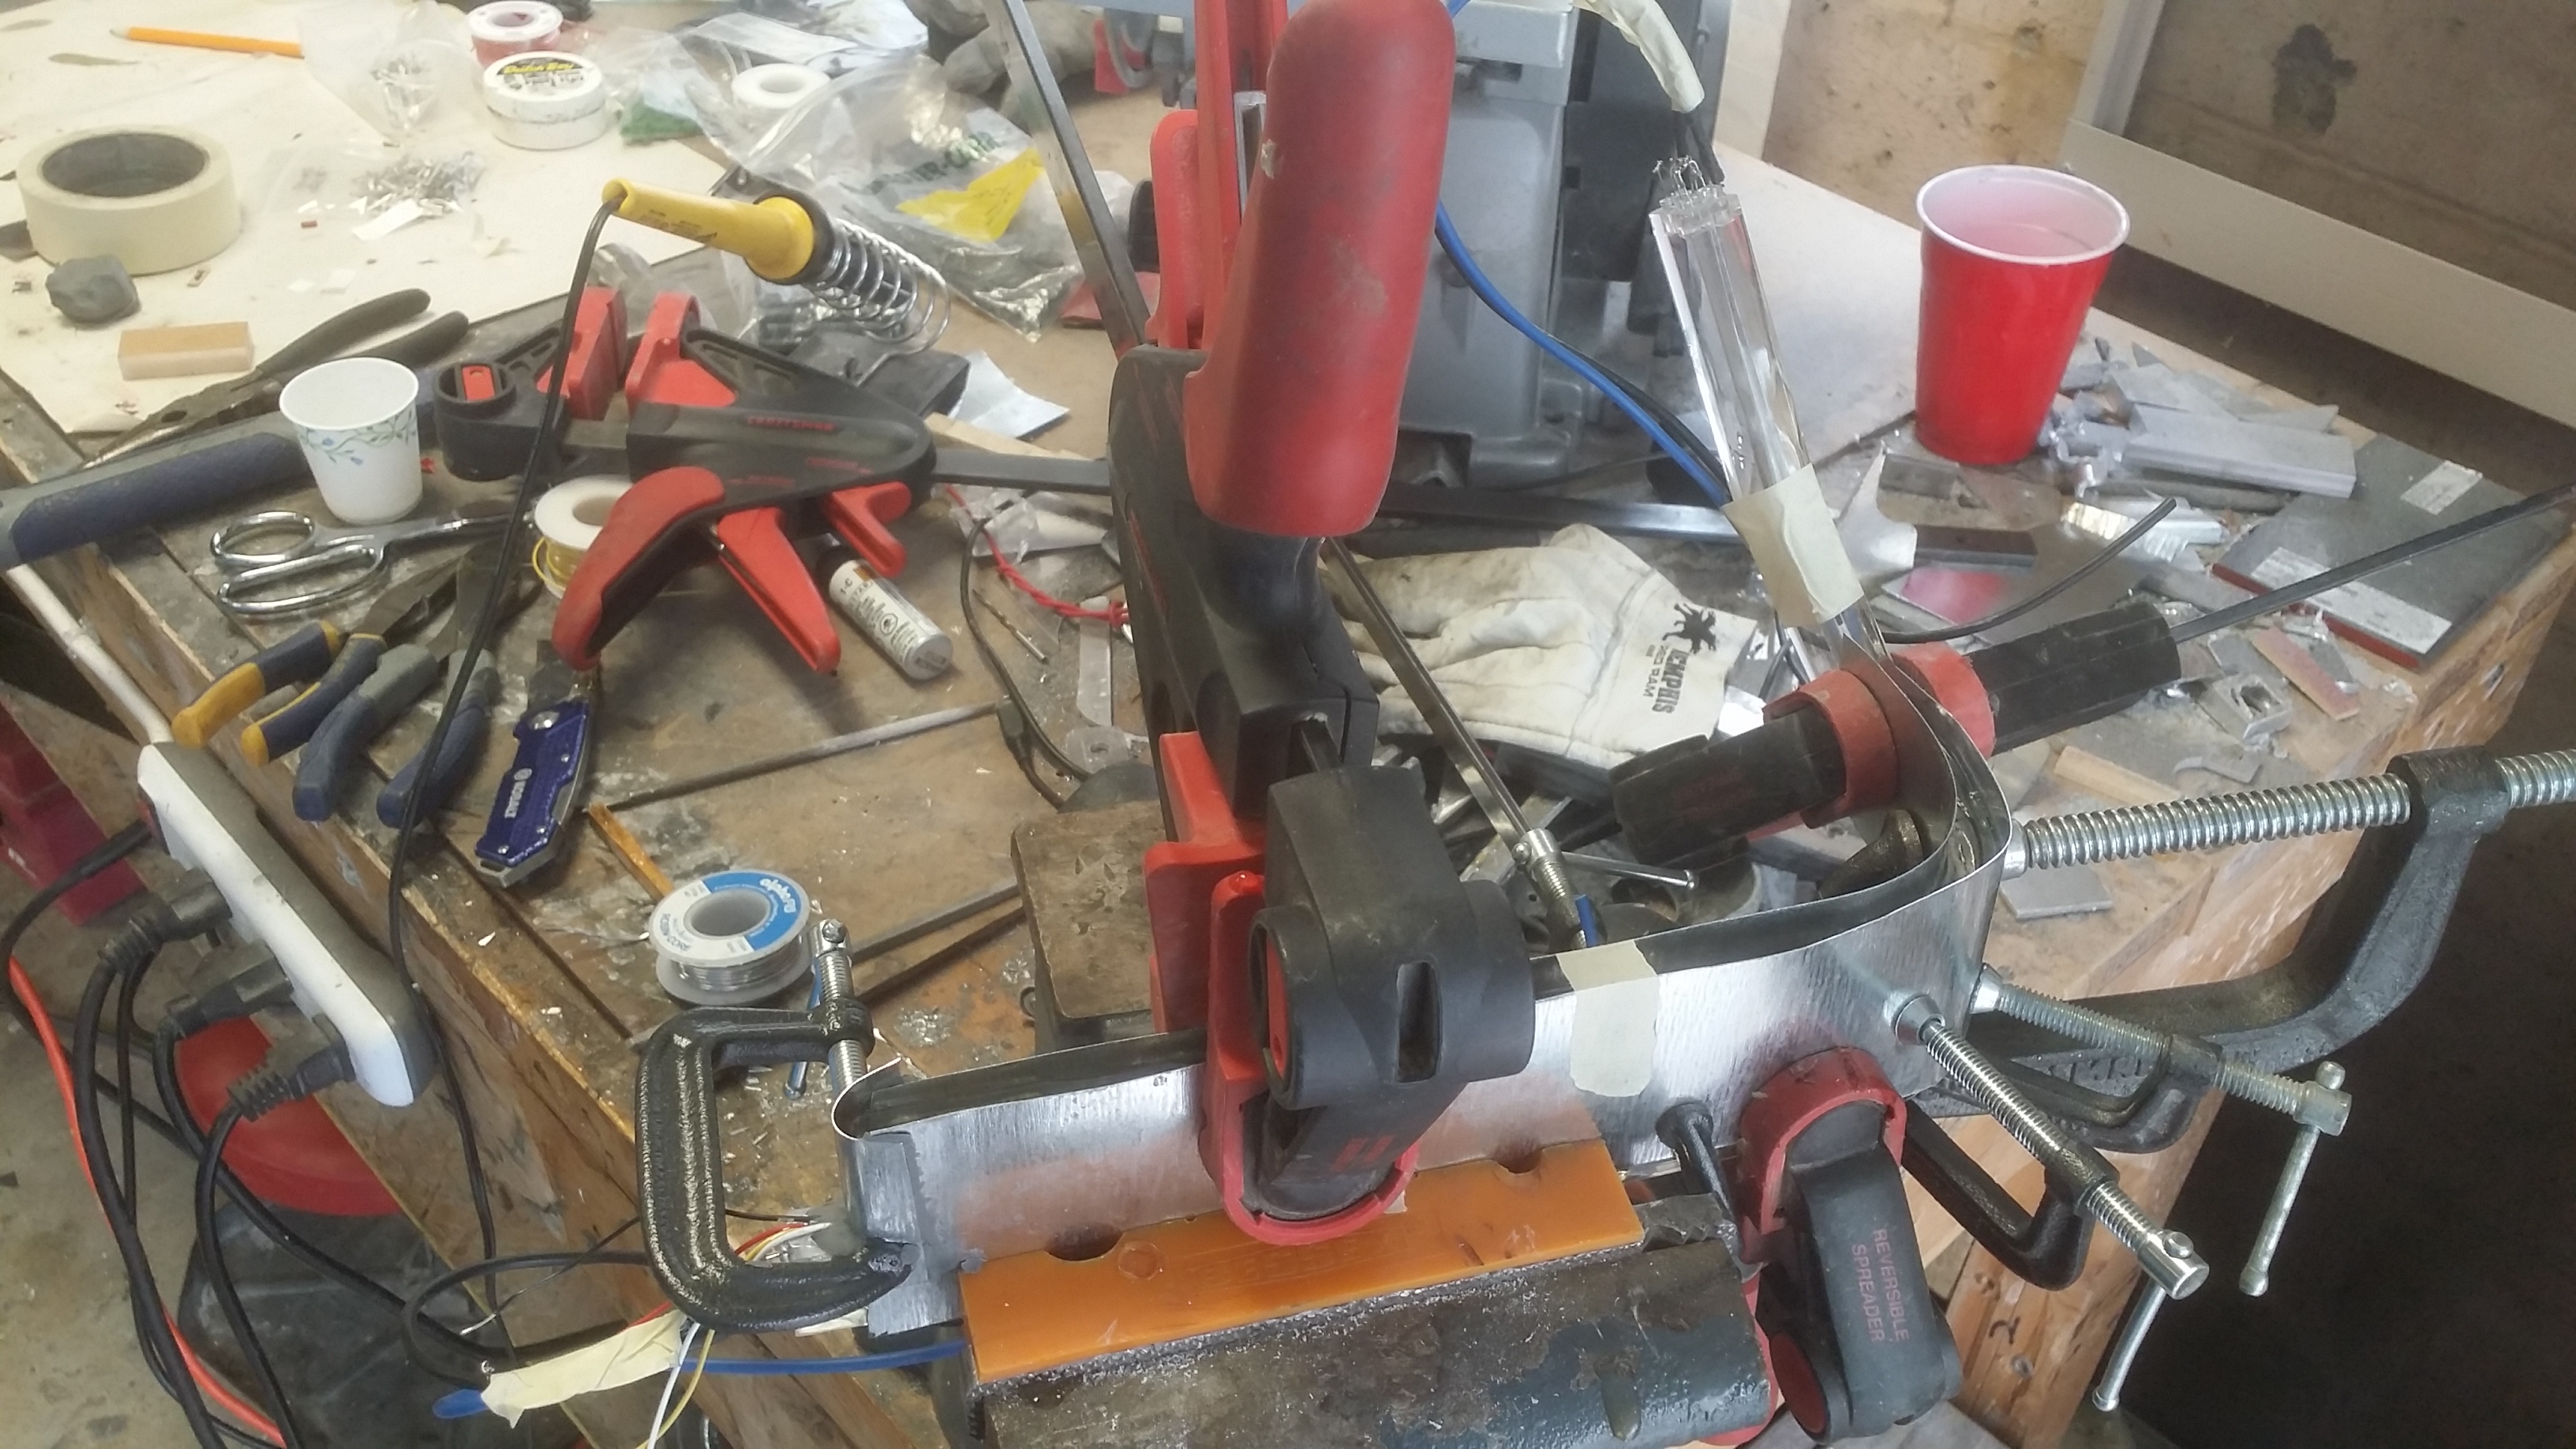
I started with a round cross section acrylic rod, and that was a nightmare. The magnification was too much to overcome. To make matters worse, I shaped the rod before drilling the holes. Then I had problems casting the urethane which protects the wiring, the wiring was a mess....:
I started over with a rectangular cross section acrylic rod. I used my drill press and drilled the holes before shaping the acrylic. As opposed to hand drilling by eye on a compound curve the first time. The acrylic below has holes drilled for the red, yellow and amber LEDs:

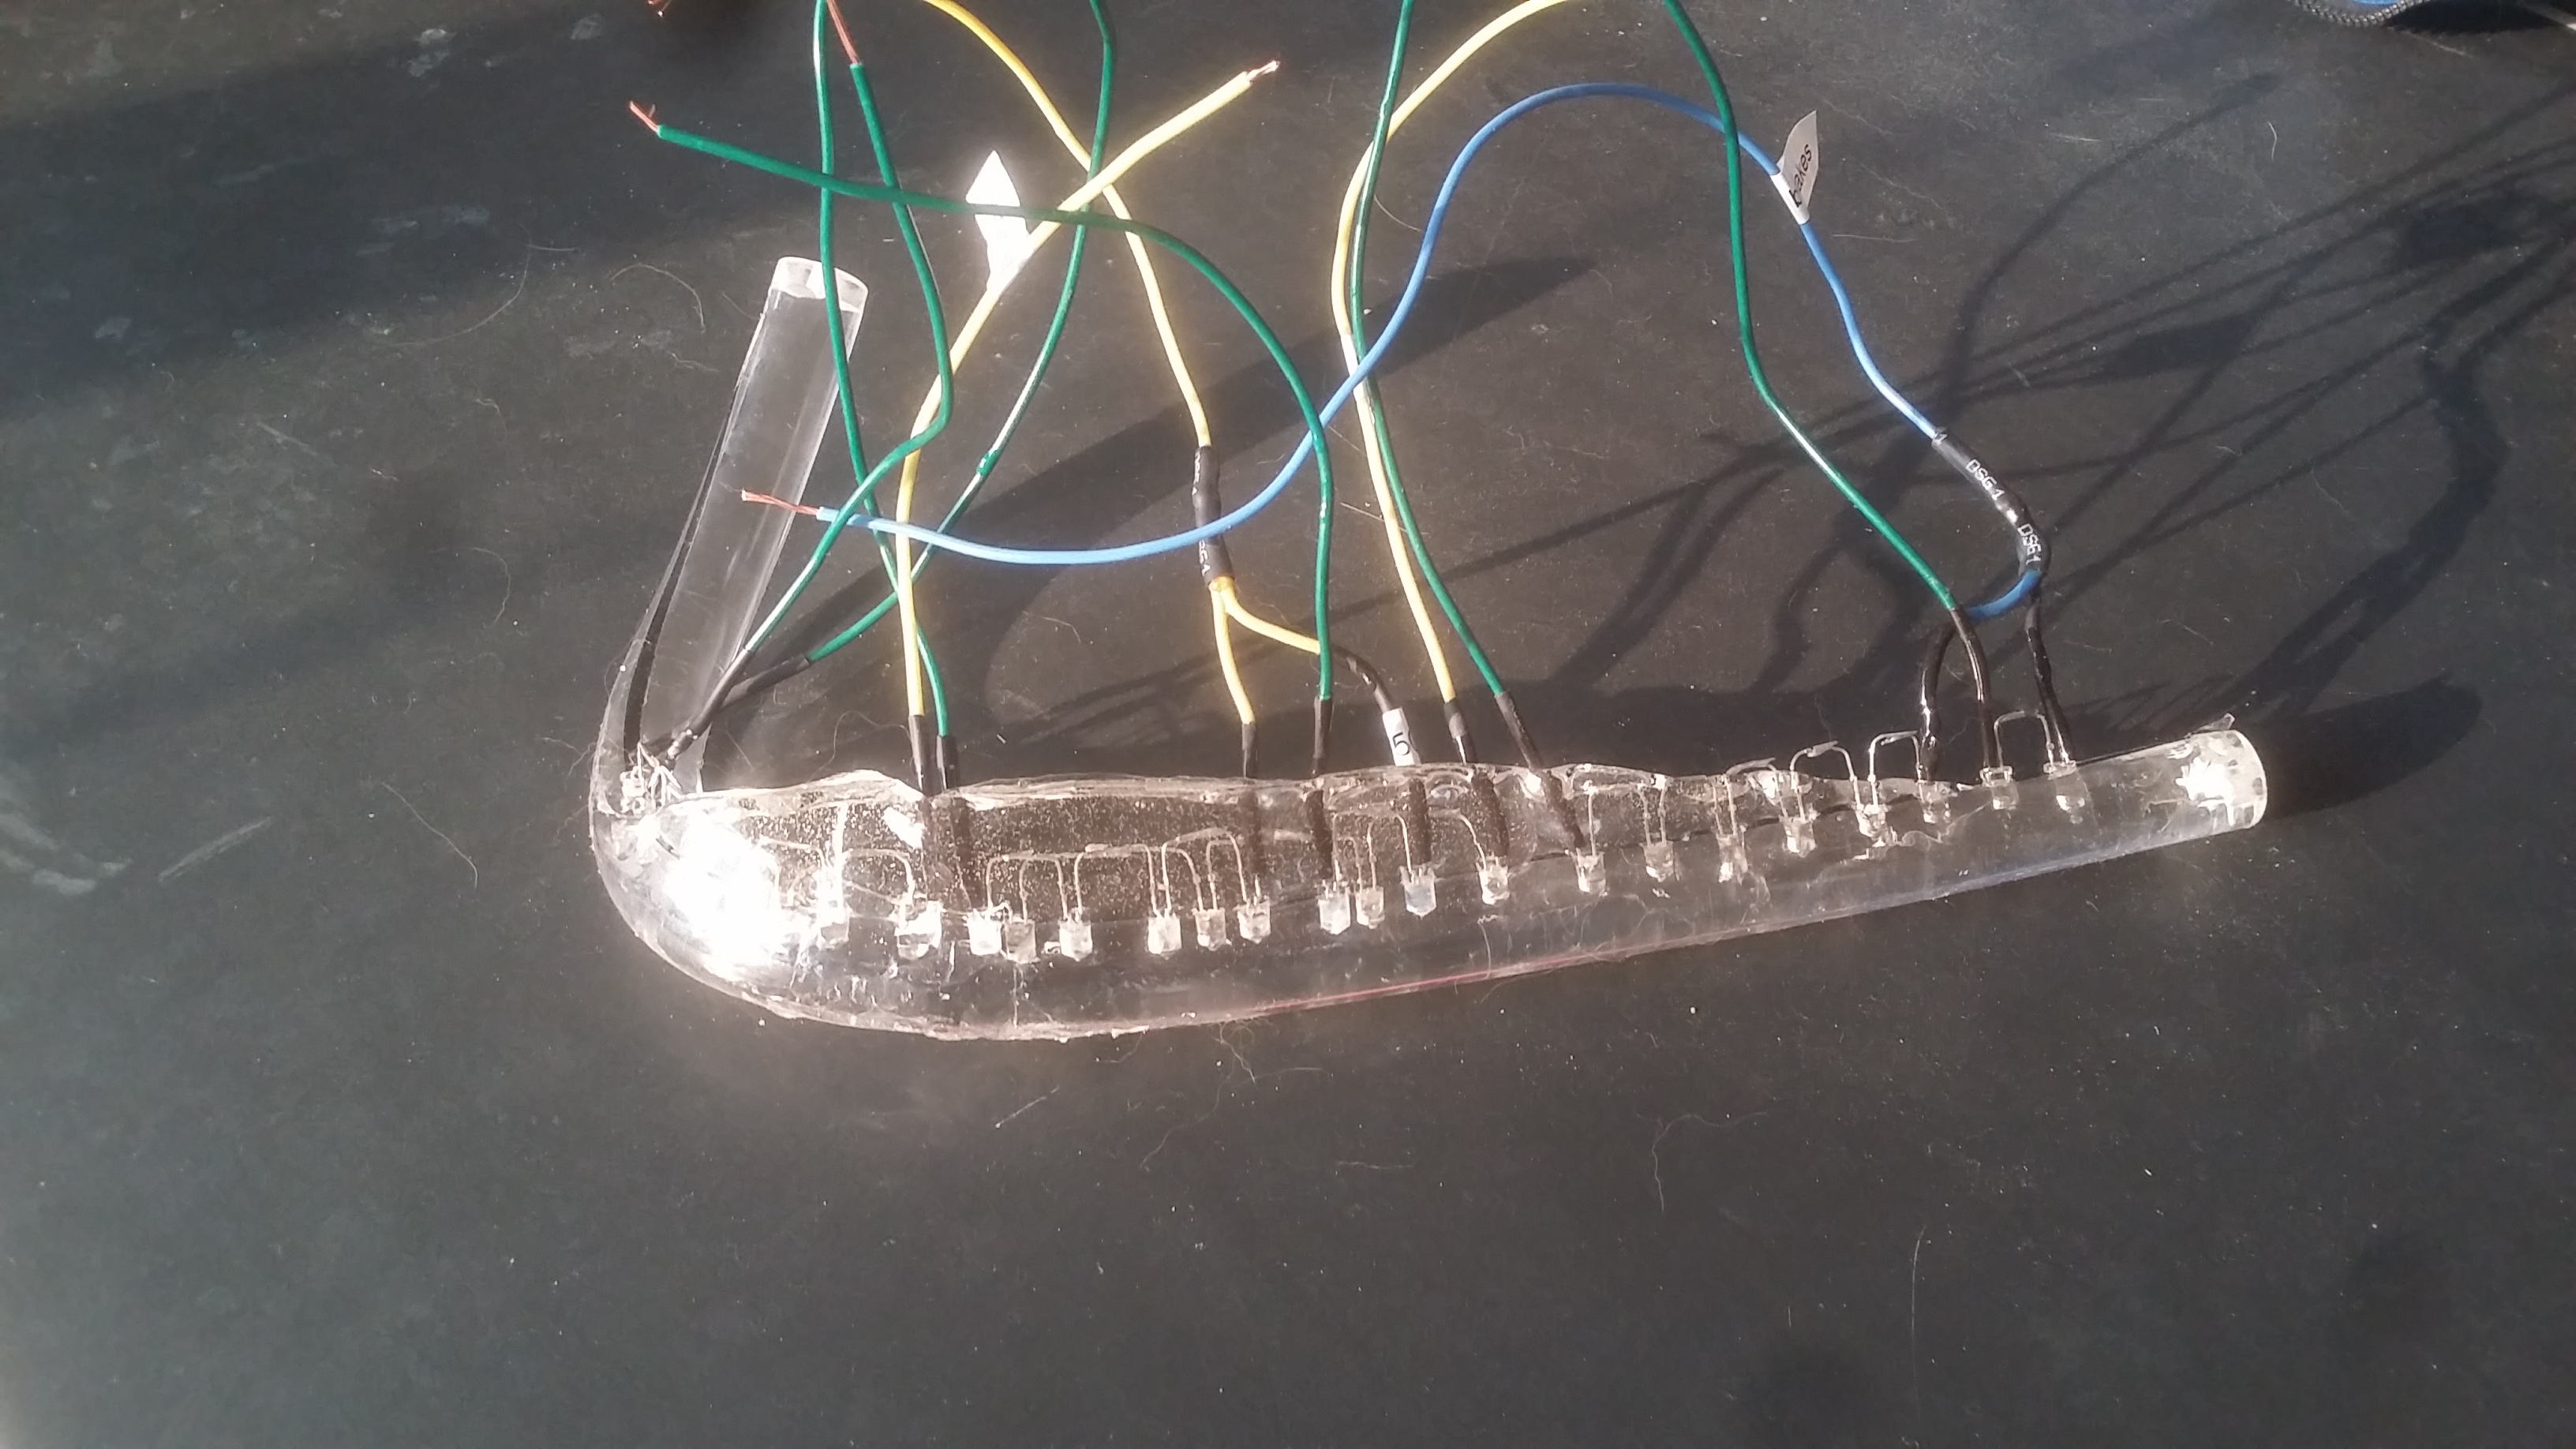
The tail light without lights or wiring:
All of the mesh will be black, and will be over all the openings:
Round 2 of casting the wiring in urethane. You can see the LEDs on the ends. Those will get encased in urethane as well:
A.J.
AJ - very cool! I've been using other known super cars as references and had considered trying to do something similar. My imagination wasn't up to snuff on coming up with curves that were complementary to the rear of the SLC (nor did I think I could actually execute without making it look like a 10yr old did it). Is acrylic rod available that is semi-opaque? That would address that reflection issue.
Very impressed with what you've done!
Very impressed with what you've done!
This is exactly the inspiration on the tail lights I have been working on. I'm following the outline of the tail light opening, trying to open up more cooling vents. I'm using acrylic rod which has been heated up and formed to shape. Cam, if you were interested in illuminating acrylic rod as a DRL, you would need to score the back side of the rod with a Dremel or something to give it something to reflect off of. But I don't think it will give the desired effect during the day. For my tail lights, I have 5 (red) LEDS on each end to illuminate as driving lights, ten total. They don't light up as brightly as Scott's strip lights appear to. And I bought 65,000 mcd LEDs from Digikey. The brightest I could find at RadioShack is 3000 mcd, which incidentally were MUCH more expensive.
This has been a work in progress with many lessons learned on how to do it better. In many aspects.
This was the original design intent:
After drilling the holes for the red LEDs, I realized I could integrate everything into one rod around the perimeter and not have to separate the turn signals and reverse light as pictured above. This picture below is just the red LEDs. There's room for amber and clear. Yay!
I started with a round cross section acrylic rod, and that was a nightmare. The magnification was too much to overcome. To make matters worse, I shaped the rod before drilling the holes. Then I had problems casting the urethane which protects the wiring, the wiring was a mess....:
I started over with a rectangular cross section acrylic rod. I used my drill press and drilled the holes before shaping the acrylic. As opposed to hand drilling by eye on a compound curve the first time. The acrylic below has holes drilled for the red, yellow and amber LEDs:
The tail light without lights or wiring:
All of the mesh will be black, and will be over all the openings:
Round 2 of casting the wiring in urethane. You can see the LEDs on the ends. Those will get encased in urethane as well:
A.J.
Man AJ, thats alot of work! Very tough to get perfect too. May the force be with you. lol
You did give me an idea though. How about scuffing just the back side of your acrylic (especially if you could create a flat surface on one side) then shining really bright leds into the ends? it should refract inside of the acrylic and bounce off of the scuffed part, illuminating it.
Hmmm, going to garage to test. Lol. I had some very bright speaker covers that were lighted exactly light that, and they were very bright.
The red led tube strips I have are super bright. Is there a reason you didn't go that direction? Then you would only be building a lens and the tube replaceable, and not nearly the perfecting tolerances needed. If you don't like the white when off, then just tint the lens. They are blindingly bright so tint is fine. I have done exactly what you are doing for many different types of car lighting, and it is a cunt when a brand new bulb burns out after 5 hours of use and makes all your hard work look bad with a dead led. Then you gotta start over with good chances it will happen again. Happens to me 50% of the time I do some detailed led work like that. Not saying a bad idea, but there can be a down side to it also in my experience.
Last edited:
Well, tested the lighting through edge thing. One single red led was used. Pretty cool to light the lens itself maybe.
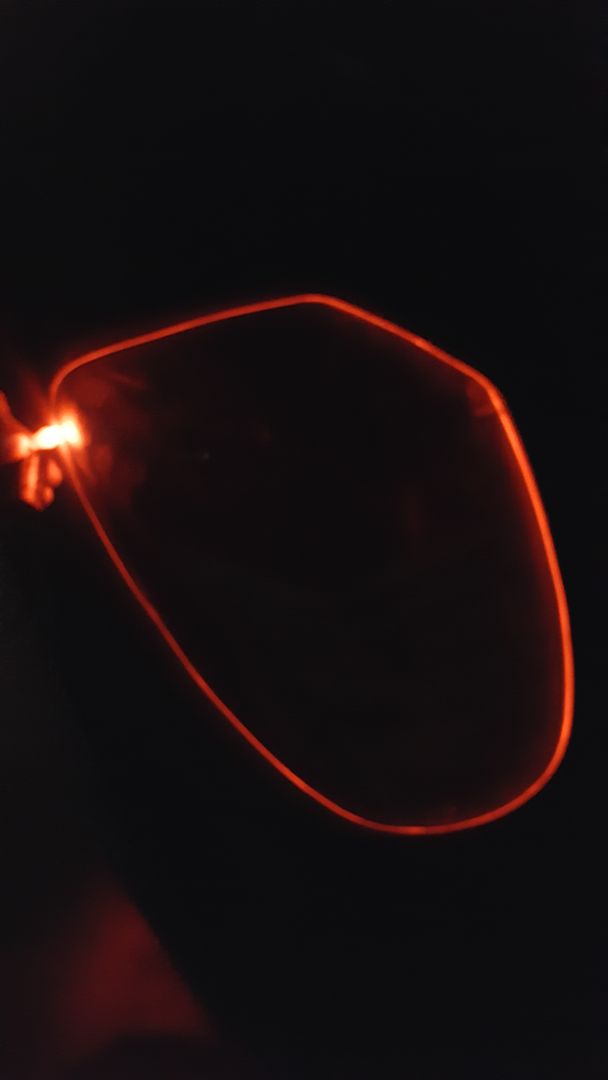

Scott, yes I'm concerned about dead LEDs. I've already had issues during fabrication, mainly broken terminals. They're VERY delicate. THANKFULLY I was able to get the LEDs back out after "gluing" them in (all have been fixed before the urethane...). I sanded the back side. I also painted a chrome strip to aid in light reflection. Yes it works, it looks cool, but in broad daylight I don't think they will be as bright as what you have. Plus, when casting with the urethane, you lose the effect. You get more impact by penetrating the acrylic, not just the back side. That's probably why your strips are so much brighter. If my acrylic were slightly opaque rather than clear, they would probably be far brighter when lit on the ends.
When I set off on my adventure, I wasn't aware of the LED strips you have. As I said above, my design direction was different when I started and the strips werent compatible with what I was after. And now I have the advantage of having turn signals, refers lights, driving lights and brake lights integrated. I'm very concerned about durability, which is why I encased them in urethane to address the vibration. With respect to them burning out, I'm going to under power them slightly. I also switched from wiring in series to parallel, so if a light does go bad it's just one and not a whole bank.
If I have any failures, I will not refabricate these with a chance of them failing again. I'll look into strips like you have. The additional cooling vents (due to not using the original tail lights and cover) are important enough to me that I won't go back to the original lights.
A.J.
You guys may already be aware of these suppliers, but I thought I'd share. I built custom LED lights for 24 hr mountain bike racing a few years ago because I couldn't stand paying close to a grand for what I needed. The project wasn't very hard and came out great. I wound up with 530+ lumen lights that run off 14V Li-Ion packs and last easily 6+ hours. Total cost was ~$350 for a bar mount and helmet mount light.
Two of the suppliers I found good stuff at were:
LEDSupply - For All Your LED Project Needs!
Cuttermainbanners
Cutter had a lot more stuff back then, but I think LED Supply has increased their range a ton since and not having to order from Aus is certainly easier for those in the US.
Two of the suppliers I found good stuff at were:
LEDSupply - For All Your LED Project Needs!
Cuttermainbanners
Cutter had a lot more stuff back then, but I think LED Supply has increased their range a ton since and not having to order from Aus is certainly easier for those in the US.
Was rooting around on eBay for alternative taillights and came across these for a tundra. Not sure if it's a good fit but could work maybe? Might be too sharp/edgy for the SLC styling maybe.
https://www.ebay.com/ulk/itm/281947051002
https://www.ebay.com/ulk/itm/281947051002
Similar threads
- Replies
- 12
- Views
- 1K
- Replies
- 6
- Views
- 2K
- Replies
- 14
- Views
- 3K