
You are using an out of date browser. It may not display this or other websites correctly.
You should upgrade or use an alternative browser.
You should upgrade or use an alternative browser.
Tornado Build - www.gt40builder.com
- Thread starter trevorsummers
- Start date
Trev,
You raise an interesting point. Where do you find, or what type of drill bits are worth getting or having in the shop. I used a Drill Docctor for a while until the grinding wheel stoped putting the right angle on the bits.
Bill
You raise an interesting point. Where do you find, or what type of drill bits are worth getting or having in the shop. I used a Drill Docctor for a while until the grinding wheel stoped putting the right angle on the bits.
Bill
Trev,
You raise an interesting point. Where do you find, or what type of drill bits are worth getting or having in the shop. I used a Drill Docctor for a while until the grinding wheel stoped putting the right angle on the bits.
Bill
I always buy the most expensive drill bits that my local hardware shop sells. I bought a cheap set of bosch drill bits when starting the project with all various sizes needed and quickly found the difference between cheap and more expensive drill bits. Cheap bits don't last long, they either snapped or lost their sharpness very quickly.
I now use mainly Black and Decker Piranha Bullet drill bits. I am sure people on here will say there are 100s of better bits but they seem strong and sharp and when I switched to them it felt like drilling through butter it was so much easier.
The problem I had with the floor was with the pilot holes. I normally start with a 2mm pilot and then step up to 4mm. Because the floor was so tough the 2mm bits didn't last long even when trying to drill slowly and not trying to strain the bits.
I think if you invest in very high quality drill bits then a drill doctor would be worth the money, I just tend to use the bits until I think they are starting to lose their edge and then replace.
Trev
Not much to report this week, still waiting for the coaters to collect the car. However I have all my cooling pipes so am going to put the chassis back on the build table tomorrow and start to have a look at test fitting the pipes.
I've not fitted any copper cooling pipes before, any tips or things I should know before I get stuck in?
Thanks
Trevor
I've not fitted any copper cooling pipes before, any tips or things I should know before I get stuck in?
Thanks
Trevor
Finally back in the garage and doing some work on the car. I am having some issues with the coaters collecting the chassis so haven't been able to do anything. They say they won't pick up the chassis and I don't see why should spend £300+ to get the chassis to them.
Anyway the chassis is now the right way up again and I've sent the new floor section to be powder coated at my local coaters who did the rest of the panels. While I am trying to get the chassis sorted I am test fitting the radiator pipes and mounting bracket at the rear. Hoping to have the pipes done by the end of the week so they can be coated once the chassis goes off.
Will post some pics later in the week
Trev
Brett James-McCall
Moderator
They say they won't pick up the chassis and I don't see why should spend £300+ to get the chassis to them.
Why not hire a trailer and borrow a carwith a tow hook? Shouldn't cost £300


Hi Trevor,
While you’re at the mock-up stage you ought to look at how the front pipes are being located. Its not good build/engineering practice to have a the pipe supported by the inner front bulk, especially if there is no seal etc to prevent fretting between the copper pipe & aluminium bulkhead panel. Over time this could lead to failure.
Regards
Andy
Hi Trevor,
While you’re at the mock-up stage you ought to look at how the front pipes are being located. Its not good build/engineering practice to have a the pipe supported by the inner front bulk, especially if there is no seal etc to prevent fretting between the copper pipe & aluminium bulkhead panel. Over time this could lead to failure.
Regards
Andy
What would you suggest, some kind of rubber seal/grommet around the hole in the bulkhead to hold the pipe in place?
Trev
Hi Trev,
thats correct, the following would be suitable:
door seals, rubber seals, rubber extrusions, window rubbers by seals direct
Also before you install them, its worth thinking about insulating the pipes as they run through the cabin, as they will radiate a fair amount of heat. The stuff I used was easy to apply and should work well.
Regards
Andy
Attachments
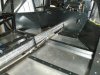
Bought some rubber seals yesterday at Race retro and started playing around with them today. I think the problem I have is that the holes for the pipes are too close together both on the front bulkhead and the steel bracket to fit a rubber seal/grommit around and still get the pipe in.
Instead to avoid the copper rubbing on the aluminium bulkhead what about enlarging the holes by 1-2mm and wrapping these areas in more radiator tape to pad them out. This will mean a very nice tight fit and should prevent the pipes wearing through.
Mockup using masking tape below to show the concept.
Trevor
PLEASE READ THE BUILD MANUAL.
Chapter 8 step 17
Thanks
Andy
PLEASE READ THE BUILD MANUAL.
Chapter 8 step 17
Thanks
Andy
Trevor
PLEASE READ THE BUILD MANUAL.
Chapter 8 step 17
Thanks
Andy
Cheers Andy, didn't spot that. I am still going to wrap the pipes as well I think as I like the idea of the extra insulation
Thanks
Trev
Trevor
To insulate wrap loft insulation around the two pipes together before installing the GRP tunnel cover.
Thanks
Andy
To insulate wrap loft insulation around the two pipes together before installing the GRP tunnel cover.
Thanks
Andy
Seymour Snerd
Lifetime Supporter
...wrap loft insulation around the two pipes
I used "Rigid Fiberglass Insulation for Pipe and Tube" part number 5556K14 from McMaster-Carr: McMaster-Carr.
Quick and easy to install and leaves no exposed glass-fiber; ~$15 total.
Ahh, just saw your post Alan. I've actually just ordered some Duck self adhesive pipe wrap that was recommended to me be Saxoncross.
Looks like good stuff but I am not sure if I should add an additional layer of insulation on the pipes first before I wrap them with the tape.
Any ideas?
Trev
Looks like good stuff but I am not sure if I should add an additional layer of insulation on the pipes first before I wrap them with the tape.
Any ideas?
Trev
Seymour Snerd
Lifetime Supporter
Ahh, just saw your post Alan.
First problem is (I'm told) McMaster does not ship outside the US anyway. That's not to say you couldn't find the stuff elsewhere because they're just a distributor.
IAE, I think the more insulation the better. The effect of my wrapping the two coolant pipes with that stuff was effectively to fill the central tunnel so now, as a kind of side-effect, the A/C lines are partially insulated as well
Trev,
I bought some heat wrap off e-bay and wrapped the pipes with the shinny side against the pipe and then bound witrh aluminium ties. Its quite compact and still leaves room in the tunnel for other piping. I am going to try and get the a/c pipes down the tunnel as well.
Ian
I bought some heat wrap off e-bay and wrapped the pipes with the shinny side against the pipe and then bound witrh aluminium ties. Its quite compact and still leaves room in the tunnel for other piping. I am going to try and get the a/c pipes down the tunnel as well.
Ian
Might I make a suggestion or two. To wrap your pipes in insulation consider the closed cell insulation that is used to wrap A/C lines that is readily available at you local Big Box hardware stores. It comes in different diameters so you can tailor it to fit your pipes. If they have a limited choice use two pieces and tape together along the seams with Duct tape or similar.
As for running the A/C lines, add a false floor to the passenger side. It can be any thickness you want, secured or floating. If you decide on floating just make the supports on either side are the same height. It only has to come back as far as the front of the seat. Just make the passageway underneath it tall enough for the largest line to pass. Then you can run the A/C and/or any electrical lines you may need like the large battery cables if you mount the battery in the front clip. You just have to remember the area directly under the seat is either touching the floor or within 1/2" or so of the flooring. So they will have to go to the side to pass. You can also add any lines in the future without having to fit them into already crowded runs. These lines can be just laid on the floor or if you feel the need put them in PVC piping. I would use the cheaper "egg shell" variety as its walls are much thinner than the schedule 40. If you use very thick plywood, you cam miter out some channels underneath for the lines to lay in.

I added a passenger emergency brake pedal for passenger foot comfort. People riding in the passenger seat need some place for their feet to rest or they will feel like they are floating in their seat.


Bill
As for running the A/C lines, add a false floor to the passenger side. It can be any thickness you want, secured or floating. If you decide on floating just make the supports on either side are the same height. It only has to come back as far as the front of the seat. Just make the passageway underneath it tall enough for the largest line to pass. Then you can run the A/C and/or any electrical lines you may need like the large battery cables if you mount the battery in the front clip. You just have to remember the area directly under the seat is either touching the floor or within 1/2" or so of the flooring. So they will have to go to the side to pass. You can also add any lines in the future without having to fit them into already crowded runs. These lines can be just laid on the floor or if you feel the need put them in PVC piping. I would use the cheaper "egg shell" variety as its walls are much thinner than the schedule 40. If you use very thick plywood, you cam miter out some channels underneath for the lines to lay in.
I added a passenger emergency brake pedal for passenger foot comfort. People riding in the passenger seat need some place for their feet to rest or they will feel like they are floating in their seat.
Bill
Last edited:
Thanks for all the info guys, certainly a few ideas to consider there.
Slightly off subject, I think I've found some black sealed rivets that I've been looking for for several months. Only issue is that they are 4mm x 12.5mm instead of 4mmx10mm. Do you think I'll have any issues with this size or should they be fine?
Thanks
Trev
Slightly off subject, I think I've found some black sealed rivets that I've been looking for for several months. Only issue is that they are 4mm x 12.5mm instead of 4mmx10mm. Do you think I'll have any issues with this size or should they be fine?
Thanks
Trev